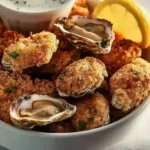
Pink Salt Recipe for Weight Loss: The Natural Trick That’s Turning Heads

pink salt recipe for weight loss detox drink

vIf you’re searching for a simple, natural weight loss hack that doesn’t involve cutting calories or expensive supplements, the Pink Salt Recipe for Weight Loss might just be your next best discovery. This ancient mineral — Himalayan pink salt — has surged in popularity, especially among women looking for holistic ways to lose weight and detox. In this article, we’ll dive deep into how pink salt works, the exact recipe you can try, its benefits, and smart ways to include it in your daily routine.

Looking for inspiration? Try Spicy Apple Cinnamon Detox Tea to combine with the Pink Salt Recipe for Weight Loss for even better results.

Table of Contents

Understanding the Pink Salt Trend for Weight Loss

What is the Pink Salt Recipe for Weight Loss?

Print
clock clock iconcutlery cutlery iconflag flag iconfolder folder iconinstagram instagram iconpinterest pinterest iconfacebook facebook iconprint print iconsquares squares iconheart heart iconheart solid heart solid icon
pink salt detox drink recipe for fat loss

Pink Salt Detox Water


  • Author: Emily Harper
  • Total Time: 3 minutes
  • Yield: 1

Description

Tired of bloat and slow weight loss? Try this Pink Salt Recipe for Weight Loss — a natural morning detox drink that works.

A refreshing mix of pink Himalayan salt, lemon and apple cider vinegar for energy.


Ingredients

  • 2 cups of water
  • 1 teaspoon of pink Himalayan salt
  • 1 tablespoon of lemon juice
  • 1 tablespoon of apple cider vinegar
  • 1 teaspoon of honey optional
  • 1/2 teaspoon of cayenne pepper optional

Instructions

Put warm water into a glass.

Add 1/4 tsp Himalayan pink salt and stir until fully dissolved.

Squeeze in 1/2 tsp fresh lemon juice.

Stir in 1 tsp raw honey (optional).

Sip slowly on an empty stomach for maximum benefits

Notes

Add Ginger: For an extra digestive boost, add a pinch of grated ginger.

Skip Honey: Omit honey for a low-sugar version.

Use Cold Water: In summer, try this tonic with cold water for a refreshing twist.

Add Mint: Garnish with fresh mint leaves for a cooling effect.

Electrolyte Boost: Add a splash of coconut water for extra hydration.

  • Prep Time: 3 minutes
  • Category: Beverage, Drinks
  • Method: Cooking classes
  • Cuisine: Health & Wellness

Nutrition

  • Serving Size: 1 glass
  • Calories: 15kcal

Keywords: Pink Salt Detox Water

At its core, the Pink Salt Recipe for Weight Loss involves mixing Himalayan salt with filtered water to create a mineral-rich detox drink. Known commonly as “sole water,” this mix helps balance electrolytes, supports hydration, and kickstarts your metabolism. This isn’t a fad — the method has been around for centuries in Ayurvedic practices.

The classic Pink Salt Recipe for Weight Loss includes:

  • 1 glass of lukewarm filtered water
  • 1/2 tsp of Himalayan pink salt
  • Optional: a splash of lemon juice for added detox benefits

Drink this on an empty stomach to activate its natural cleansing effects and start your day hydrated.

The Growing Popularity of Himalayan Salt Among Women

More women are turning to the Pink Salt Recipe for Weight Loss as part of their wellness routines. Why? It’s natural, unrefined, and rich in minerals. Unlike heavily processed table salt, Himalayan pink salt contains over 80 trace minerals that help balance hormones, improve digestion, and reduce water retention — all crucial for slimming down.

Women report feeling less bloated, more energized, and experiencing fewer cravings after incorporating pink salt detox drinks regularly.

Pink Salt vs. Table Salt: Key Differences You Should Know

FeaturePink SaltTable Salt
SourceHimalayan MountainsSea or underground mines
ProcessingUnrefinedHighly refined
AdditivesNoneOften contains anti-caking agents
Mineral ContentOver 80 trace mineralsMostly sodium chloride
Health ImpactSupports metabolism & digestionOften leads to bloating

The Pink Salt Recipe for Weight Loss provides a more mineral-rich, healthier choice for those looking to ditch belly fat without turning to synthetic solutions.

The Science Behind Pink Salt and Fat Burn

How Pink Salt Affects Digestion and Metabolism

One of the major benefits of using a Pink Salt Recipe for Weight Loss lies in its ability to aid digestion. Himalayan pink salt helps stimulate stomach acid, which improves how we break down food. This reduces bloating, enhances gut health, and speeds up nutrient absorption.

Better digestion means fewer cravings and a more efficient metabolism — which is key if you’re trying to shed pounds.

When part of a balanced Pink Salt Recipe for Weight Loss, sodium plays an important role. Pink salt provides clean, natural sodium that helps move nutrients into cells and push toxins out. This boosts hydration and muscle performance — both of which are essential when you’re working out to burn fat.

Drinking the Pink Salt Recipe for Weight Loss daily also stabilizes fluid levels and supports the body’s natural thermogenesis process — your internal fat-burning engine.

Electrolyte Balance and Weight Management

The Pink Salt Recipe for Weight Loss is packed with electrolytes like magnesium, potassium, and calcium. These help regulate metabolism, reduce stress-related cravings, and improve your ability to stay energized throughout the day.

For an even more effective combo, don’t miss our Mounjaro Recipe Drink for Weight Loss, which complements pink salt hydration benefits beautifully.

The Ultimate Pink Salt Detox Drink Recipe

Ingredients Needed for Pink Salt Detox Water

The Pink Salt Recipe for Weight Loss is both simple and cost-effective. Unlike diet supplements or protein powders, all you need are ingredients you likely already have in your kitchen. Here’s what you’ll need for one serving:

  • 1 glass (8–10 oz) of filtered lukewarm water
  • ½ teaspoon of Himalayan pink salt (fine-grain)
  • Optional: 1 teaspoon of fresh lemon juice or apple cider vinegar for extra cleansing benefits
  • Optional: A pinch of cayenne pepper for thermogenic fat-burning support

This combination makes a low-calorie yet nutrient-rich drink that boosts hydration, improves mineral absorption, and stimulates the digestive tract.

pink salt detox drink recipe for fat loss

Looking for more metabolic boosters? Discover great ideas like our Oatzempic Recipe for Weight Loss which pairs perfectly with this pink salt detox drink.

Step-by-Step Instructions to Make the Drink

  1. Warm the water until it’s comfortably lukewarm (not boiling). Lukewarm water helps your body absorb minerals faster.
  2. Add the Himalayan pink salt and stir until fully dissolved.
  3. Add lemon juice or ACV (optional) and mix well.
  4. Drink it slowly on an empty stomach — preferably first thing in the morning.

You can prepare a week’s worth by creating a “sole water concentrate”:

  • Fill a glass jar with water.
  • Add enough pink salt until it no longer dissolves (saturation point).
  • Use a teaspoon of this concentrate in your morning water daily.

Custom Variations for Morning or Night Detox

Different times of day call for different goals. Here’s how you can adapt the Pink Salt Recipe for Weight Loss:

Time of DayVariationBenefits
MorningPink salt + lemon juice + warm waterDetoxifies liver, jumpstarts metabolism
AfternoonPink salt + ACV + room temp waterStabilizes blood sugar, reduces cravings
EveningPink salt + chamomile tea (unsweetened)Calms digestion, reduces bloating before bed

Want to amplify the detox effect? Try pairing this recipe with Pineapple Turmeric Sauerkraut to support your gut microbiome.

Timing and Frequency — When and How to Drink It

Best Time to Drink Pink Salt Water for Weight Loss

Timing matters when using the Pink Salt Recipe for Weight Loss. Drinking it at the right time helps your body absorb the minerals more effectively and encourages natural detox. The best time to consume pink salt water is:

  • Immediately after waking up, before any food or coffee
  • On an empty stomach, which maximizes absorption and digestive stimulation
  • At least 30 minutes before breakfast

Morning intake triggers bowel movement, hydrates your cells after overnight fasting, and activates your metabolism.

Some users also drink it before a workout to boost endurance and performance thanks to the natural electrolytes. But always start with the morning dose before experimenting with multiple servings a day.

How Often Should You Drink Pink Salt Detox?

The frequency of consuming the Pink Salt Recipe for Weight Loss depends on your personal goals and tolerance:

GoalFrequencyNotes
Detox & hydrationDaily (morning)Drink once per day on an empty stomach
Weight loss support5–6 days/weekGive your body a rest 1–2 days/week
Gut healingEvery other dayCombine with a probiotic-rich diet

To avoid mineral overload or electrolyte imbalances, limit your intake to one glass per day unless advised by a healthcare professional.

Looking for more effective detox strategies? Don’t miss our Arugula Sauerkraut Salad, rich in gut-friendly enzymes and perfect alongside your pink salt routine.

Morning vs. Evening: Which Works Better?

TimeProsCons
MorningActivates metabolism, flushes toxins, boosts hydrationMay cause mild nausea if taken too fast
EveningReduces bloating before bed, eases digestionMay disrupt sleep due to increased urination

Most experts recommend using the Pink Salt Recipe for Weight Loss in the morning for best results. However, if digestion is your priority, an evening version (with calming herbal tea) may be more beneficial.

Benefits of Using Pink Salt in Your Diet

Metabolism Boost and Appetite Suppression

One of the top benefits of the Pink Salt Recipe for Weight Loss is its natural ability to fire up your metabolism. The trace minerals in Himalayan salt — especially magnesium, zinc, and iodine — support thyroid function, which directly regulates your metabolic rate. When your metabolism speeds up, your body burns more calories at rest.

Additionally, this pink salt detox water helps suppress your appetite by:

  • Curbing sugar cravings through better mineral balance
  • Stabilizing blood sugar with consistent hydration
  • Helping you feel full with just one glass in the morning

This makes it easier to follow calorie-conscious or intermittent fasting routines. In fact, many people find they can delay their first meal of the day longer after drinking the detox recipe.

Detoxification and Improved Gut Health

The Pink Salt Recipe for Weight Loss acts as a gentle detoxifier. It flushes out toxins stored in your digestive tract and improves waste elimination. Because pink salt stimulates bile production and promotes smoother digestion, you’re also less likely to experience constipation, bloating, or gas.

This creates a cleaner internal environment that supports:

  • Healthy gut bacteria
  • Balanced stomach acid
  • Efficient nutrient absorption

A cleaner digestive system means less inflammation — a major factor in stubborn weight gain, especially around the belly.

For enhanced digestion and fat-burning synergy, check out our Lemon Bomb Recipe for Weight Loss, designed to reduce bloat and boost energy.

Mineral Support and Hydration

Staying hydrated is one of the most overlooked aspects of fat loss. But not all hydration is equal. Plain water can sometimes flush out your body’s minerals. The Pink Salt Recipe for Weight Loss helps by:

  • Restoring electrolyte balance
  • Replenishing minerals lost through sweat and urination
  • Retaining water at the cellular level, reducing dehydration-related fatigue

This is especially helpful if you’re working out, following a keto-style diet, or drinking lots of caffeine, which can all deplete your body’s mineral stores.

Hydration with pink salt improves energy levels, mental clarity, and endurance — making it easier to stay active and burn more calories.

Precautions and Side Effects to Consider

Who Should Avoid Pink Salt Detox Drinks?

While the Pink Salt Recipe for Weight Loss is generally safe for most healthy adults, it’s not for everyone. Individuals with certain health conditions or on specific medications should approach with caution — or avoid it altogether.

Avoid or consult your doctor if you:

  • Have high blood pressure or are on sodium-restricted diets
  • Take medications like diuretics or corticosteroids
  • Are diagnosed with kidney disease or heart conditions
  • Are pregnant or breastfeeding (consult your OB-GYN)

The natural sodium in Himalayan pink salt is healthier than table salt but still contributes to your total sodium intake.

If you’re in one of these categories, check with a medical professional before trying the Pink Salt Recipe for Weight Loss.

Possible Side Effects from Excessive Intake

Though pink salt is rich in beneficial minerals, too much of it can cause unwanted side effects. Some of the most common ones include:

  • Water retention and bloating
  • Increased thirst or mild dehydration if not paired with enough water
  • Diarrhea or stomach discomfort (especially if taken on an empty stomach too quickly)
  • Headaches or fatigue if the body reacts to a rapid detox

To minimize risks:

  • Stick to ½ tsp of pink salt in your drink
  • Avoid consuming the detox drink more than once daily
  • Make sure you’re drinking plenty of clean water throughout the day

Balance is key. More pink salt doesn’t mean more weight loss.

Want more gentle weight-loss options? Don’t miss our Hot Honey Ground Beef Bowl, a savory recipe designed to support fat burn without compromising on flavor.

Safe Daily Dosage and Monitoring Signs

DosageFrequencySafety Notes
½ tsp of pink saltOnce dailyFor most healthy adults
1 tsp split into 2 servingsFor athletic or active lifestylesBest split AM/PM
>1 tsp dailyNot recommendedMay lead to sodium overload

Pay attention to how your body responds. If you feel dizzy, bloated, or overly thirsty, reduce your intake or stop for a few days. The Pink Salt Recipe for Weight Loss is meant to support your system — not stress it.

Pink Salt vs. Other Weight Loss Drinks

How Pink Salt Compares to Lemon Water, Apple Cider Vinegar, and Oatzempic

The Pink Salt Recipe for Weight Loss is often compared to other popular drinks like lemon water, apple cider vinegar (ACV), and newer trends like Oatzempic. Each offers benefits, but they work differently. Here’s how pink salt stands out:

DrinkPrimary FunctionStrengthsWeaknesses
Pink Salt WaterHydration + mineral boostElectrolyte balance, improves metabolism, gut healthMay not suit low-sodium diets
Lemon WaterAlkalizing + detoxRich in vitamin C, boosts digestionLimited minerals
Apple Cider Vinegar DrinkBlood sugar controlCurbs appetite, helps insulin sensitivityStrong taste, may cause acid reflux
OatzempicFiber-based fullnessSatiety boost, low-calSlower acting, needs prep and consistency

While all these drinks can support fat loss, the Pink Salt Recipe for Weight Loss is unique because it targets hydration, digestion, and metabolism — three cornerstones of sustainable weight loss.

For best results, many people use a combination of two: pink salt water in the morning and a lemon + ACV drink before meals. Others combine pink salt with Oatzempic for Weight Loss to help reduce hunger and stay energized.

Scientific Backing: What the Research Says

Though there’s limited direct clinical research on the Pink Salt Recipe for Weight Loss, the individual components are backed by scientific understanding:

  • Hydration and metabolism: Dehydration can slow metabolism by 2–3%; rehydrating with mineral-rich water supports calorie burn.
  • Electrolytes and fat metabolism: Sodium, magnesium, and potassium are required for cellular energy production and efficient fat oxidation.
  • Digestive health: Himalayan pink salt may improve bile flow and stomach acid levels, aiding nutrient absorption and reducing bloating.

While it’s not a miracle solution, using pink salt properly can absolutely support other healthy weight loss strategies.

Myths and Facts About Pink Salt Weight Loss

Let’s bust some common myths:

MythReality
“Pink salt melts fat instantly.”No food or drink can melt fat directly. Pink salt supports fat loss by improving digestion and hydration.
“It works without diet or exercise.”While helpful, the Pink Salt Recipe for Weight Loss is most effective when paired with smart eating and physical activity.
“More pink salt = faster results.”Too much salt can cause bloating, water retention, and kidney strain. Stick to the safe amount.

The truth? When used wisely, this natural salt drink can be a powerful addition to your daily weight loss routine — especially if you’re already eating clean and staying active.

Real-Life Tips to Add Pink Salt to Your Routine

Meal Prep Ideas with Pink Salt

You don’t have to limit the Pink Salt Recipe for Weight Loss to a detox drink. Himalayan pink salt can easily be integrated into your meals — not only for flavor but also for its trace minerals and health benefits.

using pink salt for weight loss hydration

Here are a few simple prep ideas:

MealPink Salt UseHealth Benefit
Morning eggsSprinkle pink salt instead of table saltAdds minerals and balances stomach acid
Veggie stir-fryUse pink salt + lemon juice for seasoningEnhances digestion and reduces bloating
Homemade soupsAdd pink salt at the end of cookingPreserves mineral content and flavor
Post-workout smoothieA pinch of pink salt + bananaReplenishes electrolytes and prevents cramps

Incorporating it into meals not only boosts taste but also improves digestion, which is essential for weight control.

Using Pink Salt for Flavor and Health

Pink salt isn’t just for drinks — it’s a great cooking and seasoning ingredient:

  • Use it to make DIY salad dressings with olive oil and lemon
  • Sprinkle over roasted vegetables for a mineral-rich crunch
  • Combine with honey and ginger to create a natural sore throat remedy
  • Add a touch to detox soups or bone broths for flavor and hydration

These small adjustments can make a big difference in how your body processes food and how well your metabolism functions. And since pink salt is unrefined and additive-free, it supports your overall wellness goals.

Try adding pink salt to meals like our Lemon Dump Cake with Poppy Seeds for a sweet-salty twist that won’t derail your diet.

Pairing Pink Salt with Exercise and Hydration Routines

Whether you’re walking, lifting, or doing yoga, hydration is key — and that’s where the Pink Salt Recipe for Weight Loss truly shines.

Here’s how to use it around your workouts:

  • Pre-workout: Drink a small glass 20–30 mins before exercise to hydrate and energize
  • Post-workout: Add a pinch of pink salt to a fruit smoothie or protein shake to restore electrolyte balance
  • Hydration tip: If you’re sweating a lot, make a bigger batch of pink salt water and sip throughout the day

Using pink salt like this can help prevent cramps, reduce muscle fatigue, and keep your metabolism running smoothly even after intense activity.

What is the pink salt trick for weight loss?

The “pink salt trick” refers to drinking Himalayan pink salt water — typically in the morning — to boost digestion, balance electrolytes, and support metabolism. This trick helps reduce bloating, improve hydration, and curb cravings naturally.

How does Himalayan pink salt differ from regular table salt?

Himalayan pink salt is unrefined and rich in over 80 trace minerals like magnesium, calcium, and potassium. Table salt, on the other hand, is heavily processed, often bleached, and stripped of natural minerals, with added anti-caking agents and iodine.

Why are women turning to Himalayan pink salt for weight loss?

Many women use the Pink Salt Recipe for Weight Loss because it’s natural, affordable, and easy to add to their routines. It helps relieve bloating, supports gut health, and provides essential minerals that improve hormone balance and reduce sugar cravings.

How does pink salt affect digestion and metabolism?

Pink salt supports stomach acid production, which enhances digestion and nutrient absorption. It also provides minerals that support thyroid and adrenal function — both crucial for a healthy metabolism.

What is the recipe for a pink salt detox drink?

Here’s the basic Pink Salt Recipe for Weight Loss:
8–10 oz filtered warm water
½ teaspoon of Himalayan pink salt
Optional: 1 tsp lemon juice or ACV for added detox power
Drink it first thing in the morning on an empty stomach.

When is the best time to consume pink salt water for weight loss?

The best time is first thing in the morning, before breakfast. Drinking it on an empty stomach activates digestion, flushes out toxins, and prepares the body to metabolize food more efficiently.

Is there scientific evidence supporting the use of pink salt for weight loss?

While few studies focus solely on pink salt and weight loss, the benefits of its individual elements (hydration, mineral balance, improved digestion) are well-supported by nutritional science. Together, they contribute to better fat metabolism and reduced bloating.

How much Himalayan salt should I add to water for weight loss?

Use ½ teaspoon of pink salt per 8–10 oz glass of water. Do not exceed 1 tsp per day unless advised by a healthcare provider.

Which salt is best for reducing belly fat?

Himalayan pink salt is ideal due to its natural mineral profile and low processing. Unlike regular salt, it reduces bloating and water retention without disrupting your body’s electrolyte balance.

Are there any side effects or precautions when using pink salt for weight loss?

Yes. Too much can lead to bloating, headaches, or fluid retention. Those with high blood pressure or kidney issues should consult a doctor. Stick to once a day, and monitor how your body reacts.

Can the pink salt trick be combined with other weight loss strategies?

Absolutely. It pairs well with intermittent fasting, low-carb diets, detox protocols, and fitness routines. Many people drink pink salt water in the morning, then follow up with meals like Zucchini Breadwich or a low-sugar smoothie.

How can I incorporate the pink salt trick into my daily routine?

Start your morning with the drink, cook with pink salt instead of table salt, and add it to hydrating post-workout drinks. Small, consistent use leads to the best results.

Conclusion: Is the Pink Salt Recipe for Weight Loss Worth It?

The Pink Salt Recipe for Weight Loss isn’t a miracle cure — but it is a powerful, natural tool you can add to your health routine. From boosting hydration and metabolism to improving digestion and reducing cravings, Himalayan pink salt water supports your body in multiple weight-loss-friendly ways.

It’s safe, affordable, and easy to prepare. Plus, it works great when combined with other strategies like intermittent fasting, clean eating, and exercise.

Want to take your wellness journey to the next level? Don’t miss our fat-burning favorites like the Spicy Apple Cinnamon Detox Tea and Oatzempic Recipe for Weight Loss, or try gut-friendly meals like our Pineapple Turmeric Sauerkraut and Hot Honey Ground Beef Bowl.

Small habits lead to major results — and the pink salt trick might be the small shift you’ve been looking for.

Stay Inspired With More Natural Recipes

If you’re into clean and simple health recipes, follow Brekcakes Recipes on Facebook for daily wellness inspiration and natural remedies.
Follow on Facebook →

Explore beautifully curated health-boosting drinks on Brekcakes Recipes on Pinterest and discover your new go-to for feeling great!
Follow on Pinterest →

Stay connected and let natural living become your daily lifestyle!

Spicy Apple Cinnamon Detox Tea – The Delicious Cleanse You Need Now

Spicy Apple Cinnamon Detox Tea in glass mug

Looking for a natural, flavorful way to detox your body, boost your energy, and support weight loss—without swallowing pills or choking down bitter concoctions? Say hello to Spicy Apple Cinnamon Detox Tea. This invigorating drink blends the warming zing of cinnamon with the crisp freshness of apple and just a hint of heat. It’s not only a comforting beverage but also a powerful detox elixir loaded with antioxidants, metabolism-boosting compounds, and fat-burning potential.

Unlike many so-called detox teas that rely on harsh laxatives or synthetic ingredients, this all-natural infusion works with your body’s natural cleansing systems. Whether you’re sipping it warm before bed or chilled with a twist of lemon, Spicy Apple Cinnamon Detox Tea fits easily into any wellness routine.

Don’t miss our Oatzempic Recipe for Weight Loss—another fat-burning favorite with natural ingredients!

Let’s dive into what makes this spicy apple cinnamon tea a must-have for your health arsenal.

Table of Contents

Introduction to Spicy Apple Cinnamon Detox Tea

What Is Spicy Apple Cinnamon Detox Tea?

Spicy Apple Cinnamon Detox Tea is a homemade herbal tea made by steeping apple slices, cinnamon sticks, and optional ingredients like cayenne pepper or ginger in hot water. The result is a naturally sweet, slightly spicy beverage that’s caffeine-free and loaded with wellness benefits.

Unlike commercial detox drinks, it doesn’t contain harsh chemicals or processed powders. Every ingredient comes straight from your kitchen or local produce aisle, making it an easy and affordable way to support your health goals.

This tea draws from both traditional remedies and modern nutritional science. Apple peel polyphenols and cinnamon’s active compound, cinnamaldehyde, work together to improve digestion, regulate blood sugar, and support metabolic function.

Print
clock clock iconcutlery cutlery iconflag flag iconfolder folder iconinstagram instagram iconpinterest pinterest iconfacebook facebook iconprint print iconsquares squares iconheart heart iconheart solid heart solid icon
Spicy Apple Cinnamon Detox Tea in glass mug

Spicy Apple Cinnamon Detox Tea


  • Author: Emily Harper
  • Total Time: 20 minutes
  • Yield: 2 servings 1x

Description

Boost your metabolism & reduce cravings naturally with Spicy Apple Cinnamon Detox Tea


Ingredients

Scale
  • 1 apple (sliced)

  • 1 cinnamon stick

  • ½ tsp cayenne pepper (optional)

  • Juice of ½ lemon (optional)

  • Fresh ginger slices (optional)

  • 2 cups water


Instructions

  • Add ingredients to saucepan with water.

  • Simmer for 10–15 minutes.


  • Strain and enjoy warm or cold.

  • Prep Time: 5 minutes
  • Cook Time: 15 minutes
  • Category: Vegan, Clean Eating
  • Cuisine: Health & Wellness

Nutrition

  • Serving Size: 1 cup (8 oz)
  • Calories: 5 kcal
  • Sugar: 1g (natural)
  • Sodium: 0mg
  • Fat: 0mg
  • Saturated Fat: 0mg
  • Unsaturated Fat: 0mg
  • Trans Fat: 0mg
  • Carbohydrates: 2g
  • Fiber: 0.3g
  • Protein: 0g
  • Cholesterol: 0mg

Keywords: Detox, Weight Loss, Anti-inflammatory, Herbal Tea

With detox culture booming and a renewed focus on gut health and natural remedies, this tea checks every box for today’s wellness seekers:

  • It’s plant-based and vegan.
  • It contains zero added sugar.
  • It helps reduce bloating and supports digestion.
  • It tastes great hot or cold.
  • It supports weight loss naturally.

Fitness influencers, nutritionists, and everyday health-conscious folks are raving about how this tea helps kickstart their morning routines or wind down their nights. It’s become a social media favorite thanks to its dual function as both a wellness booster and a comforting ritual.

Discover great ideas like our Lemon Bomb Recipe for Weight Loss to pair with this tea for maximum detox results.

Core Ingredients That Make It Powerful

Let’s break down what goes into this spicy apple cinnamon blend and why each element matters:

IngredientFunction
Apple slicesRich in antioxidants, helps reduce belly fat
Cinnamon sticksRegulates blood sugar, boosts metabolism
Cayenne pepperThermogenic spice that aids fat burning
Ginger (optional)Soothes digestion, anti-inflammatory benefits
Lemon juice (opt.)Enhances vitamin C content, alkalizes the body

Each ingredient is more than flavor—it’s functional. Together, they create a detox synergy that promotes full-body wellness without any harsh side effects.

Looking for inspiration? Try our Zucchini Breadwich for a satisfying clean-eating side to this tea.

The Health Benefits of Spicy Apple Cinnamon Detox Tea

Detoxifying Effects of Apple and Cinnamon

Spicy Apple Cinnamon Detox Tea offers far more than flavor—it’s a natural detoxifier that gently supports your body’s cleansing process. Apple slices are rich in pectin and polyphenols that help the liver flush out toxins, while cinnamon enhances digestive enzyme activity, supporting the body’s detox system.

By drinking Spicy Apple Cinnamon Detox Tea regularly, you provide your body with essential antioxidants and cleansing compounds that promote liver health and reduce toxin buildup. This makes it a smart addition to any detox or clean-eating plan.

Boosting Metabolism and Digestion

A key reason why Spicy Apple Cinnamon Detox Tea is so effective is its ability to ignite your metabolism. Cinnamon increases thermogenesis, helping the body burn more calories throughout the day. When combined with the mild fiber content of apple, this tea supports fat oxidation and smoother digestion.

People who feel bloated, constipated, or sluggish after meals often experience noticeable relief after drinking this detox tea daily. It calms the digestive tract while promoting regularity—without the harsh crash of store-bought “slimming teas.”

Pair this tea with meals or enjoy it first thing in the morning to maximize its metabolic impact.

Discover great ideas like our Arugula Sauerkraut Salad—a probiotic-rich recipe that complements your detox journey perfectly.

Anti-Inflammatory and Antioxidant Properties

When it comes to cellular health, inflammation is the enemy. Spicy Apple Cinnamon Detox Tea fights back with antioxidants like quercetin from apples and cinnamaldehyde from cinnamon. These natural compounds combat oxidative stress and reduce chronic inflammation throughout the body.

Regular consumption may lead to better skin, reduced bloating, improved circulation, and a strengthened immune system. For an even more powerful anti-inflammatory punch, add ginger or turmeric to your brew.

By incorporating Spicy Apple Cinnamon Detox Tea into your daily wellness routine, you’re giving your body a steady stream of natural protection—without needing synthetic supplements.

Check out our Mounjaro Recipe Drink for Weight Loss to stack the benefits of herbal detox beverages.

Weight Loss and Fat Burn Support

How Spicy Apple Cinnamon Detox Tea Helps in Weight Loss

Spicy Apple Cinnamon Detox Tea is a favorite among wellness lovers for a reason—it supports natural weight loss without extreme dieting or stimulants. The cinnamon in this tea helps control insulin levels, which plays a direct role in how your body stores fat. Stable blood sugar reduces sugar cravings and prevents energy crashes that lead to overeating.

Apples, especially their peels, contain dietary fiber and polyphenols that promote fat metabolism and help block fat absorption. Together, these ingredients support a gentle, sustainable fat-burning process that doesn’t stress your body.

When consumed consistently—especially before meals—this detox tea prepares your body to process food efficiently and burn more calories throughout the day.

Check out our Lemon Bomb Recipe for Weight Loss for another flavorful fat-burning drink to combine with your daily tea ritual.

Natural Appetite Control and Cravings Reduction

One hidden superpower of Spicy Apple Cinnamon Detox Tea is its ability to naturally suppress appetite. Cinnamon slows the emptying of your stomach, helping you feel full longer. Drinking this tea before or after a meal helps reduce the urge to snack between meals or crave sweets late at night.

Plus, the warm, spiced flavor profile of the tea satisfies the senses in a way that sugary drinks often do—minus the calories. The result? Fewer cravings, better portion control, and more willpower to stick to healthy habits.

This tea can act as a healthy replacement for soda, sweetened coffee, or energy drinks—cutting empty calories from your diet.

Don’t miss our Zucchini Breadwich—a perfect low-carb snack to pair with your detox tea when hunger strikes.

Balancing Blood Sugar and Reducing Belly Fat

One of the most important aspects of weight management is blood sugar control. Cinnamon is proven to increase insulin sensitivity, which can lower blood sugar and reduce fat storage—especially around the belly.

High blood sugar levels are directly linked to abdominal fat, sluggish metabolism, and increased risk of type 2 diabetes. Spicy Apple Cinnamon Detox Tea works to stabilize glucose after meals, keeping energy levels steady and reducing the hormonal triggers that cause belly fat gain.

When included in a consistent daily routine, this detox tea supports better glucose balance, reduced bloating, and a trimmer midsection over time.

How to Make Spicy Apple Cinnamon Detox Tea at Home

Simple Recipe With Everyday Ingredients

Making Spicy Apple Cinnamon Detox Tea at home is fast, easy, and requires no special tools. You can brew a single cup or make a batch to enjoy throughout the week. The beauty of this detox tea lies in its simplicity and the fact that most ingredients are probably already in your kitchen.

Ingredients for Spicy Apple Cinnamon Detox Tea

Here’s a basic recipe to get you started:

Ingredients:

  • 1 organic apple (preferably with peel, sliced thin)
  • 1 cinnamon stick (or ½ tsp ground cinnamon)
  • ½ tsp cayenne pepper (optional for heat & metabolism)
  • 2 cups water
  • Juice of ½ lemon (optional)
  • A few slices of fresh ginger (optional)
  • Raw honey or stevia (optional for sweetness)

Directions:

  1. Add water to a saucepan and bring it to a boil.
  2. Add the apple slices, cinnamon stick, and ginger.
  3. Simmer for 10–15 minutes until apples soften and flavors blend.
  4. Add cayenne and lemon juice last to preserve potency.
  5. Strain into a cup and sweeten if needed.

You can also chill the tea for an iced version or keep a thermos handy to sip it warm throughout the day.

Looking for inspiration? Try our Oatzempic Recipe for Weight Loss to enhance your detox meal plan.

Preparation Steps and Brewing Tips

To get the most health benefits from Spicy Apple Cinnamon Detox Tea, here are a few pro tips:

  • Use fresh, organic apples to avoid pesticide residues.
  • Always include the apple peel—it’s rich in detoxifying polyphenols.
  • Ceylon cinnamon is preferred over Cassia due to lower coumarin levels.
  • If using ground spices, stir well and let steep longer for deeper flavor.
  • Use a reusable tea infuser or strainer to catch the solids.
  • Store any leftover tea in the fridge and consume within 24–48 hours.

Adjust spice levels to your liking. Cayenne can be strong—start with a pinch and increase as needed.

Best Times of Day to Drink It

Timing matters when using Spicy Apple Cinnamon Detox Tea for health goals:

TimeWhy It Works
Morning (empty stomach)Kickstarts metabolism and digestion
Before mealsHelps reduce appetite and balance blood sugar
EveningCalms cravings and supports overnight detox

Avoid drinking this tea too close to bedtime if you include cayenne—it can increase energy. For nighttime sipping, omit the spice or reduce the quantity.

Enhancing the Detox Power – Variations and Add-Ins

Adding Cayenne Pepper, Ginger, or Lemon

Want to take your Spicy Apple Cinnamon Detox Tea to the next level? A few simple add-ins can amplify its detox power, fat-burning ability, and overall flavor.

Here’s how each ingredient boosts the tea:

  • Cayenne Pepper: This spice triggers thermogenesis—your body’s heat-producing fat burn response. Just a pinch can help increase calorie expenditure and improve digestion.
  • Ginger: A well-known anti-inflammatory, ginger also soothes the stomach, reduces nausea, and adds a delicious warmth that complements both apple and cinnamon.
  • Lemon Juice: Lemon adds vitamin C, which supports liver detox and alkalizes the body. It also enhances flavor and helps break down fat.

Use these ingredients individually or combine them to create your own signature detox blend. This allows you to tailor your tea to fit your goals—whether you’re boosting immunity or revving up metabolism.

Cold Brew vs Hot Tea Methods

Spicy Apple Cinnamon Detox Tea can be enjoyed hot or cold, depending on the season and your preferences.

Hot Method:
Ideal for colder months or before bed. Brewing the ingredients in simmering water extracts more flavor and medicinal properties.

Brewing Spicy Apple Cinnamon Detox Tea at home

Cold Brew Method:
Perfect for summer or post-workout. Simply add sliced apples, cinnamon sticks, and any extras to a jar of cold water. Let it infuse in the fridge for 6–8 hours.

ComparisonHot BrewCold Brew
Time15 minutes6–8 hours in the fridge
FlavorStrong, spiced, and warmingMild, crisp, and refreshing
Ideal UseMorning or bedtime routineDaytime sipping or after workout

Whether you’re sipping warm tea on a winter evening or enjoying a chilled version after your morning workout, this detox tea works for every lifestyle.

Check out our Lemon Bomb Recipe for Weight Loss for another citrus-packed detox option.

Sweeteners to Avoid or Include

To keep Spicy Apple Cinnamon Detox Tea truly healthy and low-calorie, it’s best to skip artificial sweeteners and refined sugars. However, if you need a touch of sweetness, here are your best options:

Smart Sweetener Choices:

  • Raw honey (adds trace minerals and antimicrobial properties)
  • Stevia (natural, calorie-free, and blood sugar safe)
  • Maple syrup (use sparingly—adds depth of flavor)

Avoid:

  • White sugar
  • High-fructose corn syrup
  • Artificial sweeteners like aspartame or sucralose

Sweetening is optional—many people find the natural sweetness from apples is enough.

When and How to Drink Apple Cinnamon Tea

Best Time to Drink for Detox and Sleep

Timing is everything when it comes to maximizing the benefits of Spicy Apple Cinnamon Detox Tea. Whether your goal is fat burning, cleansing, or calming your system before bed, choosing the right moment to sip this detox tea makes a big difference.

Morning: Drinking this tea on an empty stomach can jumpstart digestion, ignite your metabolism, and prepare your body for a day of clean eating. The warming properties of cinnamon and ginger wake up your system gently.

Before meals: Having a cup 30 minutes before eating helps suppress appetite and reduce post-meal blood sugar spikes.

Evening: A mild version of this tea—without cayenne—can be a soothing, belly-flattening nightcap. The blend helps prevent late-night cravings, so you don’t go to bed with a full stomach.

Many users prefer a twice-daily routine: once in the morning and again in the evening for full-spectrum detox.

Don’t miss our Mounjaro Recipe Drink for Weight Loss for a fat-burning boost to complement your tea.

Can You Drink It at Night?

Absolutely. Drinking Spicy Apple Cinnamon Detox Tea at night offers several benefits, especially if you omit stimulating add-ins like cayenne. Cinnamon and apple are both naturally calming and digestion-friendly. They can help your stomach settle, reduce bloating, and support gentle detoxification while you sleep.

Here are some quick tips for bedtime use:

  • Use warm water, not boiling.
  • Stick to cinnamon, apple, and ginger—avoid pepper or lemon.
  • Sip it slowly 30–60 minutes before bedtime.
  • Don’t pair it with heavy foods.

This nighttime ritual can become a powerful tool in your wellness routine. The comforting spice blend may even help curb stress eating and balance hormones that affect fat storage during sleep.

Discover great ideas like our Arugula Sauerkraut Salad for a light, gut-friendly dinner before sipping your evening tea.

Daily Consumption Guidelines

You may wonder: how much Spicy Apple Cinnamon Detox Tea is too much? As a natural, caffeine-free beverage, this tea is safe for most people to enjoy 1–2 times daily. Still, moderation is key.

Recommended Usage:

  • Once daily for general detox and wellness.
  • Twice daily for weight loss and bloating relief.
  • Avoid overuse of cayenne if you have acid reflux or ulcers.
  • Diabetics should consult a doctor—cinnamon impacts blood sugar.

If you’re using this tea as part of a detox challenge, aim for 7–10 days max, followed by a break.

Science-Backed Insights and Nutritional Breakdown

Research on Apple Peel Polyphenols and Cinnamon

There’s a reason why Spicy Apple Cinnamon Detox Tea is more than a fad. Scientific research supports many of its benefits. Apples—especially with the peel on—contain a rich concentration of polyphenols, like quercetin, chlorogenic acid, and catechins. These antioxidants are linked to improved gut health, fat metabolism, and even reduced risk of cardiovascular disease.

A 2011 study published in Nutrition Journal found that apple polyphenol extract improved lipid metabolism and reduced belly fat in overweight individuals.

Cinnamon, on the other hand, has been widely studied for its insulin-mimicking properties. A 2003 study in Diabetes Care demonstrated that just 1 to 6 grams of cinnamon per day significantly lowered blood sugar and cholesterol levels in people with type 2 diabetes.

Together, the apple-cinnamon combo enhances your body’s ability to process glucose, regulate metabolism, and reduce fat accumulation—all reasons why Spicy Apple Cinnamon Detox Tea is effective for weight management and overall wellness.

Nutritional Components Per Cup

When you brew Spicy Apple Cinnamon Detox Tea, you’re not just drinking flavored water—you’re consuming micro-doses of potent plant compounds. While the exact nutritional value varies by recipe and serving size, here’s a general estimate for one 8-ounce cup:

NutrientApproximate Value
Calories5–10 (without sweeteners)
Total Sugars0–1g (natural from apple)
FiberTrace amounts
Vitamin C (with lemon)3–5% DV
Antioxidants (polyphenols)High
Caffeine0 mg (naturally caffeine-free)

This tea is ideal for those who want to hydrate and nourish their body without caffeine or added sugar. And thanks to the bioactive compounds in its ingredients, it supports detox pathways without stressing your system.

Caffeine-Free Benefits for Daily Use

Unlike green tea or black tea, Spicy Apple Cinnamon Detox Tea is 100% caffeine-free. That makes it an excellent option for anyone avoiding stimulants—especially at night. You won’t experience energy crashes, jitters, or disturbed sleep.

Drinking this tea daily helps promote:

  • Steady energy levels
  • Hormonal balance
  • Better hydration
  • Enhanced focus (without caffeine)

It’s also safe for most children, seniors, and people with caffeine sensitivity.

Don’t miss our Zucchini Breadwich—a nourishing, caffeine-free snack option that complements your detox regimen.

Common Myths and Mistakes to Avoid

Overconsumption and Its Risks

While Spicy Apple Cinnamon Detox Tea is packed with benefits, more isn’t always better. One of the biggest misconceptions is that drinking large quantities will dramatically speed up weight loss or detoxification.

The truth is, excessive consumption of cinnamon—especially Cassia cinnamon—can lead to liver toxicity due to its coumarin content. Drinking 4–5 cups a day for long periods is not recommended.

Likewise, overloading your tea with cayenne or ginger may irritate your stomach, causing acid reflux or discomfort.

Smart Tip: Stick to 1–2 servings a day, and give your body occasional breaks—especially if you’re using this tea as part of a structured detox.

Check out our Lemon Bomb Recipe for Weight Loss for a gentle, refreshing break between tea cycles.

Misusing Detox Tea as a Meal Replacement

Another common mistake is substituting Spicy Apple Cinnamon Detox Tea for actual meals. While it helps reduce cravings and promotes fullness, it’s not a source of protein, healthy fats, or complex carbs your body needs for energy and repair.

Replacing meals with only detox tea can lead to nutrient deficiencies, metabolic slowdown, and even muscle loss over time.

Remember: This tea is a supportive addition, not a replacement for balanced meals.

A healthy weight loss or detox plan should always include real food. Think lean protein, leafy greens, whole grains, and plenty of water. Use the tea as a tool, not a crutch.

Looking for inspiration? Try our Arugula Sauerkraut Salad—a nutrient-rich meal that works in harmony with your tea.

Not Using Organic or Fresh Ingredients

The power of Spicy Apple Cinnamon Detox Tea lies in its natural ingredients. But if you’re using non-organic apples or low-quality cinnamon, you may be missing out—or worse, ingesting pesticides or additives.

Apples rank high on the EWG’s “Dirty Dozen” list of produce most contaminated with pesticides. Using organic apples, especially with the peel, ensures you’re getting clean nutrients.

Also, avoid prepackaged cinnamon powders with additives. Instead, go for Ceylon cinnamon sticks or freshly ground options from a trusted source.

Using fresh ginger, organic lemons, and filtered water will also boost the effectiveness and purity of your detox blend.

Real Stories and Lifestyle Integration

Testimonials from Detox Tea Users

Many people who’ve tried Spicy Apple Cinnamon Detox Tea report tangible results—from reduced bloating to increased energy and fewer cravings. What makes this detox tea different from others is how natural and gentle it feels, with no crash or discomfort.

Here are a few real-life examples shared in wellness groups and online communities:

  • Jenna, 34 (Atlanta): “I replaced my sugary afternoon lattes with this tea. In 3 weeks, I lost 5 pounds without changing my meals. I just didn’t feel like snacking as much.”
  • Luis, 41 (Austin): “I started drinking Spicy Apple Cinnamon Detox Tea every night before bed. I sleep better, and my stomach isn’t as bloated in the morning.”
  • Melanie, 28 (Denver): “I do a 7-day detox challenge with this tea every month. It keeps me feeling light, energized, and focused—plus it tastes amazing with ginger and lemon.”

These stories show that consistent, mindful use of this tea can complement a variety of goals, from weight management to digestion and wellness rituals.

Pairing with Clean Eating and Exercise

The most successful transformations happen when Spicy Apple Cinnamon Detox Tea is paired with healthy eating and moderate exercise. Instead of relying on the tea alone, use it as a habit anchor—a ritual that encourages other healthy choices.

For example:

  • Morning: Start with warm tea to replace coffee and reduce sugar cravings.
  • Pre-lunch: Drink 30 minutes before your meal to feel fuller and eat less.
  • Post-dinner: Sip a cup in place of dessert to soothe digestion and calm cravings.

Combine it with clean meals full of whole foods, fermented veggies, and lean protein. Light activities like walking, yoga, or stretching further support detox and metabolism.

Don’t miss our Zucchini Breadwich—a wholesome clean-eating choice that matches your detox lifestyle.

Creating a 7-Day Detox Challenge Plan

Ready to take things up a notch? Here’s a simple 7-day plan to help integrate Spicy Apple Cinnamon Detox Tea into your routine:

DayMorningEveningAdd-Ons
1–21 cup1 cupLemon + Ginger
3–41 cup1 cupCayenne (if tolerated)
52 cupsLight cardio or detox yoga
61 cup1 cupAdd a probiotic food
71 cup1 cupReflect & journal progress

After 7 days, take a break or continue with a single daily serving as maintenance.

Consistency beats intensity. Small rituals like this tea can have big, lasting effects.

Enjoying Spicy Apple Cinnamon Detox Tea in daily routine

FAQ Section

What does apple and cinnamon tea do for the body?

Spicy Apple Cinnamon Detox Tea offers several body-boosting benefits. Apple contains polyphenols that support detoxification, especially in the liver and kidneys. Cinnamon helps regulate blood sugar, reduce inflammation, and improve digestion. Together, they aid in fat metabolism, curb cravings, and enhance immune function. This tea also promotes hydration, making it a smart addition to daily wellness routines.

How to make apple cinnamon tea for weight loss?

To make Spicy Apple Cinnamon Detox Tea for weight loss, combine the following:
1 sliced organic apple
1 cinnamon stick
Optional: pinch of cayenne, lemon juice, ginger
Simmer ingredients in 2 cups of water for 10–15 minutes. Strain and drink warm. You can enjoy this tea twice daily—ideally before meals—to curb appetite and support digestion. For best results, combine with a clean diet and regular physical activity.

Can I drink apple cinnamon tea at night?

Yes, and it’s highly recommended. Drinking Spicy Apple Cinnamon Detox Tea at night—without cayenne—can help reduce late-night cravings and support overnight digestion. The cinnamon calms blood sugar swings, and apple’s fiber helps you feel full. Many users report better sleep and less bloating when drinking this tea 30–60 minutes before bed.

What is hot cinnamon spice tea good for?

Hot cinnamon spice tea is good for digestion, inflammation, immune support, and metabolic balance. When combined with apple, as in Spicy Apple Cinnamon Detox Tea, it becomes even more effective. The warmth of the tea soothes the stomach, while the antioxidants from cinnamon help reduce oxidative stress. It’s a great alternative to caffeine-heavy drinks, especially during colder months.

Conclusion: Is Spicy Apple Cinnamon Detox Tea Right for You?

If you’re looking for a natural, delicious, and affordable way to boost your wellness, Spicy Apple Cinnamon Detox Tea is a perfect choice. It offers real benefits—like fat burning, digestion support, reduced cravings, and enhanced detox—without caffeine or chemicals.

Whether you’re starting your day or winding down at night, this tea fits into almost any lifestyle. It’s easy to make, endlessly customizable, and backed by both tradition and science.

Start small. Make it a daily habit. Combine it with real food, light movement, and self-care—and watch the transformation happen.

Don’t miss our Mounjaro Recipe Drink for Weight Loss to continue your healthy drink journey.

Stay Inspired With More Natural Recipes

If you’re into clean and simple health recipes, follow Brekcakes Recipes on Facebook for daily wellness inspiration and natural remedies.
Follow on Facebook →

Explore beautifully curated health-boosting drinks on Brekcakes Recipes on Pinterest and discover your new go-to for feeling great!
Follow on Pinterest →

Stay connected and let natural living become your daily lifestyle!

Oatzempic Recipe for Weight Loss: The Ultimate TikTok Weight Loss Hack You Need to Try

oatzempic recipe for weight loss with oats and lemon

If you’ve been scrolling through TikTok lately, chances are you’ve stumbled upon the viral Oatzempic recipe for weight loss. This trend has taken over health and wellness feeds, praised for helping people shed pounds without pills or crazy diets. But what exactly is this oat-based miracle, and why is everyone from fitness influencers to moms raving about it?

In this detailed guide, we explore the real deal behind the Oatzempic recipe for weight loss, including how to make it, why it’s effective, and what nutritionists have to say about its impact. You’ll get step-by-step instructions, science-backed benefits, customization ideas, and how it stacks up against other viral drinks like the Lemon Bomb and Mounjaro recipe.

Check out our Lemon Bomb Recipe for Weight Loss to discover another trending fat-burning drink.

Whether you’re just curious or seriously aiming to slim down, this article will show you how this simple drink can support your weight loss journey.

Table of Contents

Understanding the Oatzempic Recipe Trend

What is the Oatzempic Recipe?

Print
clock clock iconcutlery cutlery iconflag flag iconfolder folder iconinstagram instagram iconpinterest pinterest iconfacebook facebook iconprint print iconsquares squares iconheart heart iconheart solid heart solid icon

Oatzempic Recipe for Weight Loss


  • Author: Emily Harper
  • Total Time: 2 minutes

Description

A simple 3-ingredient oat smoothie that helps curb cravings and support weight loss. Perfect for mornings.

Ingredients

Scale
½ cup rolled oats,

1 tbsp lemon juice,

1 cup cold water,

optional: cinnamon,

chia seeds


Instructions

Add oats to glass,

stir in water and lemon juice,

let sit for 30 mins or overnight.

Stir and drink.

  • Prep Time: 2 minutes

Nutrition

  • Serving Size: 1 person
  • Carbohydrates: 150–180 kcal
  • Fiber: 4g
  • Protein: 5g

Keywords: Oatzempic, Weight Loss, TikTok Recipe, Breakfast Smoothie

The Oatzempic recipe for weight loss is a simple, natural drink made by blending oats, lemon juice, and water. Unlike medications like Ozempic, which is a prescription drug for diabetes and weight management, this recipe uses whole food ingredients to achieve appetite suppression and promote fat burning. Its name, “Oatzempic,” is a clever spin on “Ozempic,” highlighting its similar benefits without the side effects or cost.

People are turning to this Oatzempic recipe for weight loss because it’s cheap, easy, and made with items you probably already have at home. Plus, it’s packed with soluble fiber that slows digestion and curbs hunger, making it a smart breakfast or pre-meal choice.

Ingredients Typically Used in Oatzempic Recipe:

IngredientRole in Weight Loss
Rolled oatsHigh in beta-glucan fiber to support satiety
Lemon juiceSupports digestion and adds a refreshing taste
WaterKeeps you hydrated and helps volume expansion in the gut
Optional add-insCinnamon, chia seeds, or apple cider vinegar for extra benefits
 nutritional benefits of oats in oatzempic recipe

Why TikTok is Obsessed with the Oatzempic Recipe for Weight Loss

The Oatzempic recipe for weight loss gained popularity on TikTok because of its simplicity and user testimonials. Videos show users trying the drink for 3–7 days and claiming reduced bloating, smaller cravings, and actual weight loss. The trend caught on quickly, with millions of views under hashtags like #oatzempic, #oatsmoothie, and #weightlossdrink.

People love that it:

  • Requires no cooking or blending expertise
  • Keeps them full for hours
  • Can fit into vegan, gluten-free, or low-calorie diets

And since oats are a whole grain loaded with fiber, the benefits are rooted in real nutritional science.

Don’t miss our Mounjaro Recipe Drink for Weight Loss to explore another viral alternative.

With the basics of this viral sensation now clear, let’s move on to why oats themselves are a superstar when it comes to burning fat and boosting fullness.

Nutritional Benefits of Oats for Weight Loss

Fiber-Rich Ingredients That Keep You Full

The magic behind the Oatzempic recipe for weight loss lies in its star ingredient—rolled oats. These humble pantry staples are packed with soluble fiber, particularly a type called beta-glucan, which plays a crucial role in keeping you satisfied after eating.

Soluble fiber forms a gel-like consistency in your stomach. This slows digestion, helps you feel fuller for longer, and reduces the urge to snack between meals. That’s why people who try the Oatzempic recipe for weight loss often report a noticeable decrease in cravings within just a few days.

A one-half cup of dry oats contains:

  • 4 grams of fiber
  • 5 grams of protein
  • Only around 150 calories
  • High amounts of magnesium, iron, and B vitamins

This nutrient combo makes oats not only filling but also a nutrient-dense food, meaning you get more health benefits per calorie consumed. Oats also have a low glycemic index, which means they don’t cause spikes in blood sugar—another win for anyone trying to lose weight steadily.

Discover great ideas like Cottage Cheese Ice Cream to add high-protein treats alongside your Oatzempic smoothie.

Macronutrients and Micronutrients in Oats

When examining why the Oatzempic recipe for weight loss works, you can’t ignore the balance of macronutrients and micronutrients found in oats.

Macronutrient Profile (Per ½ Cup of Dry Oats):

NutrientAmount
Carbohydrates27g
Protein5g
Fat2.5g
Fiber4g

That high fiber-to-calorie ratio is ideal for anyone looking to stay full while staying in a calorie deficit—the most important principle for weight loss.

Micronutrients Found in Oats:

  • Magnesium: Helps regulate blood sugar and insulin
  • Iron: Supports energy and metabolism
  • Zinc: Boosts immunity and cellular function
  • B Vitamins: Aid in converting food into energy

Oats are also naturally gluten-free (when processed in a gluten-free facility), making the Oatzempic recipe for weight loss an excellent option for those with gluten sensitivities.

Plus, oats are inexpensive, easy to find, and highly adaptable in both sweet and savory dishes. This means you can use the Oatzempic base as a launchpad for all sorts of healthy recipes—whether it’s a lemon-oat drink or an energy-packed morning smoothie.

Looking for inspiration? Try the Zucchini Breadwich for another high-fiber, low-calorie food that works well with your weight loss plan.

Now that we understand why oats are such a powerful food for weight loss, let’s look at the science behind the oat trick that’s fueling this TikTok trend.

Science Behind the Oat Trick for Weight Loss

How Oats Affect Appetite and Blood Sugar

The viral popularity of the Oatzempic recipe for weight loss isn’t just hype—it’s rooted in real nutritional science. Oats work like a slow-release energy source, helping regulate hunger and stabilize blood sugar levels throughout the day.

The secret weapon is beta-glucan, a type of soluble fiber that delays gastric emptying and increases satiety hormones like peptide YY (PYY) and glucagon-like peptide-1 (GLP-1). These hormones send “I’m full” signals to your brain, reducing the chances of overeating.

According to research published in the Journal of Nutrition and Metabolism, consuming oats leads to:

  • Lower post-meal glucose spikes
  • Higher insulin sensitivity
  • Reduced food intake at the next meal

This is exactly what users of the Oatzempic recipe for weight loss are experiencing—less snacking, more satisfaction, and fewer blood sugar crashes.

Even better? Stabilized blood sugar also translates to more balanced energy and fewer cravings, making it easier to maintain a calorie deficit.

Check out the Pineapple Turmeric Sauerkraut to support gut health while you’re managing cravings.

Clinical Evidence Supporting Oats in Weight Loss Diets

Let’s go beyond anecdotal claims and TikTok videos—clinical trials back up oats as a legitimate tool in structured weight loss plans.

A 2015 study in Food & Nutrition Research found that people who ate oats for breakfast consumed 30% fewer calories at lunch compared to those who had cornflakes or skipped breakfast entirely. This effect is directly tied to fiber content and slower gastric emptying.

Additional findings from peer-reviewed sources have shown that:

  • Regular oat intake is associated with lower BMI
  • Oat fiber can reduce LDL (“bad”) cholesterol
  • Dietary oats improve gut microbiota, which is linked to fat storage and metabolism

All of these outcomes directly contribute to healthy, sustainable weight loss—especially when paired with a calorie-conscious diet.

So yes, the Oatzempic recipe for weight loss works because its ingredients are backed by science. And while the trend may be fun and flashy, it stands on a solid nutritional foundation.

Don’t miss our Arugula Sauerkraut Salad for a fiber-rich meal idea to complement your morning Oatzempic smoothie.

Next, we’ll walk you through exactly how to make this viral drink the right way, step by step.

How to Make the Oatzempic Recipe at Home

Step-by-Step Oatzempic Recipe Preparation

If you’re ready to try the Oatzempic recipe for weight loss, the good news is—you don’t need fancy ingredients or equipment. This viral drink is as easy as it gets. Just 3 main ingredients, 2 minutes of prep, and no blender required (though you can use one for a smoother texture).

Here’s how to make the authentic Oatzempic drink that’s trending all over TikTok:

Basic Oatzempic Recipe

IngredientQuantity
Rolled oats½ cup
Lemon juice (fresh)1 tbsp
Cold water1 cup
Optional: cinnamon, chia seeds, ACVAs desired

Instructions:

  1. Add rolled oats into a glass or jar.
  2. Pour in 1 cup of cold water and stir to soak.
  3. Add lemon juice and stir again.
  4. For added flavor, sprinkle in a dash of cinnamon or a teaspoon of chia seeds.
  5. Let it sit for at least 30 minutes (or overnight for better digestion).
  6. Stir again and drink first thing in the morning on an empty stomach.

You can also blend the mix if you prefer a smoother, shake-like texture.

Don’t miss our Lemon Dump Cake with Poppy Seeds if you want to balance your diet with guilt-free, healthy treats.

This recipe is:

  • Dairy-free
  • Vegan
  • Naturally gluten-free (use certified GF oats)

Common Mistakes to Avoid While Making It

Although the Oatzempic recipe for weight loss is simple, there are a few key mistakes that could ruin its effectiveness or taste.

Mistake #1: Using Instant Oats

Avoid quick-cooking oats or flavored packets. They contain added sugar and don’t have the same fiber content as old-fashioned rolled oats.

Mistake #2: Not Soaking Long Enough

If you drink it immediately, the oats won’t expand properly in your stomach. Let it sit for 30 minutes minimum to help the fiber gel form and give you that full, satisfied feeling.

Mistake #3: Adding Too Much Lemon

Too much lemon juice can upset your stomach or make the drink too acidic. Stick with one tablespoon unless you’re used to it.

Mistake #4: Drinking It Too Late in the Day

For best results, drink it in the morning on an empty stomach. This sets the tone for the day and helps reduce mid-morning hunger.

The Oatzempic recipe for weight loss works best when made consistently and consumed as part of a balanced, calorie-conscious routine.

Now that you know how to make it right, let’s explore how you can tweak it to keep things interesting.

Customizing Your Oatzempic Smoothie

step-by-step oatzempic recipe preparation

Flavor Boosters and Add-Ins for Variety

Drinking the same thing every morning can get boring—no matter how effective it is. Luckily, the Oatzempic recipe for weight loss is super flexible. You can tweak flavors and textures to suit your taste buds without compromising its fat-burning potential.

Here are delicious and healthy ways to upgrade your Oatzempic drink:

Add-InBenefit
CinnamonRegulates blood sugar, adds warmth and spice
Chia seedsExtra fiber and omega-3s for fullness
Apple cider vinegar (ACV)Boosts digestion and appetite suppression
Ginger juiceSupports metabolism and reduces bloating
Unsweetened almond milkCreamier texture without added sugar
TurmericNatural anti-inflammatory and antioxidant

By experimenting with one or two of these ingredients, you can give your Oatzempic recipe for weight loss a whole new flavor while still getting the appetite-curbing effect.

Just make sure not to go overboard with high-calorie additions like honey or nut butter if your goal is to stay in a calorie deficit.

Learn more about Hot Honey Ground Beef Bowl for a satisfying high-protein lunch to follow your morning oat drink.

Vegan, Gluten-Free, and Dairy-Free Alternatives

The base recipe for Oatzempic is already plant-based, but if you have specific dietary needs or sensitivities, here are some smart substitutions:

For a Vegan Version:

  • Stick to plant-based milk like oat milk, almond milk, or coconut milk.
  • Avoid processed protein powders with dairy or animal ingredients.

For Gluten-Free Diets:

  • Use certified gluten-free oats to avoid cross-contamination.
  • Always check labels on additional ingredients like flavorings or toppings.

For a Creamier Texture (Dairy-Free):

  • Blend your Oatzempic drink with a frozen banana or half an avocado for a rich, smoothie-like feel.
  • Try unsweetened Greek-style almond or cashew yogurt for extra creaminess and gut health.

These customizations keep your Oatzempic recipe for weight loss exciting and suitable for different dietary goals, making it easier to stick with your routine.

Discover great ideas like Trader Joe’s Lobster Pasta if you’re looking to pair indulgent dinners with lighter mornings.

Coming up: Should you use Oatzempic as a full-on meal replacement? We break it down in the next section.

Oatzempic as a Meal Replacement

Is Oatzempic a Healthy Breakfast Option?

Many TikTok users swear by starting their day with the Oatzempic recipe for weight loss, claiming it keeps them full for hours and even helps them skip snacks. But is it nutritionally complete enough to count as a full breakfast?

Short answer: Yes—with a few tweaks.

The basic Oatzempic drink includes oats, lemon juice, and water, which provide fiber, hydration, and a metabolic boost. However, it lacks adequate protein and fat, which are essential for a well-rounded meal.

To make your Oatzempic recipe for weight loss a balanced breakfast, consider adding:

  • 1 tbsp chia seeds for fiber, omega-3s, and protein
  • Unsweetened plant milk instead of water for creaminess and nutrients
  • A scoop of plant-based protein powder for sustained energy

This keeps the calorie count reasonable (around 200–300) while supporting blood sugar balance and satiety.

VersionCaloriesProteinFiber
Basic Oatzempic~1505g4g
Enhanced Meal Version~28015–20g8–10g

The Oatzempic recipe for weight loss can work great as a breakfast when built out with just a few smart additions.

Check out Cottage Cheese Ice Cream for a healthy high-protein dessert you can enjoy later in the day.

When and How Often Should You Drink It?

Timing is everything when it comes to using the Oatzempic recipe for weight loss effectively. Here’s what works best for most people:

✅ Morning (On an Empty Stomach)

This is the most popular time to drink it. The fiber expands in your stomach, helping you eat fewer calories later in the day.

✅ Pre-Lunch or Snack Replacement

If you’re prone to snacking mid-morning or mid-afternoon, the Oatzempic drink can be a smart, filling alternative.

❌ Not Ideal Before Bed

It may cause bloating or keep you too full to sleep comfortably. Plus, its effectiveness relies on reducing appetite earlier in the day.

How Often Should You Drink It?

  • Daily if you’re targeting consistent weight loss.
  • 3–4 times a week if you’re just looking to reduce cravings or snack less.

You can build it into your rotation the same way you’d approach overnight oats, smoothies, or high-protein shakes.

Just remember: While the Oatzempic recipe for weight loss is a helpful tool, long-term fat loss still comes down to staying in a calorie deficit over time.

Now that we’ve nailed the ideal way to drink it, next we’ll compare Oatzempic to other viral TikTok weight loss drinks.

Comparing Oatzempic with Other Viral Weight Loss Drinks

Oatzempic vs Lemon Bomb and ACV Detox Drinks

The Oatzempic recipe for weight loss is far from the only viral drink claiming to melt fat and reduce cravings. Two other internet-famous options include the Lemon Bomb drink and Apple Cider Vinegar (ACV) detox water. But how do they all stack up nutritionally and functionally?

Let’s break it down:

DrinkKey IngredientsAppetite ControlDigestive SupportNutrient Density
OatzempicOats, lemon, water✅✅✅✅✅✅✅✅
Lemon BombLemon, ginger, cayenne✅✅✅
ACV DetoxApple cider vinegar, water✅✅✅✅

The Oatzempic recipe for weight loss stands out because it:

  • Keeps you full for hours thanks to soluble fiber
  • Provides real nutrition with carbs, protein, and minerals
  • Is easy on the stomach for most users, unlike ACV which may irritate digestion

While ACV and Lemon Bomb drinks are great for short-term bloat reduction or boosting metabolism, they often lack the sustained satiety that oats can provide.

Check out Lemon Bomb Recipe for Weight Loss to compare it directly with Oatzempic and see which one fits your goals better.

tracking oatzempic results with app

How It Stacks Up Against Mounjaro-Inspired Recipes

The Mounjaro recipe for weight loss is another TikTok trend that mimics the appetite-curbing effects of the injectable medication Mounjaro (tirzepatide), often using ingredients like chia seeds, water, and a splash of juice or ACV.

So how does the Oatzempic recipe for weight loss compare?

FeatureOatzempicMounjaro Drink
Based on whole food?
Contains complex carbs?✅✅✅
Offers protein/fiber?✅✅✅
Helps long-term satiety?✅✅✅
Mimics real meals?✅✅

While both can help reduce hunger, Oatzempic offers more substance—literally. It’s heartier, thicker, and more satisfying, especially when customized with chia or protein powder.

Don’t miss our Mounjaro Recipe Drink for Weight Loss to see how it compares ingredient-by-ingredient.

The bottom line? Oatzempic may be the most balanced and filling of all the TikTok weight loss drinks, making it a better fit for long-term use.

Coming up: Let’s hear from real users and look at expert opinions on when the Oatzempic recipe may not be the right fit.

Real Results: Testimonials and Cautions

What Real People Are Saying About Oatzempic

Scroll through TikTok or Reddit, and you’ll find hundreds of glowing reviews about the Oatzempic recipe for weight loss. What sets it apart from gimmicks is the simplicity—real food, real results. Here’s what people are saying after trying it for just a few days:

✅ TikTok Testimonials:

  • “Day 3 of drinking Oatzempic and I’m shocked—I didn’t snack once today!”
  • “Lost 5 lbs in one week just replacing my breakfast with the Oatzempic drink. No hunger pangs at all.”
  • “It’s surprisingly filling. I make it at night and drink it cold in the morning—works like a charm.”

Users consistently mention:

  • Feeling fuller longer
  • Eating less throughout the day
  • Seeing reductions in bloating and cravings
  • Easy prep and budget-friendly ingredients

While everyone’s body responds differently, many report steady weight loss over 1–2 weeks, especially when paired with calorie tracking or light exercise.

Check out Zucchini Breadwich for another smart, satisfying snack idea that pairs well with your Oatzempic routine.

Who Should Not Try This Recipe?

While the Oatzempic recipe for weight loss is generally safe for healthy adults, it’s not for everyone. There are a few exceptions to keep in mind before jumping on the trend.

⚠️ Avoid If You:

  • Have celiac disease and aren’t using certified gluten-free oats
  • Are sensitive to high-fiber foods, especially if you’ve never consumed oats regularly
  • Have diabetes or take blood sugar medication, as this drink could lower glucose levels further—consult a doctor first
  • Suffer from IBS or GI issues, since oats can cause gas or discomfort in some individuals
  • Are pregnant or nursing, and unsure about changes to fiber or fluid intake

As with any nutrition change, especially one involving weight loss, it’s best to talk to a healthcare provider before starting—even if it’s just oats and lemon.

That said, most people find the Oatzempic recipe for weight loss gentle, effective, and adaptable. Still, listen to your body and adjust ingredients if you experience discomfort or bloating.

Up next, we’ll look at expert tips on maximizing weight loss with Oatzempic and how to track your progress the smart way.

Expert Tips to Maximize Weight Loss with Oatzempic

Pairing Oatzempic with Healthy Habits

While the Oatzempic recipe for weight loss is a powerful tool, it works best when combined with smart lifestyle habits. If you’re serious about shedding pounds and keeping them off, try pairing the drink with simple, proven methods that enhance its benefits.

Here’s how to take your results to the next level:

1. Stick to a Routine

Drink your Oatzempic smoothie first thing in the morning, ideally at the same time each day. This trains your body to expect fewer calories early on and naturally reduces snacking later.

2. Pair It with Walking

Walking for 20–30 minutes after meals can boost digestion and burn calories. A daily walk after your first meal (post-Oatzempic) is one of the easiest ways to support fat loss.

3. Hydrate More

The fiber in oats works best when paired with adequate water intake. Aim for 8–10 cups of water per day to help with satiety, digestion, and flushing out toxins.

4. Avoid Processed Add-Ons

Skip sugar, syrup, or dairy creamers that sneak calories into your morning drink. Stick to clean, natural additions like cinnamon, chia, or unsweetened almond milk.

5. Support with High-Protein Meals

For lunch and dinner, aim for lean proteins, healthy fats, and whole grains. This keeps blood sugar steady and reinforces the appetite suppression from your morning Oatzempic smoothie.

Learn more about Cottage Cheese Ice Cream as a high-protein dessert idea that complements your healthy meal plan.

How to Track Your Progress Effectively

Drinking the Oatzempic recipe for weight loss consistently is step one. But if you’re not tracking your efforts, you might miss out on the motivation and momentum that come from seeing real progress.

Tools to Use:

MethodTool/Tip
Weight trackingApps like Happy Scale or Fitbit
Meal trackingMyFitnessPal or Lose It!
Body measurementsUse a flexible tape measure weekly
Progress photosTake once a week, same clothes/lighting
Habit journalingTrack energy levels, hunger, digestion daily

What to Monitor:

  • Craving frequency
  • Snacking behavior
  • Hunger between meals
  • Bloating or digestive discomfort
  • Energy levels

Even if the number on the scale moves slowly, reductions in hunger and increased satisfaction are major wins—and often the first signs that the Oatzempic recipe for weight loss is doing its job.

Tracking non-scale victories can be just as powerful for long-term motivation.

Now that you have expert strategies and tools, let’s wrap things up with answers to your top FAQs about this trending drink.

Frequently Asked Questions (FAQ)

Does Oatzempic actually work?

Yes, many users report that the Oatzempic recipe for weight loss helps curb hunger, reduce bloating, and support fat loss when consumed consistently. While it’s not a miracle solution, its high fiber content can naturally suppress appetite and promote healthier eating habits.

What is the oat trick for weight loss?

The oat trick refers to drinking a mixture of oats, lemon juice, and water—aka the Oatzempic recipe—to stay fuller longer, cut cravings, and reduce calorie intake. It’s effective due to the fiber (especially beta-glucan) which delays digestion and enhances satiety.

What is the TikTok drink that helps you lose weight?

Several drinks have gone viral, but the most popular ones include the Oatzempic recipe, the Lemon Bomb drink, and Mounjaro-inspired chia drinks. Each one focuses on curbing hunger and supporting metabolism with natural ingredients.

Are oat smoothies good for weight loss?

Yes. Oat smoothies like the Oatzempic recipe for weight loss are ideal because they combine complex carbs, fiber, and low-calorie hydration. When blended with optional protein or healthy fats, they make a nutritious, filling, and fat-burning meal replacement.

Conclusion

The viral buzz around the Oatzempic recipe for weight loss isn’t just another fleeting trend. It’s a simple, affordable, and effective way to manage hunger, boost fiber intake, and support your weight loss goals. With ingredients you probably already have at home, this drink offers real nutritional value and a solid kickstart to healthier habits.

Whether you’re looking to jumpstart your journey or break through a plateau, the Oatzempic drink can be your go-to morning routine. Just remember—consistency, hydration, and balanced meals are key.

Don’t miss our Zucchini Breadwich and Mounjaro Recipe Drink for Weight Loss to build a complete wellness plan.

Give the Oatzempic recipe a try, track your progress, and see what it can do for your health.

If you’re into clean and simple health recipes, follow Brekcakes Recipes on Facebook and pinterest for daily wellness inspiration and natural remedies.

Lemon Bomb Recipe for Weight Loss – The Best Natural Detox

lemon bomb recipe for weight loss with fresh ingredients

If you’re on the hunt for a simple, natural solution to support your weight goals, look no further than the lemon bomb recipe for weight loss. This powerful detox drink combines lemon, ginger, mint, and honey to deliver a fat-burning, digestion-boosting beverage you can enjoy every day. Not only is it refreshing and easy to make, but it’s also packed with health benefits that help fight stubborn belly fat and water retention.

The lemon bomb drink has exploded in popularity across wellness blogs and TikTok, thanks to its clean ingredients and real results. In this guide, you’ll learn how to make this invigorating blend at home, understand the science behind its effectiveness, and discover how to get the most out of every glass.

Looking for inspiration? Try our refreshing Mounjaro recipe drink for weight loss — a perfect addition to your daily routine.

Table of Contents

Introduction to the Lemon Bomb Recipe for Weight Loss

A lemon bomb is a nutrient-rich wellness drink made from a mix of lemon juice, grated ginger, cold water, mint, and honey. Often labeled as a “metabolism booster,” this blend supports weight management by naturally detoxifying your body and aiding digestion.

What makes the lemon bomb recipe for weight loss unique is its simplicity. It doesn’t require fancy equipment or expensive supplements — just fresh ingredients you probably already have at home. It’s low-calorie, hydrating, and can be sipped any time of day for consistent fat-burning support.

Here’s why it’s trending:

  • Supports fat burning without relying on artificial stimulants
  • Helps with belly fat reduction
  • Keeps you full and energized
  • Easy to prep in batches for daily use

This drink has become a go-to for people seeking sustainable, plant-based weight loss solutions — and it’s not just hype. Many report feeling less bloated, more energetic, and more in control of their eating habits.

Print
clock clock iconcutlery cutlery iconflag flag iconfolder folder iconinstagram instagram iconpinterest pinterest iconfacebook facebook iconprint print iconsquares squares iconheart heart iconheart solid heart solid icon
lemon bomb recipe for weight loss spicy and sweet versions

Lemon Bomb Recipe for Weight Loss


  • Author: Emily Harper
  • Yield: 4 servings 1x

Description

A metabolism-boosting detox drink with lemon, ginger, mint, and honey for daily fat burning and digestion support.


Ingredients

Scale
  • Juice from 23 fresh lemons

  • 1-inch piece fresh ginger, grated

  • 12 tbsp raw honey (optional)

  • Handful of mint leaves

  • 4 cups cold water

  • Ice cubes as needed


Instructions

    1. Juice lemons into a pitcher.

    2. Grate and add ginger.

    3. Mix in honey (if using).

    4. Add cold water and stir well.

    5. Toss in mint and ice.

    6. Chill and serve.

Nutrition

  • Serving Size: 8 oz (1 glass)
  • Calories: 25 kcal
  • Sugar: 5 g
  • Carbohydrates: 7g

Overview of the Lemon Bomb’s Benefits for Weight Loss

This lemon bomb recipe for weight loss taps into the natural power of everyday ingredients to support your metabolism, improve digestion, and gently detox your system. Here’s what each component brings to the table:

IngredientFunctionWeight Loss Impact
Lemon JuiceRich in vitamin CStimulates liver detox and fat metabolism
GingerAnti-inflammatoryBoosts thermogenesis and curbs cravings
Mint LeavesRefreshing herbCalms digestion and reduces bloating
HoneyNatural sweetenerAdds energy and balances glucose levels
Cold Water + IceHydrating baseActivates calorie-burning via cooling effect

By combining these ingredients in the right proportions, this drink becomes more than just a tea — it’s a natural fat-burning elixir. It promotes hydration while also delivering detoxifying and appetite-suppressing effects, helping you stay on track with your goals.

Don’t miss our healthy dessert twist like the lemon dump cake with poppy seeds — great for lemon lovers looking for guilt-free options.

The Science Behind Lemon Bomb Ingredients

The magic behind the lemon bomb recipe for weight loss isn’t just anecdotal. Each ingredient plays a targeted role in promoting fat loss, detoxification, and improved digestion. Let’s dive into the research-backed reasons why this combo works — and why you might want to make it part of your daily weight loss plan.

How Lemon Supports Digestion and Fat Breakdown

Lemon is far more than just a tangy flavor enhancer. This citrus fruit is rich in vitamin C, antioxidants, and polyphenols — all of which help support the body’s natural fat-burning process.

Here’s what lemon juice does:

  • Stimulates bile production, which aids in breaking down fats more efficiently
  • Detoxifies the liver, helping eliminate toxins that interfere with metabolism
  • Reduces bloating, thanks to its mild diuretic effects
  • Contains d-limonene, which has been shown in studies to improve digestion and fat regulation

That’s why lemon is the foundation of the lemon bomb recipe for weight loss — it sets the stage for better nutrient absorption and cleaner digestion.

Check out our gut-friendly dishes like the pineapple turmeric sauerkraut to enhance your detox routine alongside this drink.

Ginger’s Role in Metabolic Acceleration

Ginger is the firestarter in this lemon bomb. Known for its anti-inflammatory and thermogenic properties, it’s a natural choice for anyone looking to increase calorie burn and reduce hunger.

Ginger works by:

  • Activating thermogenesis, which raises your core temperature and burns more calories
  • Suppressing appetite through its active compound gingerol
  • Supporting healthy blood sugar levels, which helps regulate energy and cravings
  • Aiding in digestion by relaxing the intestinal tract

In one study, participants who consumed ginger felt fuller longer and experienced more fat loss than those who didn’t. That’s why fresh ginger — not powdered — is best in your lemon bomb recipe for weight loss.

The Power of Mint and Honey in Detoxification

Mint and honey might seem like extras, but they play important roles in both flavor and function.

Mint leaves are:

  • Known to soothe the digestive system and reduce gas
  • Great at reducing cravings for sugary foods
  • A natural refresher that keeps the drink palatable, especially for those new to detox drinks

Raw honey (in moderation) adds a gentle sweetness and:

  • Helps stabilize blood sugar
  • Provides antioxidants that support liver function
  • Offers antibacterial properties that enhance immune health

Together, they balance the tartness of lemon and the heat of ginger, turning your drink into a digestive powerhouse.

Discover great ideas like our cottage cheese ice cream for low-calorie dessert options that fit perfectly with a lemon bomb lifestyle.

The lemon bomb recipe for weight loss doesn’t just taste good — it’s engineered by nature to work with your body. Each ingredient works synergistically, creating a functional drink that’s greater than the sum of its parts.

Looking for something savory and unique? Don’t miss our zucchini breadwich — a light lunch that pairs perfectly with your daily lemon bomb.

How to Make the Perfect Lemon Bomb Recipe for Weight Loss

Now that we’ve broken down the science, let’s talk about how to make the perfect lemon bomb recipe for weight loss in your own kitchen. This refreshing detox drink is fast to prepare, requires no complicated tools, and can become a powerful daily ritual for boosting fat loss naturally.

lemon bomb recipe for weight loss ingredients prep

Ingredients You’ll Need and Why They Matter

To create the ultimate lemon bomb recipe for weight loss, you’ll need only a few fresh ingredients — each selected for their health-boosting and metabolism-enhancing effects.

IngredientQuantityWeight Loss Benefit
Lemon Juice (Fresh)From 2–3 lemonsDetoxifies the liver, helps burn fat
Ginger Root (Grated)1-inch pieceSupports digestion, boosts thermogenesis
Raw Honey (Optional)1–2 tablespoonsAdds sweetness, balances blood sugar
Fresh Mint LeavesA small handfulReduces bloat, cools and soothes digestion
Cold Water4 cupsSupports hydration and calorie burning
Ice CubesAs much as desiredTriggers the body’s cooling/calorie burn response

These ingredients, when combined, create a potent detox blend. The lemon helps cleanse the system, while the ginger and mint work together to improve digestion and metabolism. This synergy is what makes the lemon bomb recipe for weight loss so effective.

Step-by-Step Instructions to Prepare Your Lemon Bomb

Here’s how to whip up this metabolism-boosting drink in minutes:

  1. Juice Your Lemons – Start by squeezing 2–3 fresh lemons into a pitcher. Remove any seeds.
  2. Add Ginger – Grate a 1-inch knob of fresh ginger and stir it into the lemon juice.
  3. Sweeten (If Desired) – Mix in 1–2 tablespoons of raw honey. This step is optional but helps balance the tartness.
  4. Pour the Water – Add 4 cups of cold water and stir until fully combined.
  5. Toss in Mint – Drop in a handful of fresh mint leaves for added flavor and digestive benefits.
  6. Chill the Drink – Add plenty of ice. Not only does this keep it cold, but the body burns calories warming cold fluids.
  7. Let It Steep (Optional) – Let the mixture sit in the fridge for 15–30 minutes before serving to enhance the flavor blend.

This method ensures every sip of your lemon bomb recipe for weight loss delivers real results while tasting crisp and revitalizing.

Tips to Customize Without Sabotaging Your Goals

You can tweak your lemon bomb while still keeping it a fat-burning powerhouse. Here are some smart additions that won’t sabotage your weight goals:

  • Add sliced cucumber for extra hydration and minerals
  • Sprinkle cayenne pepper to increase fat burn through thermogenesis
  • Use sparkling mineral water for a bubbly version of the drink
  • Mix in a small amount of apple cider vinegar for gut support

Avoid anything with added sugar, juice concentrates, or artificial flavors. The power of the lemon bomb recipe for weight loss lies in its clean, whole-food ingredients.

Looking for other metabolism-friendly meals? Try our hot honey ground beef bowl — great for lunch or dinner alongside your daily detox drink.

Best Times and Ways to Consume Lemon Bomb for Maximum Effect

Drinking the lemon bomb recipe for weight loss at the right times can significantly amplify its fat-burning and detox effects. While there’s no one-size-fits-all, certain moments in your day are more ideal than others — especially if you’re looking to flatten your belly, boost energy, and reduce cravings naturally.

Should You Drink Lemon Bomb in the Morning or at Night?

The best time to enjoy your lemon bomb drink is first thing in the morning on an empty stomach. Here’s why:

  • Kickstarts your metabolism after a night of fasting
  • Flushes out toxins that accumulate overnight
  • Hydrates your body quickly, preventing bloating
  • Prepares your digestive system for the day’s meals

For many people, it works similarly to a natural fat-burning coffee — without the jitters. You’ll feel more energized and may even notice less desire to snack between meals.

But what about at night? Drinking the lemon bomb recipe for weight loss in the evening has its own benefits:

  • Aids digestion of dinner
  • Reduces late-night cravings
  • Helps your body detox while you sleep
  • May promote deeper sleep when mint is used generously

Whether you drink it in the morning, evening, or both, consistency is key. Find the time that best fits your lifestyle and stick to it for optimal results.

How Often Should You Drink It for Effective Results?

To see noticeable changes in bloating, digestion, and fat loss, most people benefit from drinking the lemon bomb recipe for weight loss at least once a day. Here’s a general guide:

GoalFrequency
Detox & hydration3–4 times per week
Belly fat reductionDaily, preferably before breakfast
Digestive supportAfter large meals or nightly

Pro Tip: Prepare a large batch and store it in the fridge. That way, you’ll always have a cold glass ready when you need it.

Looking for inspiration? Try our zucchini breadwich for a light meal option that pairs perfectly with your lemon bomb routine.

Bonus Tip: Combine with Light Movement

Drinking your lemon bomb before a walk, yoga, or light cardio can further activate your metabolism. Lemon and ginger increase body warmth slightly, making your fat-burning routine more effective when combined with gentle movement.

Don’t miss our unique pineapple turmeric sauerkraut to further support digestion alongside your lemon detox beverage.

Real Results – What Can You Expect from Drinking Lemon Bomb Daily?

Consistency is everything when it comes to any natural health routine. The lemon bomb recipe for weight loss is no exception. While it’s not a magic potion, those who commit to drinking it daily often report impressive results over time — not just on the scale but in how they feel day to day.

Let’s explore what you can realistically expect when incorporating this powerful fat-burning drink into your lifestyle.

Timeline of Weight Loss Effects Based on User Reports

Although individual results may vary, here’s a general breakdown of what many people experience:

TimeframeExpected Effects
Day 1–3Reduced bloating, improved hydration, better digestion
Week 1Noticeable increase in energy, reduced appetite
Week 2–3Flatter stomach, fewer cravings, regular digestion
1 MonthVisible fat loss (especially around midsection), enhanced mood and focus

These effects are amplified when the lemon bomb recipe for weight loss is paired with light exercise, balanced meals, and good sleep.

This is why many people say that lemon bomb becomes not just a drink, but a daily habit that resets the body.

Additional Health Benefits Beyond Weight Loss

Weight loss may be your initial goal, but the benefits of this drink go well beyond the number on the scale. Drinking the lemon bomb recipe for weight loss daily may lead to:

  • Improved skin clarity, thanks to detoxification and vitamin C
  • Boosted immunity, especially with ginger and honey in the mix
  • Better digestion, with fewer episodes of constipation or acid reflux
  • Mental clarity, due to reduced sugar cravings and more stable blood sugar
  • Less water retention, helping you feel lighter throughout the day

Discover great ideas like our cottage cheese ice cream for a delicious, protein-packed dessert that supports your weight journey.

Real People, Real Stories

Social media is filled with real-world reviews of the lemon bomb recipe for weight loss. From busy moms to fitness enthusiasts, many people credit this drink with:

  • Kickstarting their weight loss plateau
  • Helping them feel “lighter” and more energized
  • Acting as a natural appetite suppressant
  • Making them more mindful of their overall nutrition

While it’s not a replacement for a healthy diet or medical advice, this drink often becomes a cornerstone of wellness routines for those looking to slim down the natural way.

Comparisons – Lemon Bomb vs. Other Weight Loss Drinks

With so many weight loss beverages trending on social media and wellness blogs, it’s natural to wonder: how does the lemon bomb recipe for weight loss stack up against the rest?

From apple cider vinegar blends to viral TikTok teas and even Ozempic-inspired tonics, let’s break down what makes lemon bomb a standout — and when it might be a better (or worse) choice depending on your goals.

How It Stacks Up Against Apple Cider Vinegar Drinks

Apple cider vinegar (ACV) drinks have long been touted as a natural metabolism booster. But how do they compare to the lemon bomb recipe for weight loss?

FeatureLemon BombACV Drink
TasteFresh, citrusy, mintySour, pungent, sharp
Digestive SupportYes (mint, lemon, ginger)Yes (ACV promotes gut balance)
Daily ToleranceEasy to sipOften hard to swallow regularly
Acidity LevelGentle on the stomachHighly acidic (can damage enamel)
Main BenefitsDetox, hydration, bloat reductionBlood sugar balance, appetite control

The lemon bomb is generally easier to drink daily and gentler on the stomach. It also provides hydration, unlike the concentrated nature of most ACV shots.

Don’t miss our naturally sweet lemon dump cake with poppy seeds if you’re craving a healthier dessert while staying on track.

Comparison with Ozempic-Inspired Herbal Blends

Recently, weight loss drinks inspired by Ozempic (a GLP-1 receptor agonist) have gained popularity. These typically include apple cider vinegar, lemon, cayenne, and herbs like berberine or bitter melon.

Here’s how the lemon bomb recipe for weight loss compares:

ElementLemon BombOzempic-Inspired Drink
Natural SimplicityUses only kitchen ingredientsOften includes specialty herbs or supplements
Side EffectsRare (if any)May cause GI distress or blood sugar dips
Appetite ControlMild, steadyStrong, but can be harsh
Ease of AccessVery easy to makeMay require supplements or online ordering

While Ozempic-style drinks can be more potent, they often come with side effects and are not ideal for daily use. The lemon bomb, on the other hand, offers a more gentle, sustainable fat-burning approach you can maintain over time.

Learn more about balanced meal ideas like the hot honey ground beef bowl — a savory choice that fits within a mindful eating plan.

Why Lemon Bomb Often Wins for Long-Term Use

Unlike extreme detox teas or fad drink mixes, the lemon bomb recipe for weight loss:

  • Is gentle enough for daily use
  • Doesn’t rely on laxatives or artificial appetite suppressants
  • Provides hydration and essential vitamins
  • Can be made fresh in minutes with no additives

It’s the combination of effectiveness, simplicity, and sustainability that makes the lemon bomb one of the best natural drinks for weight loss.

lemon bomb recipe for weight loss results real user

Expert Tips and Custom Variations of Lemon Bomb

The beauty of the lemon bomb recipe for weight loss is that it’s incredibly versatile. While the core formula is simple and effective, you can tweak it to match your taste, goals, and even the seasons — all without sacrificing its fat-burning benefits.

Whether you’re looking to spice things up or craft a gentler blend, these expert-backed variations will help you personalize your lemon bomb routine.

How to Make a Spicy Lemon Bomb for Fat Burning

If you want to supercharge your metabolism, a spicy lemon bomb variation is a game-changer. Adding a bit of heat boosts thermogenesis — the process your body uses to burn calories through heat production.

Ingredients to Add:

  • 1 pinch of cayenne pepper – Raises core body temperature, promoting fat burn
  • 1–2 slices of fresh jalapeño (optional) – Adds extra spice and may suppress appetite
  • Extra ginger – For added heat and digestion support

This version of the lemon bomb recipe for weight loss is perfect before a morning workout or brisk walk, when your body is primed to torch calories.

Learn more about flavorful options like the mounjaro recipe drink for weight loss for more powerful natural fat-burning drinks.

Sweet Lemon Bomb vs. Detox Lemon Bomb: What’s Right for You?

Not everyone has the same taste preferences or tolerance levels. That’s why it’s helpful to tailor your lemon bomb based on your goals.

Sweet Lemon Bomb

Ideal for beginners or those easing off sugary drinks:

  • Add a teaspoon of raw honey for sweetness
  • Use fresh mint and orange slices for a light citrus twist
  • Great for midday cravings or afternoon fatigue

Detox Lemon Bomb

Designed for deeper cleansing and fat flushing:

  • Add apple cider vinegar (1 tsp)
  • Include turmeric powder (1/4 tsp) to support liver health
  • Best used in the morning on an empty stomach

Both versions keep the integrity of the lemon bomb recipe for weight loss, while helping you stay consistent based on your flavor preferences.

Looking for a cool-down treat? Try our cottage cheese ice cream — a protein-packed dessert that won’t sabotage your goals.

Expert Advice: Keep It Simple, Keep It Fresh

Nutritionists agree: the simpler the routine, the easier it is to stick to. Don’t get overwhelmed trying to overcomplicate your lemon bomb. Here are some final pro tips:

  • Use fresh ingredients whenever possible – bottled lemon juice and powdered ginger won’t deliver the same results
  • Make it part of a daily ritual – pairing your drink with a walk or morning stretch creates consistency
  • Avoid drinking it too close to meals – give your body time to absorb and digest its active compounds

Simplicity and freshness are what make the lemon bomb recipe for weight loss one of the easiest long-term strategies for anyone trying to improve their health.

Common Mistakes to Avoid with Lemon Bomb Recipes

The lemon bomb recipe for weight loss is easy to prepare — but like any natural remedy, small missteps can reduce its effectiveness. To help you get the most out of every glass, here are the most common mistakes people make and how to avoid them.

Using Bottled Lemon Juice Instead of Fresh Lemons

One of the biggest mistakes is swapping fresh lemon juice for bottled alternatives. While convenient, store-bought lemon juice is often:

  • Pasteurized, which kills enzymes
  • Loaded with preservatives and citric acid
  • Less flavorful and nutrient-dense

Fresh lemon juice contains live enzymes, vitamin C, and natural acids that support digestion and fat breakdown. If you want real results from your lemon bomb recipe for weight loss, always juice fresh lemons.

lemon bomb recipe for weight loss spicy and sweet versions

Overusing Sweeteners or Skipping Key Ingredients

Another common issue? Over-sweetening your lemon bomb or skipping critical fat-burning ingredients like ginger or mint.

Here’s why that’s a problem:

  • Adding too much honey or syrup increases your sugar intake, spiking insulin levels
  • Skipping ginger or mint removes powerful digestion and metabolism benefits
  • Leaving out cold water or ice eliminates the drink’s thermogenic effect

Stick to the original lemon bomb recipe for weight loss with balanced ingredients. If sweetness is a concern, use raw honey in moderation or skip it altogether.

Discover great ideas like our zucchini breadwich to keep your meals clean, satisfying, and weight-loss-friendly alongside your drink.

Drinking It at the Wrong Times

Drinking your lemon bomb right after a heavy meal can dilute its benefits. To maximize fat burning and detoxification:

  • Drink it on an empty stomach, especially in the morning
  • Wait 30–45 minutes after meals if consuming later in the day
  • Avoid mixing it with high-sugar foods that counter its fat-burning potential

Timing matters. Aligning your drink schedule with your digestion helps your body absorb nutrients and activate metabolism efficiently.

Expecting Instant Weight Loss

While the lemon bomb recipe for weight loss supports your goals, it’s not a miracle cure. It won’t replace a poor diet or lack of movement. What it will do is:

  • Enhance your body’s fat-burning potential
  • Reduce bloating and cravings
  • Support hydration and gut health

Think of it as a daily ritual that contributes to long-term results — not a one-time fix.

Check out our nutrient-packed hot honey ground beef bowl to balance your day with protein and flavor, keeping you full without sabotaging your progress.

Frequently Asked Questions (FAQ)

Does lemon bomb tea help you lose weight?

Yes, lemon bomb tea can support weight loss when consumed consistently as part of a balanced lifestyle. It combines ingredients like lemon, ginger, and mint that naturally boost metabolism, reduce bloating, and suppress appetite. By aiding digestion and detoxification, this tea acts as a gentle, daily fat-burning aid. When paired with a clean diet and light activity, it enhances your body’s ability to shed excess weight.

What is the lemon drink that burns belly fat?

The lemon bomb recipe for weight loss is widely considered one of the most effective natural drinks for targeting belly fat. Its combination of fresh lemon juice, ginger, mint, and cold water helps to stimulate digestion, reduce water retention, and activate thermogenesis — all of which support fat loss around the midsection. Drinking it on an empty stomach daily can produce visible results over time.

How to make lemon balm like Ozempic?

To make a lemon balm weight loss drink inspired by Ozempic’s appetite-suppressing effects, you can build upon the lemon bomb base by adding a few additional ingredients:
1 tsp apple cider vinegar
A pinch of cayenne pepper
1/2 tsp turmeric powder (optional)
Stick with the original lemon bomb recipe for weight loss: lemon juice, ginger, mint, cold water, and honey
This hybrid blend mimics some of Ozempic’s appetite control benefits naturally, without pharmaceuticals. Be sure to consult your doctor if you have any health conditions before using vinegar regularly.

What is the lemon trick to lose weight?

The “lemon trick” often refers to consuming lemon water or the lemon bomb drink first thing in the morning. The idea is simple: the acidity of lemon juice encourages bile production and primes your digestive system to efficiently process fats. When combined with ginger and mint in the lemon bomb, it becomes a powerful natural remedy that reduces cravings and boosts energy.

Conclusion: Make Lemon Bomb Your Daily Ritual for Lasting Weight Loss

The journey to natural weight loss doesn’t have to involve expensive supplements or extreme diets. With the lemon bomb recipe for weight loss, you have a simple, delicious, and science-backed drink that supports your goals gently and effectively. From boosting digestion and burning fat to keeping cravings under control, this refreshing elixir can truly elevate your daily wellness routine.

If you’re ready to commit to a clean, consistent health habit, there’s no better time to start than now. Begin with one glass each morning, track your progress, and feel the difference in your energy, digestion, and mindset.

If you’re into clean and simple health recipes, follow Brekcakes Recipes on Facebook for daily wellness inspiration and natural remedies.

Explore beautifully curated health-boosting drinks on Brekcakes Recipes on Pinterest and discover your new go-to for feeling great!

Brazilian Mounjaro Recipe Drink for Weight Loss – The Natural Booster You Need

Brazilian Mounjaro recipe drink for weight loss with lemon and ginger

Looking for a delicious and effective way to shed pounds? The Brazilian Mounjaro recipe drink for weight loss is a vibrant, nutrient-packed beverage designed to support your fat-burning goals naturally. With ingredients like butterfly pea flower, lemon juice, ginger, and apple cider vinegar, this drink doesn’t just look stunning—it works.

Whether you’re currently using Mounjaro or searching for a natural Mounjaro recipe drink to complement your routine, this recipe delivers multiple benefits. It’s anti-inflammatory, detoxifying, and aids in weight control by supporting digestion and metabolism. This Brazilian-inspired wellness booster offers a holistic way to approach health and slimming down.

Learn more about gut-friendly ingredients with our pineapple turmeric sauerkraut recipe.

Let’s dive into how this Mounjaro recipe drink for weight loss works and how you can easily make it at home.

Table of Contents

What is a Mounjaro Recipe Drink for Weight Loss?

Understanding the Trend Behind Mounjaro and Weight Loss

If you’ve heard of Mounjaro (tirzepatide), you probably know it’s a prescription medication originally designed for managing type 2 diabetes—but it’s now making waves for its weight loss properties. However, not everyone wants to take pharmaceuticals. That’s where a natural solution like the Mounjaro recipe drink for weight loss comes in.

This trending drink is crafted with health-boosting ingredients that mirror the metabolism-boosting effects of the medication. By using all-natural elements, the Brazilian Mounjaro recipe drink for weight loss gives your body the tools to reduce cravings, support digestion, and burn fat—all without harsh chemicals or drugs.

Even those already on Mounjaro find it helpful to integrate this mounjaro recipe drink for weight loss into their daily routine for added nutritional support.

The Fusion of Brazilian Health Culture and Natural Ingredients

Brazil’s approach to wellness is deeply rooted in herbs and natural remedies. By blending butterfly pea flower, ginger, lemon juice, and apple cider vinegar, the Mounjaro recipe drink for weight loss channels the healing traditions of South America with the power of detox-friendly ingredients.

Unlike artificial drinks loaded with preservatives, this natural beverage fits into your routine effortlessly. It’s not just a detox—it’s a strategy. The bold color of the butterfly pea flower signals antioxidants at work, while the apple cider vinegar helps balance blood sugar and appetite.

When you sip the Mounjaro recipe drink for weight loss, you’re not only nourishing your body—you’re actively working toward your goals with every glass.

Print
clock clock iconcutlery cutlery iconflag flag iconfolder folder iconinstagram instagram iconpinterest pinterest iconfacebook facebook iconprint print iconsquares squares iconheart heart iconheart solid heart solid icon
Brazilian Mounjaro recipe drink for weight loss with lemon and ginger

Brazilian Mounjaro Recipe Drink for Weight Loss


  • Author: Emily Harper
  • Total Time: 7 minutes
  • Yield: 2 servings 1x

Description

A vibrant detox drink made with butterfly pea flowers, lemon juice, ginger, and apple cider vinegar—perfect for natural weight loss.


Ingredients

Scale
  • 500 ml 2 cups water
  • 2 tablespoons dried butterfly pea flowers
  • 1 teaspoon honey
  • 1 teaspoon fresh ginger sliced
  • Juice of 1 lemon
  • 1 tablespoon apple cider vinegar with mother

Instructions

Boil Water:

  • Start by boiling 500 ml of water in a saucepan. If you are adding ginger add it this time. This boiling water step is essential to fully extract the flavors and color from the Butterfly Pea Flowers.
  • Once the water reaches a rolling boil, remove the saucepan from heat.Add in 2 tablespoons of dried Butterfly Pea Flowers. Let them steep for about 10 minutes to ensure a vibrant color and infused flavor.

Strain:

  • Strain the mixture to remove the flowers if you prefer a clear drink. Or, if you like a more rustic presentation, feel free to leave the flowers in the beverage.

Add Flavorings:

  • Stir in 1 tsp honey1 teaspoon lemon juice, and 1 teaspoon apple cider vinegar. Watch as the brilliant blue turns into an alluring purple shade—truly a sight to behold!

Cool and Serve:

  • Serve Hot or Iced For a comforting warm drink, pour it into your favorite mug and enjoy immediately.If you prefer an icy refreshment, allow the liquid to cool slightly. Fill a glass with ice cubes and top it off with your Brazilian Mounjaro Drink

Notes

This recipe makes 2 servings. You can add 1 teaspoon honey per cup. I personally prefer 1/2 teaspoon which works good. 
  • Prep Time: 2 minutes
  • Cook Time: 5 minutes

Nutrition

  • Serving Size: 2
  • Calories: 14kcal
  • Sugar: 3 g
  • Sodium: 1mg
  • Fat: 0.01g
  • Carbohydrates: 3g
  • Protein: 0.1g

Keywords: Mounjaro Recipe Drink for Weight Loss

Core Ingredients of the Brazilian Mounjaro Drink Recipe

Benefits of Butterfly Pea Flower in Weight Management

One of the star ingredients in the Mounjaro recipe drink for weight loss is the vibrant butterfly pea flower. Known for its deep blue hue that transforms into purple with lemon juice, this flower is packed with anthocyanins—natural antioxidants that may support metabolic health and reduce inflammation.

Studies show that butterfly pea flower can help regulate blood sugar levels, reduce cravings, and improve digestion—all essential components of any effective weight loss strategy. Plus, its visually stunning color makes the drink feel like a treat, encouraging consistency in your weight loss routine.

When used in a mounjaro recipe drink for weight loss, it contributes not just flavor and color but real functional support for your body’s detox and fat-burning efforts.

 Ingredients for Mounjaro recipe drink for weight loss

Role of Lemon Juice, Apple Cider Vinegar, and Ginger

These powerhouse ingredients are what truly turn this drink into a functional, weight loss-supporting elixir:

  • Lemon Juice: Adds vitamin C and boosts your body’s natural cleansing process. It also helps balance pH levels, which can contribute to improved digestion and reduced bloating. Combined with butterfly pea flower, it activates a beautiful color change that’s not just visual—it signals a shift in alkalinity.
  • Apple Cider Vinegar (ACV): Perhaps the most iconic ingredient in detox drinks. ACV contains acetic acid, which has been studied for its ability to suppress appetite, reduce insulin spikes, and increase fat burning. In the Brazilian mounjaro recipe drink for weight loss, ACV plays a critical role in enhancing the metabolism-boosting effects.
  • Fresh Ginger: Known for its thermogenic properties, ginger naturally increases body temperature, which can help burn more calories. It’s also anti-inflammatory and aids in digestion—making it an ideal ingredient in any mounjaro recipe drink for weight loss.

These ingredients work in synergy. When combined, they create a drink that doesn’t just taste good—it helps your body burn fat, digest better, and feel energized. It’s a natural solution that aligns with the benefits of Mounjaro, making it the perfect addition to your weight loss plan.

Check out this cottage cheese ice cream for another low-calorie option to complement your journey.

How to Make the Brazilian Mounjaro Recipe Drink

Step-by-Step Preparation Instructions

Making the Brazilian Mounjaro recipe drink for weight loss is as easy as it is rewarding. This refreshing drink requires just a few simple steps and delivers a powerful punch of health benefits.

Ingredients You’ll Need:

  • 500 ml (2 cups) water
  • 2 tablespoons dried butterfly pea flowers
  • 1 teaspoon honey (optional, or adjust to taste)
  • 1 teaspoon fresh ginger, sliced
  • Juice of 1 lemon
  • 1 tablespoon apple cider vinegar (with the mother)

Instructions:

  1. Boil the Water:
    Pour 2 cups of water into a saucepan and bring it to a rolling boil. Add sliced ginger during this stage to help release its full aroma and benefits.
  2. Steep the Butterfly Pea Flowers:
    Remove the pot from heat and add 2 tablespoons of dried butterfly pea flowers. Let them steep for around 10 minutes. This process enhances the flavor and ensures that brilliant blue hue develops.
  3. Strain the Mixture:
    If you prefer a smoother drink, strain out the flowers and ginger slices. However, some people enjoy the rustic aesthetic and nutritional boost from leaving them in.
  4. Add the Final Touches:
    Mix in the lemon juice, honey (if using), and apple cider vinegar. Watch the blue tea magically turn purple—thanks to the lemon’s acidity interacting with the butterfly pea flower.
  5. Serve It Up:
    This mounjaro recipe drink for weight loss can be enjoyed hot or iced. For a warm, soothing drink, pour it into your favorite mug. For a cold, detoxifying refreshment, let the tea cool, pour over ice, and enjoy.

Tips for Maximizing Health Benefits

To get the most out of your Brazilian Mounjaro recipe drink for weight loss, keep these pro tips in mind:

  • Drink on an Empty Stomach: The drink’s digestion-supporting ingredients are most effective first thing in the morning or 30 minutes before meals.
  • Stay Consistent: Results come with consistency. Add it to your daily routine, ideally at the same time each day.
  • Pair with a Balanced Diet: This isn’t a miracle solution on its own. Combine it with healthy meals and exercise for the best weight loss results.
  • Adjust Sweetness: If you’re cutting sugar, you can reduce or eliminate honey. The lemon and vinegar provide plenty of flavor on their own.

This recipe is proof that healthy doesn’t have to mean boring. It’s colorful, aromatic, and packed with ingredients that promote real change. You can also batch brew it and store in the fridge for up to 3 days.

Don’t miss our zucchini breadwich for a high-fiber snack that pairs perfectly with this detox drink.

Nutritional Breakdown of the Mounjaro Drink

Calories and Macros per Serving

The Brazilian Mounjaro recipe drink for weight loss is incredibly low in calories while being high in health benefits. Each serving is crafted to give your body nutrients without sabotaging your caloric intake. Here’s a quick breakdown of its nutritional profile for 2 servings:

NutrientPer Serving
Calories14 kcal
Carbohydrates3 g
Sugars3 g
Fiber0.1 g
Protein0.1 g
Fat0.01 g
Sodium1 mg
Potassium15 mg
Vitamin C1 mg
Vitamin A1 IU
Calcium2 mg
Iron0.1 mg

As you can see, this drink is virtually calorie-free while still providing trace amounts of essential nutrients and antioxidants. It’s perfect for anyone tracking macros or looking to maintain a caloric deficit without feeling deprived.

Vitamins and Minerals Explained

  • Vitamin C: From fresh lemon juice, supports immune health and skin clarity while improving iron absorption. It’s also crucial for collagen production.
  • Potassium: Essential for balancing fluids in the body and preventing bloating—making it a great ally in weight loss drinks like this one.
  • Iron & Calcium: Trace amounts that contribute to overall energy and muscle function. Even in small doses, every bit helps in the long-term.

One major benefit of the Mounjaro recipe drink for weight loss is that it delivers functional hydration. You’re not just drinking water—you’re replenishing your body with ingredients that help it detox, metabolize fat, and feel energized.

There’s no added sugar (unless you choose to include honey), no artificial preservatives, and no unnecessary calories. It’s the perfect sidekick for anyone on a weight loss journey, whether you’re using the Mounjaro medication or going the all-natural route.

Discover great ideas like our arugula sauerkraut salad for more nutrient-dense meals that keep you feeling light and satisfied.

Health Benefits and Weight Loss Effects

How This Drink Supports Fat Metabolism

The Brazilian Mounjaro recipe drink for weight loss isn’t just pretty to look at—it works on a biological level to help your body burn fat more efficiently. Here’s how:

  • Apple cider vinegar contains acetic acid, which has been studied for its ability to boost fat oxidation and increase insulin sensitivity. This makes your body more efficient at converting food into energy instead of storing it as fat.
  • Lemon juice helps your liver detoxify, which is vital for efficient fat metabolism. A sluggish liver can slow down your entire metabolic rate.
  • Ginger acts as a natural thermogenic—meaning it slightly increases your body temperature, helping you burn more calories even at rest.

Together, these ingredients make this Mounjaro recipe drink for weight loss a metabolic powerhouse, especially when consumed before meals or workouts.

Brewing Brazilian Mounjaro drink for weight loss

Detoxification and Appetite Control Effects

Beyond fat burning, the drink also plays a significant role in cleansing your system and controlling hunger, which are both essential for sustainable weight loss.

  • The butterfly pea flower is rich in antioxidants and flavonoids, helping your body fight inflammation and eliminate toxins.
  • Apple cider vinegar slows down digestion, keeping you feeling full longer, and helps regulate blood sugar spikes that often lead to cravings.
  • Lemon and ginger work together to soothe your gut and improve nutrient absorption, reducing bloating and supporting a flat stomach.

Many people using this Mounjaro recipe drink for weight loss report not only weight loss but also clearer skin, better digestion, and fewer energy crashes throughout the day.

It’s not just about dropping pounds—it’s about supporting your body’s natural functions so you lose weight in a sustainable, healthy way.

Looking for inspiration? Try our lemon dump cake with poppy seeds—a light dessert that won’t derail your goals.

The Science Behind Mounjaro’s Weight Loss Support

What is Mounjaro’s Active Ingredient and How It Helps

The medication Mounjaro (tirzepatide) works through GLP-1 and GIP receptor agonism, which means it mimics gut hormones that help regulate appetite and blood sugar levels. By stimulating these receptors, Mounjaro:

  • Reduces hunger and calorie intake
  • Slows gastric emptying, so you feel full longer
  • Improves insulin sensitivity, lowering fat storage

Although this Brazilian Mounjaro recipe drink for weight loss doesn’t contain tirzepatide, it uses natural ingredients that activate similar effects on digestion, metabolism, and appetite.

For example, apple cider vinegar can blunt blood sugar spikes, ginger boosts thermogenesis, and lemon juice aids in digestion—mimicking some mechanisms of Mounjaro without pharmaceutical compounds.

This makes the drink an excellent natural alternative or companion to the medication. If you’re already using Mounjaro, the drink won’t interfere—instead, it enhances the process by supporting your body with clean, plant-based nutrients.

Combining Mounjaro Medication with the Drink for Better Results

If you’re currently prescribed Mounjaro, adding this drink to your daily routine can amplify your results naturally. Here’s how:

  • Morning Kickstart: Drinking it first thing in the morning can set the tone for your digestive system and reduce unnecessary snacking.
  • Pre-Meal Strategy: Drinking it 20 minutes before lunch or dinner helps control portion sizes and reduce post-meal blood sugar spikes.
  • Hydration with Benefits: Unlike plain water, this beverage hydrates while providing bioactive compounds that aid metabolism.

It’s important to note: this Mounjaro recipe drink for weight loss isn’t a replacement for your medication—but it is a valuable addition. Think of it as a natural metabolic ally that fits effortlessly into your wellness plan.

By understanding how Mounjaro works and using ingredients that mimic or support those effects, you’re stacking the deck in your favor. It’s a safe, enjoyable way to accelerate your progress.

Don’t miss our hot honey ground beef bowl—a high-protein option that pairs well with your weight loss journey.

Best Times and Ways to Consume the Drink

When to Drink for Optimal Fat-Burning

Timing matters when using the Brazilian Mounjaro recipe drink for weight loss to support your health goals. To maximize its metabolism-boosting and appetite-suppressing effects, here are the best times to drink it:

  • First thing in the morning (fasted): Drinking it on an empty stomach jumpstarts digestion, helps detoxify the liver, and curbs mid-morning cravings.
  • 20–30 minutes before meals: Especially before lunch or dinner, this drink can reduce hunger levels, leading to smaller portion sizes and fewer calories consumed.
  • Before workouts: The thermogenic effects of ginger and the hydration boost from this drink make it an excellent pre-exercise choice to elevate energy and fat-burning potential.
  • Evening detox: Sipping it warm in the evening can aid digestion, especially if you’ve had a heavy meal or want to reduce late-night snacking.

Since this Mounjaro recipe drink for weight loss is non-caffeinated, it’s also safe to drink at night without disrupting your sleep cycle.

Iced Mounjaro recipe drink for weight loss post-workout

Hot vs Iced: When and Why It Matters

How you serve your mounjaro recipe drink for weight loss can influence how your body responds:

VersionBenefitsBest Time
HotSoothes digestion, ideal in colder monthsNight or post-meal
IcedRefreshing, boosts hydrationMorning or pre-workout

Hot version: Ideal if you’re using it to unwind at night or need relief from bloating. Warm liquids are gentler on the stomach and may improve nutrient absorption.

Iced version: Perfect for warmer days or before a workout. Cold drinks can help wake you up and refresh your system without added stimulants.

The key is consistency, not temperature. Whether you go hot or cold, daily use is what delivers results. The adaptability of this mounjaro recipe drink for weight loss makes it easy to incorporate into your lifestyle, no matter the season or schedule.

Learn more about creative weight-loss strategies in our trader joe’s lobster pasta article—great for high-protein meal planning.

Comparing the Mounjaro Drink to Other Natural Remedies

How It Stacks Up Against Other Miracle Drinks

The wellness world is full of so-called “miracle drinks,” but few offer the balanced blend of benefits found in the Brazilian Mounjaro recipe drink for weight loss. Let’s break down how it compares to other popular options:

Drink TypeKey IngredientsProsCons
Mounjaro DrinkButterfly pea flower, lemon, ginger, ACVBoosts metabolism, supports digestion, antioxidant-richRequires specialty ingredients
Apple Cider Vinegar ShotACV, waterGreat for blood sugar and appetiteHarsh on the stomach if undiluted
Lemon WaterLemon, warm waterHydrating, supports digestionMild fat-burning benefits
Green TeaCatechins, caffeineEnhances metabolism, boosts energyContains caffeine, can disrupt sleep
Celery JuiceCelery stalksAnti-inflammatory, gut-friendlyTime-consuming to prepare, strong taste

The mounjaro recipe drink for weight loss stands out because it combines multiple functional ingredients, offering a more comprehensive weight loss solution than most other single-ingredient drinks.

Where green tea offers energy, and lemon water aids hydration, the Brazilian drink brings it all together—appetite control, detoxification, fat metabolism, and a visually stunning appearance.

Pros and Cons of Each Method

Like any remedy, each drink has strengths and limitations. Here’s what sets the Brazilian Mounjaro drink apart:

Pros:

  • Combines multiple natural weight-loss ingredients in one
  • No caffeine, so it’s safe day or night
  • Can be enjoyed hot or iced
  • Enhances digestion and metabolism
  • Visually appealing, making it enjoyable and habit-forming

Cons:

  • May require online shopping for butterfly pea flower
  • Taste may be strong for beginners (can be adjusted with honey)

Compared to single-ingredient trends, the Mounjaro recipe drink for weight loss takes a balanced approach—offering real, sustainable benefits without over-reliance on one compound.

You’re not just following a fad. You’re building a wellness habit backed by botanical wisdom and smart nutrition.

Conclusion

The Brazilian Mounjaro recipe drink for weight loss is more than just a pretty drink—it’s a functional, natural aid in your journey to better health. By blending butterfly pea flower, lemon juice, apple cider vinegar, and ginger, this beverage brings together powerful ingredients known to support metabolism, detoxification, and appetite control.

Whether you’re currently taking Mounjaro or simply seeking a natural alternative, this recipe provides a sustainable way to amplify your results. It’s low in calories, easy to make, and adaptable to any routine—hot or iced, morning or evening.

Adding this drink to your daily regimen can help build healthy habits that support real, lasting weight loss. Give it a try for 7 days, track how you feel, and adjust the ingredients to your taste. Health doesn’t have to be bland—it can be bold, beautiful, and effective.

Discover great ideas like our zucchini breadwich and cottage cheese ice cream to pair with this drink for a balanced weight loss plan.

Frequently Asked Questions (FAQs)

What is a natural Mounjaro drink?

A natural Mounjaro drink refers to a beverage that mimics the weight-loss effects of the Mounjaro medication (tirzepatide) using all-natural, plant-based ingredients. The Brazilian Mounjaro recipe drink for weight loss is one such example. Made with butterfly pea flower, lemon juice, apple cider vinegar, and ginger, it supports appetite suppression, improves digestion, and boosts metabolism—all without pharmaceutical compounds.
This drink provides a holistic, stimulant-free way to assist fat-burning efforts, and is ideal for people who want natural support for their weight loss goals.

What is the miracle drink for weight loss?

While there’s no magic bullet, many consider the Brazilian Mounjaro recipe drink for weight loss to be a miracle due to its potent blend of metabolism-enhancing and detoxifying ingredients. Unlike fad drinks that rely on caffeine or excessive laxatives, this recipe offers sustained benefits without harsh side effects.
Its combination of antioxidants, acetic acid, and digestive enhancers make it a top-tier natural remedy for weight management, especially when used consistently.

How to speed up weight loss on Mounjaro?

If you’re taking Mounjaro, you can accelerate your results with healthy lifestyle strategies, including:
Drinking the Mounjaro recipe drink for weight loss daily to support digestion and appetite control
Following a high-protein, whole-food diet
Staying hydrated and limiting sugary drinks
Incorporating daily movement or light exercise
Getting adequate sleep and managing stress
Adding this drink to your routine may enhance insulin sensitivity, reduce cravings, and help you feel fuller longer—all key elements to faster, healthier weight loss on Mounjaro.

What is the active ingredient in Mounjaro for weight loss?

The active ingredient in Mounjaro is tirzepatide, a dual GIP and GLP-1 receptor agonist. It works by mimicking gut hormones that regulate blood sugar and hunger. This leads to:
Reduced appetite
Improved insulin function
Slower digestion
Increased satiety
While the Brazilian Mounjaro recipe drink for weight loss doesn’t contain tirzepatide, it offers natural support by encouraging similar metabolic responses with ingredients like ginger, apple cider vinegar, and lemon.
Looking for another clean-eating option? Don’t miss our pineapple turmeric sauerkraut.

If you’re into clean and simple health recipes, follow Brekcakes Recipes on Facebook for daily wellness inspiration and natural remedies.

Explore beautifully curated health-boosting drinks on Brekcakes Recipes on Pinterest and discover your new go-to for feeling great!

Viral Hot Honey Ground Beef Bowl Recipe: A Protein-Packed Dinner You’ll Crave

Close-up of Hot Honey Ground Beef Bowl with sweet potatoes and hot honey

If you’ve been scrolling through social media lately, chances are you’ve seen the buzz around the Hot Honey Ground Beef Bowl. This viral recipe has won over foodies, fitness fans, and home cooks alike — and for good reason. It’s high-protein, flavor-packed, and shockingly easy to throw together. With tender roasted sweet potatoes, savory seasoned ground beef, cool and creamy cottage cheese, slices of ripe avocado, and a spicy-sweet drizzle of hot honey, this dish hits every taste bud.

What makes this bowl even more impressive is how effortlessly it blends health and indulgence. Whether you’re looking for meal prep ideas, a new dinner obsession, or just want to hop on the latest food trend — this recipe delivers. Check out this refreshing twist on greens for pairing inspiration: Arugula Sauerkraut Salad.

Let’s dig into the origins, flavors, and steps behind the viral Hot Honey Ground Beef Bowl.

Print
clock clock iconcutlery cutlery iconflag flag iconfolder folder iconinstagram instagram iconpinterest pinterest iconfacebook facebook iconprint print iconsquares squares iconheart heart iconheart solid heart solid icon
Close-up of Hot Honey Ground Beef Bowl with sweet potatoes and hot honey

Viral Hot Honey Ground Beef Bowl


  • Author: Christine McMichael
  • Total Time: 35 minutes
  • Yield: 4 servings 1x

Description

This Hot Honey Ground Beef Bowl is the viral dinner you need to try. Sweet, spicy, creamy, and done in 35 minutes. Who’s making this tonight?


Ingredients

Scale
  • 4 ½ cups cubed sweet potatoes

  • 1 lb lean ground beef

  • 2 cups low-fat cottage cheese

  • 1 avocado

  • 1 tbsp tomato paste

  • 1 tbsp taco seasoning

  • 4 tbsp hot honey

  • Salt, pepper, cinnamon to taste


Instructions

    1. Preheat oven to 425°F. Roast sweet potatoes with oil, salt, pepper, cinnamon for 30 mins.

    2. Cook beef with tomato paste and taco seasoning.

    3. Assemble bowls with potatoes, beef, cottage cheese, avocado, and hot honey drizzle.


Notes

Great for meal prep. Add greens or swap proteins as desired.

  • Prep Time: 5 minutes
  • Cook Time: 30 minutes
  • Cuisine: American

Nutrition

  • Serving Size: 4 bowls
  • Calories: 515 kcal

Keywords: HotHoneyBeef

Table of Contents

What Is a Hot Honey Ground Beef Bowl?

The Origin of the Viral Hot Honey Beef Bowl Trend

The internet loves a good food trend, and the Hot Honey Ground Beef Bowl exploded across TikTok and Instagram thanks to its vibrant colors, drool-worthy textures, and simple prep. It first gained traction when creators showcased how it delivers over 40 grams of protein with ingredients most people already have at home. From fitness influencers to busy moms, everyone jumped on the hype.

What makes this bowl viral isn’t just how good it looks — it’s how ridiculously good it tastes. The combination of spicy, sweet, creamy, and savory flavors makes each bite a full-on experience. Users have recreated their own versions, customizing toppings or swapping proteins, making it one of the most flexible bowl recipes online.

Why This Bowl Has Taken Over Social Media

Let’s be honest: food trends thrive when they’re both aesthetic and satisfying. This bowl checks both boxes. It’s also:

  • Quick to make (ready in 35 minutes).
  • Perfect for meal prep — batch roast the sweet potatoes and cook beef ahead.
  • Balanced in macros — ideal for high-protein diets or intuitive eaters.

On top of that, this bowl doesn’t require any fancy techniques. You roast, sauté, assemble, and drizzle. That’s it. Its shareability, simplicity, and craveable taste made it skyrocket in popularity. And if you’re already a fan of fusion recipes, don’t miss this sauerkraut twist: Pineapple Turmeric Sauerkraut.

Ingredients Breakdown – Flavor Meets Nutrition

Main Components: Beef, Sweet Potatoes, Cottage Cheese & More

The heart of the Hot Honey Ground Beef Bowl lies in its simple, yet nutrient-rich ingredients. Each one plays a specific role, creating a perfect harmony of flavor, texture, and health benefits.

Ground beef in skillet for hot honey bowl

Let’s take a closer look at what goes into a truly satisfying Hot Honey Ground Beef Bowl:

IngredientPurposeFlavor ProfileHealth Benefit
Lean Ground BeefMain proteinSavory, richHigh in protein, iron, and B vitamins
Sweet PotatoesBase starchSweet, earthyPacked with fiber and vitamin A
Low-Fat Cottage CheeseCreamy contrastMild, tangyExcellent protein source, low fat
AvocadoHealthy fat topperCreamy, smoothFull of heart-healthy fats and potassium
Hot HoneyFlavor enhancerSweet with a kickAdds spice and natural sweetness
Tomato Paste & SeasoningBeef seasoningUmami and smokyRich in antioxidants and flavor depth
Salt, Pepper, CinnamonRoasting blendBalanced seasoningEnhances sweet and savory balance

Each bowl is loaded with bold flavor and real nutrients — a major reason why the Hot Honey Ground Beef Bowl is more than just a trend. It satisfies cravings while supporting balanced eating habits.

Want to explore more creative recipes? Check out this bold plant-based pick: Zucchini Breadwich.

Nutritional Value: Calories, Protein & Macros Overview

This isn’t just about taste — the Hot Honey Ground Beef Bowl offers impressive nutrition in every serving:

  • Calories: 515 kcal
  • Protein: 42g
  • Carbohydrates: 56g
  • Fat: 14g
  • Fiber: 8g
  • Sugar: 28g

This balanced bowl delivers everything you need in a meal:

  • Muscle-building protein
  • Slow-digesting carbs for energy
  • Healthy fats for satiety
  • A rainbow of micronutrients like Vitamin A, Vitamin C, iron, and calcium

That’s why fitness experts, busy parents, and food lovers alike keep coming back to this Hot Honey Ground Beef Bowl — it’s the ideal mix of comfort and nutrition in one easy dinner.

And if you’re in the mood for a creamy post-dinner treat, don’t miss our refreshing Cottage Cheese Ice Cream.

Step-by-Step Recipe Instructions

Roasting the Sweet Potatoes Perfectly

The base of your Hot Honey Ground Beef Bowl starts with caramelized, golden sweet potatoes. Here’s how to get them just right:

  1. Preheat your oven to 425°F.
  2. Cube about 4½ cups of sweet potatoes (around 1½ pounds).
  3. Spread them on a large baking sheet, sprayed with avocado oil.
  4. Season evenly with:
    • ½ tsp salt
    • ¼ tsp black pepper
    • ¼ tsp ground cinnamon
  5. Toss everything until well-coated.
  6. Roast for 30 minutes, flipping halfway to ensure crispy edges.

Pro Tip: The cinnamon brings out the natural sweetness, complementing the hot honey later in the bowl.

Cooking the Ground Beef with Flavor Depth

While your sweet potatoes roast, let’s tackle the protein centerpiece of your Hot Honey Ground Beef Bowl.

  1. Heat a non-stick skillet over medium-high heat.
  2. Add 1 pound of lean ground beef.
  3. Stir in:
    • 1 tablespoon tomato paste
    • 1 tablespoon taco seasoning
  4. Cook until the beef is browned and fully cooked through, stirring occasionally to keep it juicy and flavorful.

This combo gives the beef a savory, spiced profile that balances perfectly with the sweet potatoes and hot honey.

Final Assembly: Layering Textures and Taste

Here’s where the magic happens. Once your ingredients are prepped, it’s time to build your Hot Honey Ground Beef Bowl.

  1. In each bowl, start with a generous layer of roasted sweet potatoes.
  2. Add a scoop of the seasoned ground beef.
  3. Top with:
    • ½ cup low-fat cottage cheese
    • Slices from ¼ avocado
    • A tablespoon of hot honey drizzled over everything

Every bite gives you warm, sweet, creamy, and spicy — a flavor experience that’s been driving people wild online.

Looking for inspiration? Try this globally inspired fusion bowl: Trader Joe’s Lobster Pasta.

Why Hot Honey Works So Well With Beef

The Science of Sweet & Savory Pairings

If you’ve ever wondered why the Hot Honey Ground Beef Bowl tastes so irresistible, it all comes down to flavor contrast. Combining spicy-sweet hot honey with savory ground beef isn’t random — it’s a strategic culinary move grounded in science.

Here’s how the contrast works:

  • Sweetness (from the honey) balances the umami and saltiness of the beef.
  • Heat (from chili in hot honey) stimulates taste buds and amplifies flavor intensity.
  • When paired, these opposites enhance each other, making every bite pop.

This is the same reason why pineapple goes on pizza, or why people drizzle maple syrup on bacon. It’s about balance — and in this case, the Hot Honey Ground Beef Bowl nails it.

According to culinary experts, when you combine protein-rich meat with a hint of natural sugar, it helps round out mouthfeel and adds complexity. The subtle spice also activates salivary glands, intensifying the overall eating experience.

Hot honey isn’t just a trend — it’s become a pantry staple in creative kitchens across America. Its popularity skyrocketed because it delivers a dual-layered flavor profile in one simple ingredient.

Here are some of the top modern uses of hot honey:

  • Pizza drizzle: Adds a spicy-sweet touch to cheese and cured meats.
  • Fried chicken glaze: A sticky finish that balances the crisp.
  • Charcuterie boards: A dip or drizzle that complements cheeses and meats.
  • Roasted vegetables: Enhances sweetness in root veggies and squash.
  • Bowls and salads: As seen in the viral Hot Honey Ground Beef Bowl, where it ties all components together.

And it’s not limited to savory dishes. Hot honey is now being added to cocktails, desserts, and even baked goods for that extra punch.

Pro tip: Warm your hot honey slightly before drizzling it onto your bowl — it spreads better and melts into every layer of the dish.

Looking for an inventive sweet-and-savory idea? Discover great ideas like our Lemon Dump Cake with Poppy Seeds to finish your meal on a balanced note.

How to Customize Your Hot Honey Ground Beef Bowl

Add Veggies: Spinach, Corn, Broccoli & More

One of the best things about the Hot Honey Ground Beef Bowl is how easily it adapts to your cravings, dietary needs, or what’s left in your fridge. While the base combo is unbeatable, adding vegetables turns this meal into a full-blown nutrition powerhouse.

Here are some simple add-ons that blend seamlessly with the core flavors:

  • Sautéed Spinach – Adds iron and pairs well with the creamy cottage cheese
  • Roasted Broccoli – Crunchy and hearty, balancing out the tender sweet potatoes
  • Corn Kernels – Sweetness that complements the hot honey
  • Red Bell Peppers – Adds color, crunch, and vitamin C
  • Shredded Cabbage or Kale – Boosts fiber and texture
  • Pickled Red Onions – Offers acidity to cut through the richness

Veggies also introduce more fiber and antioxidants, helping you stay full longer without adding a lot of calories. For meal preppers and busy eaters, it’s an easy way to stretch the Hot Honey Ground Beef Bowl for multiple days.

Looking for another fermented veggie option to level up your bowls? Don’t miss our Pineapple Turmeric Sauerkraut.

Custom Hot Honey Ground Beef Bowl with vegetables

Alternate Proteins: Chicken, Turkey, or Vegan Swaps

Not a beef fan? You can still enjoy the essence of the Hot Honey Ground Beef Bowl by switching up the protein.

Here are some tasty alternatives:

  • Ground Turkey – Lower in fat, still packed with protein
  • Ground Chicken – Lean and neutral; soaks up flavor from hot honey beautifully
  • Shredded Rotisserie Chicken – A great time-saving option
  • Vegan Crumbles – Plant-based proteins that mimic the texture of beef
  • Lentils or Chickpeas – Whole food, high-fiber alternatives for vegans

Just keep the seasoning strong and don’t skimp on the hot honey. That spicy-sweet finish is what ties every bowl together.

Pro tip: If you’re using vegan or low-fat proteins, consider adding extra avocado or a splash of olive oil to retain that satisfying mouthfeel.

Whether you’re feeding picky eaters or adapting to diet changes, the Hot Honey Ground Beef Bowl proves that flexibility and flavor can absolutely go hand in hand.

Is the Hot Honey Beef Bowl Healthy?

Macronutrient & Micronutrient Breakdown

At first glance, the Hot Honey Ground Beef Bowl might seem indulgent — sweet potatoes, beef, honey, and avocado? But when you break it down, it’s actually one of the most balanced meals you can eat. It’s loaded with whole-food ingredients that support energy, muscle growth, and satiety — especially for active lifestyles.

Here’s the macro breakdown again (per bowl):

NutrientAmount per Serving
Calories515 kcal
Protein42 grams
Carbohydrates56 grams
Fat14 grams
Fiber8 grams
Sugar28 grams

Protein Power: With 42 grams of protein, this bowl hits your muscle-repair and recovery goals hard. It’s ideal for post-gym meals or those trying to stay fuller, longer.

Healthy Fats: Avocado and cottage cheese deliver essential monounsaturated fats and omega-3s that support brain function and heart health.

Smart Carbs: Sweet potatoes are a low-glycemic carb full of fiber, vitamin A, and potassium. They stabilize blood sugar and help maintain steady energy.

Natural Sugars: The hot honey adds a touch of sweetness, but when used in moderation (1 tablespoon), it’s just enough to elevate flavor without overloading on sugar.

So yes — when made with lean ground beef, moderate honey, and portion control, the Hot Honey Ground Beef Bowl is not just tasty — it’s a nutrient-rich, well-rounded, and satisfying meal.

Want to balance the meal with a clean, crisp veggie side? Try our Arugula Sauerkraut Salad — it’s the perfect tangy complement.

Health Benefits of Each Ingredient

Let’s break down the benefits by ingredient:

  • Ground Beef: High in iron, zinc, and B12 for energy and red blood cell production
  • Sweet Potatoes: Boost vision, immune support, and gut health
  • Cottage Cheese: Excellent source of casein protein for sustained satiety
  • Avocado: Heart-healthy fats and natural anti-inflammatory properties
  • Hot Honey: Natural antimicrobial benefits from honey, and a metabolism boost from chili

This isn’t just a trendy dinner. It’s a smart one.

Craving dessert that won’t derail your goals? Discover our protein-packed Cottage Cheese Ice Cream.

Meal Prep Tips for Busy Weeks

Make-Ahead Tips and Storage Recommendations

The beauty of the Hot Honey Ground Beef Bowl is that it’s not just delicious — it’s meal-prep gold. With minimal effort, you can prep multiple servings and have lunch or dinner ready to go for the next few days.

Here’s how to make the most of your prep time:

  1. Roast sweet potatoes in bulk.
    Use two baking sheets and double your usual batch. Once cooled, store them in airtight containers in the fridge for up to 4 days.
  2. Cook a larger batch of seasoned ground beef.
    After browning, allow the meat to cool, then portion into containers. It freezes well too — just thaw and reheat when needed.
  3. Use compartmentalized containers.
    Keep ingredients separate to avoid soggy textures, especially with avocado and cottage cheese. Store hot honey separately for drizzling at the last minute.
  4. Prep your avocado smartly.
    If you need to slice avocados ahead of time, brush with lemon juice and keep them tightly sealed to slow browning.
  5. Cottage cheese tip:
    Portion it into small containers and keep chilled. It’s best added fresh right before eating.

Quick Reheat Methods That Retain Texture and Flavor

Meal prep only works if your leftovers taste just as good as the original. Follow these reheating tricks to keep your Hot Honey Ground Beef Bowl fresh and satisfying:

IngredientBest Reheat MethodTip
Ground BeefMicrowave or stovetop skilletAdd a splash of broth to rehydrate
Sweet PotatoesOven or air fryerReheat at 375°F for 5–7 minutes
Hot HoneyMicrowave for 10 secondsHelps with an even drizzle
Whole Bowl (minus cold toppings)Microwave with lid slightly openAdd avocado and cottage cheese after heating

Meal prepping the Hot Honey Ground Beef Bowl means you’ll never have to wonder what’s for dinner again. It’s a fast, flavor-packed solution that doesn’t get old, even on day four.

Looking for another prep-friendly idea that blends sweet and savory? Don’t miss our unique Zucchini Breadwich. It’s as creative as it is convenient.

Serving Ideas and Pairings

Perfect Sides to Complement This Bowl

The Hot Honey Ground Beef Bowl is a complete meal on its own, but pairing it with the right side dishes can elevate it even further — especially for gatherings or family dinners.

Here are some winning side pairings:

  • Simple Green Salad: A light arugula or spring mix salad with lemon vinaigrette balances out the richness of the bowl.
  • Roasted Veggies: Think carrots, Brussels sprouts, or asparagus tossed in olive oil and garlic — easy and flavorful.
  • Brown Rice or Quinoa: If you want to stretch your bowl further or make it even more filling, grains make a great companion.
  • Soup Starter: A light veggie or broth-based soup complements the hearty textures of the bowl.

The goal is to keep your side light and fresh, allowing the bold, spicy-sweet flavor of the Hot Honey Ground Beef Bowl to take center stage.

Need a fresh tangy side to cut through the richness? Try our Arugula Sauerkraut Salad for a crisp contrast.

Ideal Drinks and Sauces to Serve With It

Great meals become unforgettable when paired with the right drink. The flavor-packed nature of the Hot Honey Ground Beef Bowl begs for a refreshing, palate-cleansing drink on the side.

Drink Pairing Ideas:

  • Citrus-Infused Water – Lemon or grapefruit slices keep things crisp.
  • Sparkling Water with Lime – The fizz helps cut through the richness.
  • Iced Green Tea – Adds antioxidants while refreshing the palate.
  • Light Lager or Wheat Beer – For a more casual dinner setting.

Optional Sauce Add-ons:
Want to amp up your flavor game? Try these drizzle options:

Sauce IdeaFlavor Boost
Greek Yogurt SauceCooling & tangy
Garlic AioliRich & creamy
Chili Lime SauceZesty & spicy
Avocado-Cilantro CremaHerbaceous & smooth

These small touches can turn your Hot Honey Ground Beef Bowl from “wow” to “where has this been all my life?”

Need dessert to follow? Don’t miss our sweet-meets-healthy Lemon Dump Cake with Poppy Seeds. It’s the perfect finale to this bold meal.

Meal prep containers with hot honey ground beef bowls

What People Are Saying – Reviews & Reactions

Online Reviews from Food Bloggers and Influencers

The internet hasn’t stopped raving about the Hot Honey Ground Beef Bowl — and with good reason. Influencers across TikTok, YouTube, and Instagram have been recreating and rating this viral recipe, often calling it the “ultimate high-protein comfort food.”

Here’s what some of them are saying:

  • @fitfoodieashley (Instagram):
    “This bowl is unreal. I meal prepped it for the week and I’m still not tired of it. The hot honey just takes it to another level!”
  • @cleanplatechef (TikTok):
    “If you’re looking for a dinner that hits sweet, spicy, and savory in one bite, this is it. Also, 42 grams of protein?! YES.”
  • @homecookinghaley (YouTube):
    “It’s fast, macro-friendly, and so flavorful. I’ve tried it with ground turkey and it was still amazing. Definitely a new staple in my kitchen.”

These real-world reactions reflect what makes the Hot Honey Ground Beef Bowl such a hit: flavor, flexibility, and serious meal prep value.

Social Media Praise and Feedback Highlights

Social platforms are bursting with user-generated versions of this recipe. Hashtags like #hothoneybeefbowl, #viralbeefbowl, and #groundbeefdinner have collected millions of views.

Here’s how people are reacting:

  • 🔥 “This recipe SLAPS! I was skeptical about cottage cheese but it works!”
  • 🥑 “Hot honey + avocado = game changer. I’m hooked.”
  • 🕒 “Took 35 minutes to make and I’m obsessed. Adding this to my weekly lineup.”
  • 🍽️ “Made this for my boyfriend and he asked for seconds. That NEVER happens.”

Food lovers aren’t just trying this bowl — they’re sharing it, tweaking it, and turning it into their go-to dinner. From fitness communities to foodie moms, the Hot Honey Ground Beef Bowl has secured its spot as one of the top viral meals of the year.

Want to see how easy it is to whip up trendy dishes that taste gourmet? Don’t miss our Trader Joe’s Lobster Pasta for another viral-worthy meal idea.

Conclusion: Why the Hot Honey Ground Beef Bowl Belongs in Your Weekly Meal Rotation

The Hot Honey Ground Beef Bowl isn’t just another viral trend — it’s a flavorful, nutrient-rich, and unbelievably satisfying meal that lives up to the hype. Whether you’re looking for a high-protein dinner, a customizable meal-prep option, or a way to wow your tastebuds in under 40 minutes, this bowl checks every box.

From the sweet caramelized edges of roasted sweet potatoes to the bold seasoning of ground beef, the cool creaminess of cottage cheese, and that final sticky-spicy drizzle of hot honey — this recipe is about balance. It’s craveable, practical, and endlessly adaptable.

So if you’re on the hunt for your next go-to dinner, trust the internet for once — the Hot Honey Ground Beef Bowl is worth every bite.

Want to explore more game-changing recipes? Discover our fresh take on fermented fusion with Pineapple Turmeric Sauerkraut.

Frequently Asked Questions (FAQ)

What is in a viral hot honey beef bowl?

A viral hot honey beef bowl is a balanced, flavorful dish made with roasted sweet potatoes, seasoned ground beef (usually with taco seasoning and tomato paste), creamy low-fat cottage cheese, avocado slices, and a generous drizzle of hot honey. Each component adds a unique texture and taste — from spicy to sweet, creamy to hearty — making this bowl the perfect mix of comfort and nutrition.

How to make the viral hot honey bowl?

Making the Hot Honey Ground Beef Bowl is quick and beginner-friendly. Here’s the process:
Roast cubed sweet potatoes with salt, pepper, and cinnamon at 425°F for 30 minutes.
While roasting, cook lean ground beef with taco seasoning and tomato paste in a skillet.
Assemble your bowl: roasted sweet potatoes on the bottom, followed by ground beef, cottage cheese, avocado slices, and finish with a warm drizzle of hot honey.
Done in just 35 minutes — and every bite is flavor-packed!

Why do people put honey on beef?

People use honey on beef because it enhances flavor through contrast. The sweetness of honey balances the savory and umami elements in beef, creating a more dynamic, delicious bite. When it’s hot honey, that sweet-and-spicy combo heightens the beef’s flavor even more, giving each bite a kick and a caramelized edge.

Is a bowl of ground beef healthy?

Yes — when done right, a bowl of ground beef like the Hot Honey Ground Beef Bowl can be very healthy. With lean beef, nutrient-dense add-ons like sweet potatoes, avocado, and cottage cheese, and minimal added sugars (from hot honey), it becomes a balanced, high-protein, whole-food meal. It’s also naturally gluten-free and easy to customize for various dietary goals.

If you enjoyed this recipe, I’d love to share more with you—feel free to visit me over on Facebook or Pinterest, where I post stories, seasonal ideas, and my favorite family recipes straight from my kitchen to yours.

Arugula Sauerkraut Salad: A Bold, Gut-Friendly Superfood You’ll Crave

Fresh arugula sauerkraut salad with berries and goat cheese

Are you tired of the same old leafy salads? Looking to punch up your meal with something fresh, tart, and surprisingly gut-healthy? Enter the Arugula Sauerkraut Salad—a flavor-packed creation loaded with probiotics, antioxidants, and that perfect balance of sweet, tangy, and savory.

This salad blends peppery arugula, fermented sauerkraut, sweet berries, crunchy pistachios, and a creamy honey mustard dressing. It’s perfect as a side dish or a complete meal with added protein like grilled chicken or tofu. Don’t miss our guide to power-packed greens recipes if you love nutrient-rich meals.

In this article, you’ll learn how to build this salad from scratch, modify it to your taste, and even store it for meal prepping. We’ll answer some common FAQs and dive into dressing tips and pairing ideas. Let’s get started with what makes this salad so powerful and delicious.

Introduction to Arugula Sauerkraut Salad

What Is an Arugula Sauerkraut Salad?

An Arugula Sauerkraut Salad is a vibrant dish made with fresh arugula leaves, fermented sauerkraut, cucumbers, berries, pistachios, and goat cheese—all tossed in a homemade honey mustard dressing. It’s not just a salad, it’s a gut-loving, antioxidant-rich explosion of flavor and nutrition.

This recipe stands out because it combines raw, fermented foods (like sauerkraut) with fresh produce and healthy fats, helping you boost digestive health while keeping your palate intrigued.

Print
clock clock iconcutlery cutlery iconflag flag iconfolder folder iconinstagram instagram iconpinterest pinterest iconfacebook facebook iconprint print iconsquares squares iconheart heart iconheart solid heart solid icon
Fresh arugula sauerkraut salad with berries and goat cheese

Arugula Sauerkraut Salad


  • Author: Emily Harper
  • Total Time: 10 minutes
  • Yield: 4 servings 1x

Ingredients

Scale
  • 6 cups arugula

  • 3 small cucumbers, sliced

  • ½ cup blackberries

  • ½ cup blueberries

  • ½ cup sauerkraut, drained

  • ¼ cup roasted pistachios

  • ¼ cup crumbled goat cheese

    Dressing:

    • 2 tbsp olive oil

    • 1 tbsp honey

    • 1 tbsp Dijon mustard

    • 2 tbsp lemon juice

    • Salt and pepper to taste


Instructions

  • Wash and prep ingredients.

  • Toss all salad ingredients in a large bowl.

  • Whisk dressing ingredients separately.


  • Drizzle over salad and serve immediately.

  • Prep Time: 10 minutes

Nutrition

  • Serving Size: 1 bowl (~200g)
  • Calories: 210 kcal
  • Sugar: 6g
  • Sodium: 420mg
  • Fat: 15g
  • Saturated Fat: 3.5g
  • Unsaturated Fat: 10.5g
  • Trans Fat: 0g
  • Carbohydrates: 14g
  • Fiber: 4g
  • Protein: 6g
  • Cholesterol: 10mg

Sauerkraut is loaded with probiotics and digestive enzymes. Arugula is high in vitamin K, calcium, and fiber. Together, they offer a serious boost to your gut microbiome. More wellness-focused eaters are seeking creative ways to include fermented foods in their daily meals—this salad is an ideal start.

Not to mention: the combo of berries and greens makes this salad both anti-inflammatory and antioxidant-rich. Learn more about other creative recipes in our fermented superfoods article.

Ingredients That Make It Pop

Ingredients for arugula sauerkraut salad
All the ingredients that bring bold flavor and nutrition

Nutrient Breakdown of the Key Ingredients

This Arugula Sauerkraut Salad isn’t just delicious—it’s packed with nutrition from top to bottom. Here’s a closer look at how each ingredient contributes to both flavor and wellness:

IngredientNutritional Benefits
Arugula (6 cups)Rich in vitamins A, C, and K, arugula is known for its cancer-fighting antioxidants and detoxifying chlorophyll.
Sauerkraut (½ cup)A top source of probiotics, sauerkraut aids in digestion, strengthens immunity, and enhances nutrient absorption.
Cucumbers (3 small)Hydrating and low-calorie, cucumbers add crunch and help flush out toxins thanks to their water content.
Blueberries (½ cup)These antioxidant powerhouses fight inflammation and are great for heart and brain health.
Blackberries (½ cup)Another antioxidant-rich fruit, blackberries support healthy skin and reduce oxidative stress.
Pistachios (¼ cup)Provide healthy fats, protein, and fiber; these nuts add crunch and help stabilize blood sugar levels.
Goat cheese (¼ cup)Creamy and tangy, goat cheese brings calcium, protein, and healthy fats while being easier to digest than cow’s milk cheese.

Every ingredient is there for a reason. Together, they build a salad that checks the boxes for nutrition, texture, and gut support.

The Flavor Chemistry: Tangy, Peppery, Sweet, and Creamy

The secret to the bold taste of this arugula sauerkraut salad lies in its brilliant contrasts. Here’s how it balances:

  • Arugula delivers a peppery bite.
  • Sauerkraut adds that sharp, salty tang with a fermented edge.
  • Berries bring a pop of sweetness.
  • Cucumbers mellow the flavors with a fresh crunch.
  • Pistachios layer in a nutty base.
  • Goat cheese smooths it all out with creamy tartness.
  • The honey mustard dressing pulls everything together with sweet acidity and a velvety texture.

This combination turns a simple bowl of greens into a full-blown experience for your taste buds. If you love complex flavor harmony, check out our berry salad variations guide for more ideas.

Step-by-Step: How to Make Arugula Sauerkraut Salad

Prep the Vegetables and Fruits

Start by gathering and prepping your ingredients for this vibrant, gut-loving salad. Here’s how to get started:

  1. Wash and drain the blackberries and blueberries. Gently pat dry with a towel to avoid excess moisture in the bowl.
  2. Slice the cucumbers into thin rounds. You want even, bite-sized pieces that complement the softness of the berries and greens.
  3. Drain the sauerkraut well. This is crucial. Too much brine can overpower the dressing and make the salad soggy.
  4. Roughly chop the pistachios if you prefer a finer crunch. Leave some whole for visual interest.
  5. If using fresh goat cheese, crumble it by hand for a rustic look and better distribution throughout the salad.
Preparing arugula sauerkraut salad with dressing

With everything prepped, you’re just moments away from combining some of the healthiest ingredients in one bowl. For more meal-prep help, don’t miss our kitchen prep tips article.

Make the Honey Mustard Dressing

Now let’s build the heart of the flavor: the dressing.

Ingredients for the Honey Mustard Dressing:

  • 2 tablespoons olive oil
  • 1 tablespoon honey
  • 1 tablespoon Dijon mustard
  • 2 tablespoons lemon juice
  • Salt and black pepper to taste

Instructions:

  1. In a small bowl or mason jar, whisk or shake together the olive oil, honey, Dijon mustard, and lemon juice.
  2. Season lightly with salt and pepper.
  3. Mix until creamy and emulsified.

Pro tip: Want to kick it up? Add a pinch of garlic powder or a splash of apple cider vinegar for extra tang.

Assemble the Salad

Once everything is ready:

  1. In a large mixing bowl, combine the arugula, cucumbers, berries, sauerkraut, pistachios, and goat cheese.
  2. Drizzle the honey mustard dressing over the top.
  3. Toss gently to coat everything without crushing the berries or bruising the arugula.
  4. Serve immediately or chill for 10–15 minutes before plating for a more cohesive flavor experience.

If you’re craving a heartier meal, serve with grilled chicken or a slice of toasted sourdough. For more pairings, check out our grilled protein salad combos.

Balancing Flavors: Sauerkraut and Arugula

How Sauerkraut Enhances the Salad’s Gut-Friendly Benefits

The standout star of this Arugula Sauerkraut Salad is undoubtedly the fermented sauerkraut. Why? Because it does double duty: it brightens the flavor and nourishes your gut.

Fermented sauerkraut is rich in probiotics—live microorganisms that help balance your intestinal bacteria. Just half a cup added to this salad can:

  • Improve digestion
  • Boost immunity
  • Enhance absorption of minerals like calcium and iron

Pairing it with arugula, a bitter green full of chlorophyll and fiber, helps activate your body’s detox pathways. This combo makes the salad not just a dish, but a functional food.

In fact, adding raw fermented ingredients to your meals—like in this arugula sauerkraut salad—is one of the easiest ways to promote better gut health without supplements. For more fermented inspiration, check out our DIY pickled veggie guide.

Reducing Arugula’s Bitterness Naturally

If you’re new to arugula, its peppery, bitter profile might be too strong at first bite. But here’s the trick: it doesn’t have to stay that way.

To mellow the bitterness in your arugula sauerkraut salad, try these simple hacks:

MethodHow It Helps
Toss with citrus juice (lemon)The acid helps neutralize bitterness and softens the leaves
Pair with naturally sweet fruitsBlueberries and blackberries add balance and contrast
Use a creamy, tangy dressingThe honey mustard dressing wraps the bitterness in sweetness and acidity
Let it marinate a bit before servingSitting in dressing for 10–15 minutes helps mellow out sharp edges

These techniques don’t mask the flavor—they round it out. And when you combine it with crunchy pistachios and tangy goat cheese, arugula transforms into a completely different experience.

Want to explore other bold greens? Don’t miss our leafy salad green comparison to see how arugula stacks up against spinach, kale, and more.

Customizing Your Salad

Protein Additions: Grilled Chicken, Chickpeas, or Tofu

While the Arugula Sauerkraut Salad is incredibly nutrient-dense on its own, adding a lean protein can turn it into a complete and satisfying meal. Depending on your diet, there are a few great options to choose from:

  • Grilled chicken breast: Adds lean protein and a smoky depth that complements the tartness of the sauerkraut and the creaminess of goat cheese.
  • Chickpeas: A fantastic plant-based protein that adds a buttery texture. Roast them for a crunchy topping or keep them soft for a hearty bite.
  • Tofu: When marinated in lemon and Dijon, tofu blends beautifully with the flavor notes of the salad. Try pan-searing it for a crispy edge.

These options balance out the salad’s bright acidity and bold flavor while increasing its staying power—perfect for lunch or dinner.

Looking for more high-protein salad ideas? Discover great ideas like our superfood protein bowl guide.

Alternative Toppings for Texture and Crunch

The beauty of a versatile dish like the Arugula Sauerkraut Salad is that you can make it your own. Swapping toppings can cater to different textures and dietary needs without losing its essence.

Original ToppingSwap OptionWhy It Works
PistachiosPumpkin seeds or sunflower seedsAdds crunch and more magnesium
Goat cheeseFeta, cashew cheese, or nutritional yeastVegan-friendly and still packs tang
BerriesPomegranate seeds or sliced applesMaintains sweet-tart balance with seasonal flexibility
CucumbersShaved fennel or thin-sliced radishDelivers that crisp bite with an earthy or spicy note

Experimenting with toppings lets you adapt the arugula sauerkraut salad to suit your mood or pantry without compromising nutrition or taste. If you’re all about building your own bowl, check out our salad topping ideas for every season.

Best Dressings for Arugula-Based Salads

Why Honey Mustard Works Perfectly

For a salad as bold as the Arugula Sauerkraut Salad, the dressing can either clash or elevate every bite. Luckily, honey mustard nails the assignment.

Here’s why it works so well:

  • Balances bitter arugula with a sweet, creamy touch
  • Mellows sauerkraut’s acidity with soft, rounded flavor
  • Emulsifies beautifully with olive oil and lemon juice
  • Enhances berries and goat cheese with depth and tang

This honey mustard dressing isn’t just a condiment—it’s a bridge between sharp and sweet, turning conflicting ingredients into harmony.

Want to kick it up a notch? Add a tiny splash of apple cider vinegar or grated fresh ginger for an immune-boosting zing. You can find more dressing variations in our homemade salad dressing guide.

Here’s a reminder of the ingredients used:

Honey Mustard Dressing
2 tbsp olive oil
1 tbsp honey
1 tbsp Dijon mustard
2 tbsp lemon juice
Salt and pepper to taste

It takes only 2 minutes to whisk this up, but it makes a world of difference in your arugula sauerkraut salad experience.

While honey mustard is the perfect match, you can always switch it up depending on your flavor cravings. Here are some other dressings that pair beautifully with the Arugula Sauerkraut Salad:

Dressing OptionFlavor ProfileWhy It Works
Balsamic vinaigretteSweet, tangy, boldBrings out the earthiness of arugula and the sweetness of berries
Lemon tahini dressingCreamy, citrusy, nuttyBalances bitterness and adds richness
Green goddess dressingHerbaceous, tangy, garlickyLayers fresh herb flavor over fermented tang
Yogurt herb dressingCool, creamy, and savoryCools down sharp flavors and adds probiotics

Each of these alternatives brings something different to your arugula sauerkraut salad, making it easy to reinvent the dish throughout the week without boredom.

Looking for inspiration? Try our ultimate salad dressing pairing chart to find your perfect match.

What to Serve With Arugula Sauerkraut Salad

Perfect Pairings: Proteins, Grains, and Drinks

The bold, tangy layers of flavor in this Arugula Sauerkraut Salad make it a versatile centerpiece—or a vibrant side. Depending on the occasion, you can build a balanced plate by pairing it with complementary proteins, grains, or even beverages.

Here’s how to create harmony on the table:

PairingWhy It Works
Grilled chicken breastAdds smoky, savory depth to the bright, tangy salad
Quinoa or wild riceOffers nutty texture and soaks up the zesty dressing beautifully
Smoked salmonLends rich umami and pairs well with goat cheese and arugula
Boiled eggsA quick protein boost with creamy yolks that complement bitter greens
Sparkling water with lemonRefreshes the palate and enhances the salad’s citrus notes
Chardonnay or dry roséWine lovers will appreciate how these pairings balance acidity and creaminess

These combos elevate your Arugula Sauerkraut Salad from a bowl of greens to a full, thoughtfully designed dish. Don’t miss our quick pairing guide for salads and proteins for more inspiration.

Making It a Complete Meal

On its own, the Arugula Sauerkraut Salad is light, fresh, and functional. But when you’re planning a full meal—whether for yourself, guests, or meal prep—there are a few additions that can round it out:

  • Add roasted sweet potatoes: For fiber, beta-carotene, and a soft, sweet contrast
  • Top with avocado slices: Healthy fats and creaminess that pair beautifully with berries and pistachios
  • Serve with crusty whole-grain bread: Perfect for soaking up extra dressing
  • Include a warm side soup: A mild lentil or carrot soup complements the cold, crisp salad textures

Creating a meal around the arugula sauerkraut salad means thinking balance—flavors, temperatures, and nutrients. The result? A satisfying dish that fuels and delights in equal measure.

Looking for more full-meal salad inspiration? Don’t miss our complete meal salad planner.

Storage, Prep Tips, and Meal-Prepping Ideas

How to Keep Ingredients Fresh

One of the best things about the Arugula Sauerkraut Salad is how well its components hold up—if stored correctly. This makes it a smart pick for meal prepping or prepping ahead for events.

To keep your ingredients at peak freshness:

IngredientStorage Tip
ArugulaKeep dry and sealed in a paper towel-lined container in the fridge
SauerkrautStore in its brine in a tightly sealed jar; use clean utensils every time
BerriesWash only before eating; store in a single layer in the fridge
CucumbersStore whole and unpeeled in a produce drawer
Goat CheeseKeep wrapped and cold; store away from strong-smelling items
Dressing (homemade)Store in a sealed glass jar for up to 1 week; shake before using

Want to learn more about storing salad ingredients like a pro? Check out our meal prep ingredient storage guide.

Making Ahead Without Losing Texture

While the Arugula Sauerkraut Salad is best enjoyed fresh, here’s how to meal-prep it while maintaining crunch, color, and flavor:

  • Pre-chop cucumbers and portion out berries and pistachios in advance.
  • Store sauerkraut separately to avoid sogginess.
  • Keep dressing on the side and toss in only when ready to eat.
  • Layer in jars for grab-and-go salads—start with dressing, followed by firmer ingredients like cucumbers and sauerkraut, and top with arugula and cheese.

By following these tips, you can assemble several days’ worth of salads without compromising quality. Perfect for work lunches, weekend picnics, or quick dinners.

Need more prep tricks? Discover great ideas like our mason jar salad assembly tutorial to keep your meals crisp and convenient.

Why Arugula Sauerkraut Salad Deserves a Spot in Your Meal Plan

The Arugula Sauerkraut Salad isn’t just another leafy green bowl—it’s a flavor-forward, gut-friendly powerhouse that hits every note: tangy, creamy, crunchy, and sweet. With fermented sauerkraut boosting your digestion, antioxidant-rich berries adding vibrant color and taste, and peppery arugula grounding it all, this salad proves that healthy doesn’t have to be boring.

Whether you’re prepping lunches for the week or serving a crowd, this salad is versatile, easy to modify, and downright refreshing. Top it with grilled chicken, layer it in mason jars, or just enjoy it as a quick no-cook meal with a chilled glass of lemon water or a crisp Chardonnay.

Want more ways to enjoy delicious, functional meals?
Discover great ideas like our 5-minute probiotic salads or how to ferment vegetables at home.

Looking for inspiration? Try our seasonal salad meal plans, or check out high-fiber meals that support gut health to level up your clean-eating game.

Arugula sauerkraut salad with grilled chicken and quinoa

PART 9: FAQs About Arugula Sauerkraut Salad

What dressing goes on arugula salad?

Arugula’s bold, peppery flavor pairs beautifully with dressings that are either slightly sweet, tangy, or creamy. The honey mustard dressing featured in our Arugula Sauerkraut Salad strikes a perfect balance—sweetness from honey, tang from Dijon mustard, and a citrus kick from lemon juice. Other popular options include:
Lemon vinaigrette
Balsamic reduction
Green goddess
Tahini-based dressings
The key is to soften arugula’s bitterness without overpowering it. Looking for ideas? Don’t miss our salad dressing pairing guide.

What is good to mix with sauerkraut?

Sauerkraut pairs well with both savory and sweet ingredients. In this Arugula Sauerkraut Salad, it blends beautifully with:
Peppery arugula
Sweet berries (like blueberries and blackberries)
Creamy goat cheese
Nutty pistachios
Crisp cucumbers
You can also mix sauerkraut with avocado, roasted vegetables, hard-boiled eggs, or even hummus for other salad variations. Learn more in our fermented food pairing ideas.

How do you make arugula less bitter for salad?

Arugula’s natural bitterness is what gives it character, but it can be too strong for some palates. To make it milder in your Arugula Sauerkraut Salad:
Toss it with acidic dressings like lemon juice or vinegar
Add sweet elements like honey, fruit, or sweet mustard
Mix it with milder greens like spinach or butter lettuce
Let it marinate for 10–15 minutes in the dressing before serving
These simple tricks help balance flavor without masking the green’s natural peppery punch. For more salad hacks, check out our arugula prep tips.

What does arugula pair well with?

Arugula pairs well with a wide range of ingredients, both savory and sweet. In our Arugula Sauerkraut Salad, the top pairings include:
Fermented sauerkraut
Fresh fruits (like berries or citrus)
Nuts and seeds
Creamy cheeses like goat or feta
Lean proteins like chicken, tofu, or chickpeas
You can even pair it with grains like quinoa, farro, or couscous to make it a full meal. Looking for more ideas? Don’t miss our ingredient pairing matrix.

Table of Contents

Love discovering new Passover recipes? Follow us on Facebook for the latest kosher cooking tips and check out our Pinterest board for even more delicious holiday dishes!

Pineapple Turmeric Sauerkraut – The Best Gut-Healing Fermented Recipe

Pineapple Turmeric Sauerkraut in mason jar

Introduction

Pineapple Turmeric Sauerkraut is more than a tangy, vibrant side dish—it’s a reflection of my culinary journey and my belief in the healing power of food. I’m Emily Harper, the heart behind BrekCakes, a chef, writer, and former journalist who swapped breaking news for breaking bread.

Growing up in a small Vermont town, I learned early on that the best recipes weren’t just about ingredients—they were about stories, memories, and connection. Years later, in my Portland bistro and through this blog, I’ve continued that tradition, creating dishes that bring people together and nourish body and soul.

This sauerkraut recipe is one of those dishes. Born out of a love for functional ingredients and fermentation, it combines sweet pineapple, earthy turmeric, and crunchy cabbage with a splash of raw apple cider vinegar. It’s a probiotic powerhouse that supports digestion, reduces inflammation, and lights up your taste buds.

Whether you’re a seasoned fermenter or a curious first-timer, you’ll find everything here—from the science behind the ferment to troubleshooting tips and tasty serving ideas. And if you love flavorful, health-forward recipes, don’t miss our zucchini breadwich for another twist on wholesome comfort food.

Let’s dive into why this golden kraut is worth a place in your fridge—and on your plate.

Print
clock clock iconcutlery cutlery iconflag flag iconfolder folder iconinstagram instagram iconpinterest pinterest iconfacebook facebook iconprint print iconsquares squares iconheart heart iconheart solid heart solid icon
Grain bowl topped with Pineapple Turmeric Sauerkraut

Pineapple Turmeric Sauerkraut


  • Author: Chef Emily Harper
  • Total Time: 10 days
  • Yield: 1 half-gallon 1x

Ingredients

Scale
  • 1 Head Green Cabbage, shredded

  • ½ Pineapple, diced

  • 1 Tbsp Fresh Ginger

  • 1 Tbsp Sea Salt (kraut)

  • 1 Tbsp Turmeric Powder

  • Brine: 1 Tbsp Sea Salt, 1 Tbsp Raw Apple Cider Vinegar, 4 cups Spring Water


Instructions

  • Mix cabbage, pineapple, ginger, and salt. Let rest.

  • Make brine. Add turmeric and combine.

  • Pack into jars and pour brine over.

  • Loosen lid for fermentation gases.

  • Shake daily. After 7–10 days, refrigerate.


  • Serve chilled. Enjoy extra brine as a probiotic tonic.

  • Prep Time: 45
  • Cook Time: 7–10 days

Nutrition

  • Serving Size: 2 tablespoons (30g)
  • Calories: 12
  • Sugar: 1.5g
  • Sodium: 220mg
  • Fat: 0g
  • Saturated Fat: 0g
  • Unsaturated Fat: 0g
  • Trans Fat: 0g
  • Carbohydrates: 2.5g
  • Fiber: 1g
  • Protein: 0.5g
  • Cholesterol: 0mg

Introduction to Pineapple Turmeric Sauerkraut

What is Pineapple Turmeric Sauerkraut?

Pineapple Turmeric Sauerkraut is a fermented cabbage dish infused with tropical pineapple, warm turmeric, and ginger. It’s made by packing shredded cabbage and pineapple into jars with a brine of sea salt, apple cider vinegar, and water. Over time, natural bacteria ferment the mixture, turning it into a tangy, probiotic-rich superfood.

What makes it unique is the flavor profile—it balances the savory crunch of traditional sauerkraut with the sweetness of pineapple and the earthy spice of turmeric. Plus, the vibrant yellow hue is a showstopper on any plate.

The Rise of Functional Fermented Foods

Fermented foods have been gaining traction for their gut-boosting benefits. But this kraut isn’t just another health trend—it’s functional food done right. Combining turmeric’s anti-inflammatory magic with pineapple’s digestive enzymes and the natural probiotics of lacto-fermentation, it’s a triple-threat for wellness seekers.

From kombucha to kefir, fermentation is making a comeback. And in this sea of sour sips and pickled bites, Pineapple Turmeric Sauerkraut offers a refreshing, crunchy, and brightly flavored alternative you can make at home.

Don’t miss our lemon dump cake with poppy seeds if you’re into flavor fusions that surprise and delight.

Why Pineapple and Turmeric Are a Powerful Combo

What Do Turmeric and Pineapple Do for the Body?

The real magic of Pineapple Turmeric Sauerkraut lies in its two hero ingredients—pineapple and turmeric. Each brings unique healing benefits to the table, and when combined, they amplify each other’s effects in powerful ways.

Pineapple is more than just tropical sweetness. It contains bromelain, a digestive enzyme that helps break down proteins and ease bloating. It’s also loaded with vitamin C, which supports your immune system, and antioxidants that fight off oxidative stress. In traditional wellness circles, pineapple is often used to soothe inflammation and speed up recovery from workouts or illness.

Turmeric, on the other hand, is best known for curcumin, the compound responsible for its signature golden hue and impressive health benefits. Curcumin is a potent anti-inflammatory and antioxidant. It helps calm chronic inflammation—a root cause of many modern diseases, including heart disease, diabetes, and arthritis. Studies also suggest curcumin supports brain function, balances mood, and protects against cognitive decline.

When you ferment these two together, their powers multiply. Fermentation enhances the bioavailability of curcumin, making it easier for your body to absorb. Plus, the probiotic action of the kraut improves gut health, which is directly linked to your immune system, mental health, and more.

Looking for inspiration? Try our cottage cheese ice cream for another gut-friendly treat with a surprising twist.

Key Nutrients and Anti-Inflammatory Benefits

Let’s break it down:

IngredientStar CompoundBenefit
PineappleBromelain, Vitamin CAids digestion, supports immunity
TurmericCurcuminFights inflammation, protects brain
GingerGingerolEases nausea, supports metabolism
CabbageFiber, Vitamin KSupports gut health, anti-cancer properties

This combination isn’t just about good flavor—it’s functional nourishment with real benefits you’ll feel. By adding just a few spoonfuls of Pineapple Turmeric Sauerkraut to your daily meals, you’re giving your body a natural, flavorful boost.

Fermented foods like this don’t have to be intimidating. They can be vibrant, simple, and satisfying. Don’t miss our trader joe’s lobster pasta for more unique flavor pairings that break the mold.

Health Benefits of Fermented Sauerkraut

Is Pineapple Turmeric Sauerkraut Good for You?

Yes—Pineapple Turmeric Sauerkraut is incredibly good for you, thanks to its powerhouse blend of fermented cabbage, golden turmeric, and tropical pineapple. This vibrant, probiotic-rich kraut supports everything from digestion to inflammation to immunity—and it tastes amazing too.

Fermentation gives this sauerkraut its superfood status. The process naturally creates probiotics, the good bacteria that improve gut health and overall wellness. These microbes help balance your digestive system, ease bloating, improve nutrient absorption, and even support mental clarity and mood—because a healthy gut means a healthier you.

Add in the anti-inflammatory properties of turmeric and the digestive enzymes from pineapple, and Pineapple Turmeric Sauerkraut becomes more than a side dish—it becomes a daily ritual for feeling your best.

Digestive, Immune, and Anti-Inflammatory Support

The ingredients in Pineapple Turmeric Sauerkraut are carefully chosen for function as much as flavor. Let’s break it down:

IngredientBenefit
CabbagePacked with fiber, supports gut and liver detox
PineappleContains bromelain to aid digestion and reduce swelling
TurmericLoaded with curcumin, which helps fight inflammation
GingerSoothes the digestive tract and supports metabolism
Apple Cider VinegarPromotes good gut bacteria and balances pH levels

Eating a few spoonfuls of Pineapple Turmeric Sauerkraut each day is a natural way to flood your body with beneficial nutrients and enzymes. It’s low-calorie, gut-friendly, and 100% plant-based.

Want a creative pairing? Don’t miss our zucchini breadwich—stack it with this kraut for a fiber-packed, gut-loving combo.

How to Make Pineapple Turmeric Sauerkraut at Home

Ingredient Breakdown: Nutrient Roles

Making your own Pineapple Turmeric Sauerkraut is not only simple—it’s deeply satisfying. With just a few vibrant ingredients, you can craft a gut-friendly ferment that’s as nutritious as it is delicious.

Mixing Pineapple Turmeric Sauerkraut ingredients

Here’s what you’ll need, and what each ingredient brings to the table:

IngredientNutritional Role
Green Cabbage (1 head, shredded)High in fiber, vitamin C, and natural prebiotics
Pineapple (½, diced)Contains bromelain for digestion, adds natural sweetness
Fresh Ginger (1 Tbsp, minced)Anti-inflammatory, aids nausea relief and digestion
Sea Salt (2 Tbsp total)Essential for brine formation and fermentation control
Organic Turmeric Powder (1 Tbsp)Curcumin-rich, supports immune health
Raw Apple Cider Vinegar (1 Tbsp)Balances pH, enhances gut flora
Spring Water (4 cups)Clean base for the brine, free from chlorine and chemicals

These ingredients aren’t just flavorful—they work together to turn humble cabbage into a jar of probiotic gold.

Step-by-Step Instructions with Pro Tips

Here’s how to turn these raw components into your own batch of Pineapple Turmeric Sauerkraut:

  1. Prep the Produce
    Shred one head of green cabbage finely. Dice ½ of a fresh, ripe pineapple into ½-inch chunks. Add both to a large mixing bowl.
  2. Add Ginger and Salt
    Sprinkle in 1 Tbsp of sea salt and 1 Tbsp of minced fresh ginger. Mix with your hands for 1–2 minutes to release moisture from the cabbage. Let rest for 20–30 minutes to draw out more brine naturally.
  3. Make the Probiotic Brine
    In a separate container, dissolve 1 Tbsp of sea salt in 1 cup of hot spring water. Then add 3 cups of cool spring water and 1 Tbsp of raw apple cider vinegar. Stir well.
  4. Add Turmeric
    Toss in 1 Tbsp of turmeric powder. Using tongs (to avoid stained hands), mix it thoroughly with the cabbage and pineapple mixture.
  5. Pack into Jars
    Use a half-gallon mason jar or two quart-size jars. Fill each jar halfway with the kraut mixture, then pour the brine over until everything is submerged—leave about 1 inch of space at the top. Screw on the lids tightly.
  6. Ferment Properly
    Loosen the lid slightly to allow gases to escape. Store the jars in a cool, shaded area (around 65–72°F) and shake gently once daily. Check that all contents stay submerged under brine to avoid mold.
  7. Monitor and Maintain
    Over the next 5–10 days, your kraut will bubble, cloud slightly, and develop flavor. Skim off any harmless “scum” that forms on the surface. After about a week, taste test. Once it reaches your desired sourness, refrigerate.
  8. Enjoy & Store
    Your Pineapple Turmeric Sauerkraut is now ready! Keep it refrigerated for up to 3 months. The flavor will continue to develop beautifully over time.

Pro Tip: Don’t toss the leftover brine—sip it as a probiotic tonic, or use it as a starter for your next batch!

If you love creating vibrant, nutrient-packed dishes like this, you’ll also enjoy our lemon dump cake with poppy seeds—a zesty treat with a twist of wellness.

Perfecting the Taste of Pineapple Turmeric Sauerkraut

What Can Be Added to Sauerkraut to Make It Taste Better?

Even though Pineapple Turmeric Sauerkraut already has a bold and bright flavor profile, there’s always room to level it up. Whether you prefer it zesty, spicy, or savory, the base recipe is super versatile and open to your creativity.

Here are some popular and flavorful add-ins that blend beautifully with this golden kraut:

IngredientFlavor BoostFunction
Garlic clovesPungent, earthyAdds umami and antimicrobial benefits
Red pepper flakes or sliced chiliSpicy kickEnhances metabolism and warmth
Carrots (shredded)Natural sweetnessBoosts crunch and color
Golden raisins or cranberriesSweet-tart contrastBalances savory and sour notes
Cumin seeds or corianderEarthy depthAdds aromatic spice
Fresh herbs (dill, cilantro, parsley)Fresh finishEnhances complexity post-fermentation

Keep in mind, if you’re adding fresh herbs or fruits like raisins, it’s best to add them toward the end of fermentation or even after refrigerating to avoid unwanted bacterial overgrowth or spoilage.

Flavor Boosters: Garlic, Chili, Herbs, and More

Let’s say you want your Pineapple Turmeric Sauerkraut to have more bite—toss in chopped garlic and a bit of red chili during the brining stage. This not only brings heat but deepens the overall flavor without overpowering the sweetness of pineapple.

If you’re going for a mild, aromatic finish, a pinch of ground cumin or coriander seed can introduce earthy undertones that pair beautifully with turmeric. For those craving a crunchier bite, carrot ribbons not only complement the texture but add beta carotene and extra fiber.

After fermentation, sprinkling in fresh chopped cilantro or parsley gives the kraut a final flavor burst—and visual appeal.

Don’t forget, experimentation is the heart of homemade fermentation. One of the joys of making your own sauerkraut is that you get to customize the taste, texture, and spice to your exact liking.

Looking for a unique dessert to follow your tangy kraut dish? Don’t miss our cottage cheese ice cream—a creamy, high-protein surprise that balances savory meals with a clean finish.

Avocado toast with Pineapple Turmeric Sauerkraut

Fermentation Science Explained Simply

How Fermentation Works

At the heart of Pineapple Turmeric Sauerkraut is a fascinating biological process: lacto-fermentation. This natural method uses lactic acid bacteria, particularly Lactobacillus, to convert sugars in cabbage and pineapple into lactic acid. This acidic environment not only preserves the kraut but also transforms it into a probiotic powerhouse.

Here’s what happens step-by-step:

  1. Anaerobic Environment: Packing your ingredients under brine removes oxygen, creating an anaerobic (oxygen-free) space that good bacteria love—and harmful bacteria hate.
  2. Lactic Acid Production: Natural bacteria on the cabbage and pineapple start to feed on sugars, producing lactic acid as a byproduct.
  3. pH Drop: The brine becomes more acidic over time, which further preserves the food and gives sauerkraut its signature tang.
  4. Probiotics Multiply: Beneficial microbes flourish, enriching your kraut with live cultures that support your gut.

What makes Pineapple Turmeric Sauerkraut unique is that turmeric and pineapple both offer additional prebiotic support—fuel for these probiotics—making it an even more effective digestive aid.

Why Brine, Salt, and Apple Cider Vinegar Matter

Every ingredient in this kraut’s fermentation process has a purpose:

  • Sea Salt (1 Tbsp per quart): Draws moisture from the cabbage, inhibits bad bacteria, and regulates the speed of fermentation.
  • Brine (Spring Water + Sea Salt + Vinegar): Provides an optimal environment for the fermentation to thrive while keeping everything safely submerged.
  • Raw Apple Cider Vinegar: Contains “the mother,” rich in acetic acid and enzymes. It helps lower the pH of the brine early in the process, giving the good bacteria a head start.

Let’s look at the science behind this synergy:

ComponentScientific Function
SaltDehydrates cabbage, suppresses spoilage microbes
VinegarSpeeds up pH drop, boosts antimicrobial action
Spring WaterAvoids chlorine that could kill bacteria
Time5–10 days for optimal probiotic development

The result? A delicious, crunchy, slightly sour kraut that’s alive with beneficial microbes. No pasteurization, no additives—just nature doing its work.

This process might sound technical, but it’s surprisingly foolproof. And once you’ve mastered this golden kraut, you’ll never want store-bought again.

Don’t miss our trader joe’s lobster pasta if you’re curious how to combine gourmet flavor with simplicity—just like this kraut.

Best Ways to Eat and Store Your Sauerkraut

Should You Rinse Sauerkraut Before Eating?

One of the most common questions I get about Pineapple Turmeric Sauerkraut is whether it should be rinsed before serving. The short answer? No, you shouldn’t rinse it—unless absolutely necessary.

Here’s why: rinsing sauerkraut washes away the live probiotics that develop during fermentation. These beneficial bacteria are what make this kraut so valuable for your gut health. Rinsing also removes much of the brine, which contains minerals, enzymes, and the sour-sweet balance that defines its flavor.

However, there are exceptions:

  • If the kraut is too salty for your taste, a quick rinse may tone it down.
  • If you’re cooking it into a hot dish (like stir-fry or soup), you can rinse and drain first—but you’ll lose the probiotic benefits due to heat anyway.

For the full health boost, always eat it raw and unrinsed—preferably chilled, straight from the jar.

Serving Suggestions and Storage Tips

Pineapple Turmeric Sauerkraut is incredibly versatile. Here are easy, delicious ways to enjoy it daily:

Serving IdeaHow to Use It
On avocado toastAdds tang, texture, and anti-inflammatory benefits
With eggsServe alongside scrambled or hard-boiled eggs for a gut-boosting breakfast
In tacos or wrapsA juicy topping that balances spicy or smoky flavors
Over grain bowlsMix into quinoa, rice, or farro with greens and beans
As a sideAdd to any grilled protein or roasted veggie dish

Need a detox shot? Sip a tablespoon or two of the leftover brine—it’s filled with enzymes and probiotics that support digestion and help reduce inflammation.

For storage:

  • Refrigerate your sauerkraut once it’s fermented to your desired sourness.
  • It’ll last for up to 3 months in the fridge, sometimes longer if stored properly.
  • Always use a clean fork when serving to prevent contamination.
  • If mold appears on the surface or the smell is off (think sulfuric or rotten), discard it.

If you love bright, wholesome recipes like this, don’t miss our lemon dump cake with poppy seeds—an easy dessert that packs flavor and flair into every bite.

Common Mistakes and Troubleshooting

Why Is My Pineapple Turmeric Sauerkraut Cloudy or Smelly?

Fermenting foods can feel mysterious, especially if you’re new to it. But most of the time, what looks or smells “off” is totally normal. Pineapple Turmeric Sauerkraut, with its vibrant color and tropical ingredients, might act a little different than traditional kraut—but that doesn’t mean it’s gone bad.

Here are the most common concerns and what they really mean:

  • Cloudy Brine: This is a good sign! It’s caused by beneficial bacteria multiplying and releasing lactic acid. No need to worry—your kraut is alive and thriving.
  • Strong Smell: Fermented foods are supposed to be pungent. You might smell sulfur or vinegar—totally normal. A rotten or putrid smell, however, means it’s time to toss it.
  • Surface Scum or White Film: Often mistaken for mold, this is typically harmless kahm yeast. Just skim it off. Mold, on the other hand, is fuzzy and colorful—anything blue, black, or pink is a no-go.
  • Color Changes: Turmeric may intensify in color or settle in the jar. This is cosmetic, not a danger sign.
  • Bubbling or Fizzy Sounds: That’s fermentation in action! These are gases escaping as the bacteria get to work.

Trust your senses. If the kraut smells cleanly sour, tastes good, and looks vibrant, it’s likely safe.

Fixing Mold, Mush, and Funky Tastes

If you run into actual issues, here’s how to troubleshoot your Pineapple Turmeric Sauerkraut:

ProblemCauseSolution
Mold forming on topKraut wasn’t fully submergedUse a fermentation weight or press the kraut below the brine daily
Too saltyMeasurement issue or evaporationRinse before serving or dilute next batch’s brine slightly
Too soft or mushyWarm environment or fermenting too longShorten ferment time or store in a cooler area
Fermentation won’t startChlorinated water or not enough saltUse spring water, recheck ratios, ensure clean jars

Pro tip: Always label your jars with the start date of fermentation. This keeps you on track and helps you dial in your preferred sourness level.

Once you’ve got the basics down, troubleshooting becomes second nature—and you’ll feel confident customizing batches with extra pineapple, ginger, or even shredded beet for color.

Love recipes that empower you to get creative? Try our zucchini breadwich—a hearty, fiber-filled way to use kraut in sandwiches that go way beyond basic.

Creative Ways to Use Pineapple Turmeric Sauerkraut

Sauerkraut Smoothies, Wraps, and Tacos

If you thought Pineapple Turmeric Sauerkraut was just a side dish, think again. This golden kraut can be the unexpected star in a range of meals—from smoothies to savory wraps and even desserts. The bold, zesty flavor and probiotic power make it a secret weapon in creative, health-forward cooking.

Here are a few ideas to spark your imagination:

1. Gut-Healing Smoothie Add-In
Yes, you can blend kraut into your morning smoothie. Add 1–2 tablespoons of Pineapple Turmeric Sauerkraut to a tropical green smoothie with banana, mango, spinach, and coconut water. The flavor disappears, but the probiotic punch remains.

2. Power Wrap Filler
Roll kraut into a collard green or whole-wheat wrap with hummus, avocado, shredded carrots, and grilled tofu. The sauerkraut brings balance and brightness to every bite.

3. Topping for Tacos
Whether you’re serving fish tacos, jackfruit, or pulled chicken, a spoonful of this kraut adds tang, crunch, and a nutritional upgrade. It’s especially great with citrusy or spicy fillings.

4. Kraut-Infused Grain Bowls
Top your quinoa or farro bowl with roasted vegetables, chickpeas, tahini dressing, and a generous scoop of Pineapple Turmeric Sauerkraut. It brings acidity and color to the bowl.

5. Kraut Quesadillas or Grilled Cheese
Surprise twist? Layer kraut inside a sharp cheddar grilled cheese. It melts into the cheese and adds texture and tang.

6. Brine Shots
Leftover brine doesn’t need to go to waste. Sip it as a probiotic shot or mix into salad dressings for a zippy, fermented boost.

Using Extra Brine for Probiotic Shots

Don’t underestimate the leftover brine from your kraut jars. This golden liquid is packed with probiotics, minerals, and enzymes. Use it to:

  • Make quick probiotic shots with ginger and lemon juice
  • Add to soups and sauces (after they cool slightly) for flavor and gut support
  • Whisk into vinaigrettes with olive oil and herbs

Storage Tip: Keep brine in a sealed glass container in the fridge. It can last just as long as the kraut—up to 2–3 months.

Discover great ideas like our cottage cheese ice cream for other surprising ways to blend flavor and health.

 Grain bowl topped with Pineapple Turmeric Sauerkraut

Conclusion

Whether you’re a fermentation newbie or a seasoned sour-maker, Pineapple Turmeric Sauerkraut offers an easy and rewarding way to boost your gut health, spice up your meals, and connect with food in a more meaningful way.

From its vibrant color and bold flavor to its deep nutritional benefits, this kraut is a standout addition to your wellness routine. It’s more than just fermented cabbage—it’s a symbol of how functional ingredients and tradition can blend beautifully in your kitchen.

Try your first batch, taste as you go, and don’t be afraid to get creative. This is food with purpose, flavor, and heart.

Looking for more delicious inspiration? Don’t miss our comforting zucchini breadwich—it’s the perfect companion for your kraut-filled lunch.

FAQs About Pineapple Turmeric Sauerkraut

What do turmeric and pineapple do for the body?

Turmeric and pineapple each offer unique and powerful health benefits, especially when combined in a probiotic-rich food like Pineapple Turmeric Sauerkraut. Turmeric is rich in curcumin, a natural anti-inflammatory compound that can help reduce chronic pain, support brain health, and fight oxidative stress. Pineapple contains bromelain, an enzyme that aids digestion, reduces swelling, and supports immunity. Together, they create a potent combination for digestive and whole-body wellness.

Is turmeric sauerkraut good for you?

Yes, turmeric sauerkraut—especially when made with pineapple—is incredibly beneficial. It delivers live probiotics for gut health, anti-inflammatory compounds from turmeric, and digestive enzymes from pineapple. It’s also low in calories, high in fiber, and naturally sugar-free. Consuming even a few spoonfuls a day may improve digestion, boost immunity, and support a healthier inflammatory response.

What can be added to sauerkraut to make it taste better?

To enhance the flavor of Pineapple Turmeric Sauerkraut, consider adding ingredients like garlic, chili flakes, shredded carrots, golden raisins, fresh herbs, or cumin seeds. These additions complement the tropical tang of pineapple and the earthiness of turmeric, helping you create a more personalized and flavorful kraut.

Should you rinse sauerkraut before eating?

It’s generally best not to rinse sauerkraut before eating. Rinsing removes much of the beneficial brine and live probiotics that support gut health. If the flavor is too intense or salty for your taste, a brief rinse may be okay—but keep in mind you’ll be reducing its nutritional potency. For best results, enjoy your Pineapple Turmeric Sauerkraut raw and unwashed.

Table of Contents

Love discovering new Passover recipes? Follow us on Facebook for the latest kosher cooking tips and check out our Pinterest board for even more delicious holiday dishes!

Zucchini Breadwich: Easy, Healthy, and Low-Carb Delight

zucchini breadwich savory sandwich recipe

Introduction

Zucchini Breadwich might sound like something out of a culinary daydream—but for me, it’s a delicious reality born right in the heart of my Portland bistro. I’m Emily Harper, the soul behind BrekCakes, where each dish reflects a moment, a memory, and a bit of my small-town Vermont roots.

Growing up, I watched my grandmother turn humble ingredients into heartfelt meals, and zucchini bread was one of her summer staples. But it wasn’t until I swapped my press pass for a chef’s apron and opened my cozy kitchen to the world that the idea of a breadwich—yes, a sandwich made with zucchini bread—truly came to life.

This recipe came about during a slow autumn afternoon, experimenting with savory ingredients and craving something both wholesome and creative. Zucchini Breadwiches blend nostalgia with novelty. They’re perfect for brunches, light lunches, or those moments when regular bread just won’t do.

Discover great ideas like this hearty Zucchini Breadwich and more on my take on cottage cheese ice cream.

Print
clock clock iconcutlery cutlery iconflag flag iconfolder folder iconinstagram instagram iconpinterest pinterest iconfacebook facebook iconprint print iconsquares squares iconheart heart iconheart solid heart solid icon
zucchini breadwich savory sandwich recipe

Zucchini Breadwich: Easy, Healthy, and Low-Carb Delight


  • Author: Emily Harper
  • Total Time: 1 hour
  • Yield: 6 1x

Description

A light, low-carb sandwich alternative made with grilled zucchini slices instead of bread. Packed with flavor and nutrients, it’s perfect for keto, gluten-free, or healthy meal plans


Ingredients

Scale
  • 2 cups grated zucchini (drained)

  • 1 ½ cups flour (or almond flour)

  • 2 eggs

  • ½ cup grated Parmesan

  • ¼ cup olive oil

  • ½ tsp garlic powder

  • 1 tsp baking powder

  • Salt and herbs to taste

For Filling:

  • Turkey, cheese, greens, spreads of choice


Instructions

  • Preheat oven to 350°F and grease a loaf pan.

  • Mix wet and dry ingredients separately, then combine.

  • Pour into pan and bake 40–45 minutes.

  • Cool, slice, and toast if desired.


  • Assemble with fillings and serve warm or cold.

Notes

  • alues are estimated using USDA and general ingredient data (e.g., eggs, almond flour, Parmesan, turkey breast, olive oil).

  • Values may vary depending on specific ingredients or brand types used (e.g., full-fat cheese vs low-fat).


  • Adjust quantities in a nutrition calculator for highly accurate macro tracking.

  • Prep Time: 15 minutes
  • Cook Time: 45 minutes

Nutrition

  • Serving Size: 1 breadwich (1 slice bread + filling)
  • Calories: 285 kcal
  • Sugar: 3 g
  • Sodium: 470 mg
  • Fat: 16 g
  • Saturated Fat: 5 g
  • Unsaturated Fat: 10 g
  • Trans Fat: 0 g
  • Carbohydrates: 16 g
  • Fiber: 3 g
  • Protein: 14 g
  • Cholesterol: 55 mg

Keywords: Zucchini Breadwich

What is a Zucchini Breadwich?

The concept behind zucchini breadwich

A Zucchini Breadwich is a unique spin on the classic sandwich. Instead of standard bread slices, this creation uses thick, savory (or slightly sweet) slices of zucchini bread as the base. Think of it as a cozy hug between two garden-fresh, flavor-packed layers that hold your favorite fillings.

Where a zucchini bread loaf is typically reserved for sweet treats—think walnuts, cinnamon, or even chocolate chips—the breadwich elevates it into the savory realm. It’s what happens when hearty veggie bread meets sandwich innovation.

How it differs from traditional zucchini bread and sandwiches

Traditional zucchini bread is often sweet and enjoyed as a quick bread, best paired with coffee or a dollop of butter. The Zucchini Breadwich, however, flips the narrative. By using a less-sweet, firmer version of the bread and stuffing it with everything from smoked turkey and avocado to herbed cream cheese and grilled veggies, you get a meal that satisfies without the heaviness of traditional sandwich bread.

Let’s be honest—standard sandwiches can feel predictable. A zucchini breadwich, on the other hand, surprises the palate. The tender crumb of zucchini bread contrasts beautifully with crisp veggies or melty cheese. Plus, it’s naturally moist and lower in carbs than some store-bought breads.

Looking for inspiration? Try this lobster pasta fusion twist that plays with unconventional flavors just like the breadwich does.

The rise of veggie-based breads in healthy cooking

In today’s health-conscious culinary world, vegetables are no longer just side dishes—they’re taking center stage. Zucchini Breadwich is part of a bigger trend: the rise of veggie-based breads. Low-carb, gluten-sensitive, and keto-friendly eaters are always looking for alternatives to traditional grains, and zucchini delivers big time.

Zucchini is not only nutrient-rich and low in calories, but it also has a naturally moist texture that works wonders in bread-making. Replacing standard wheat bread with a zucchini loaf isn’t just a quirky twist—it’s a smarter, lighter, and flavor-packed upgrade. In fact, many foodies are swapping out regular sandwich bread entirely in favor of veggie alternatives like cauliflower, chickpea, or—you guessed it—zucchini.

More than just a health move, it’s also about innovation in the kitchen. With increasing attention to whole-food recipes, homemade zucchini breadwiches offer flexibility for a range of diets: vegan, gluten-free, paleo, and low-carb.

Discover more creative, nutrient-rich dishes like our Lemon Dump Cake with Poppy Seeds, which reimagines traditional desserts with vibrant ingredients.

TikTok and Pinterest’s role in making zucchini breadwich viral

Social media plays a huge role in what we eat now. Recipes aren’t just found in cookbooks anymore—they’re trending, looping, and getting millions of views. And the Zucchini Breadwich has officially made its rounds on TikTok and Pinterest.

In a world where visually appealing food dominates feeds, the zucchini breadwich is perfect clickbait: golden, toasted zucchini slices sandwiching gooey cheese or vibrant veggies, served up on a rustic cutting board with a drizzle of hot honey or a side of homemade hummus. It’s Instagrammable, Pinterest-perfect, and TikTok-approved.

The hashtag #ZucchiniBreadwich has racked up thousands of shares from food bloggers, dietitians, and home cooks experimenting with everything from air fryer versions to meat-stuffed variations. The breadwich has transformed from a niche kitchen idea to a viral sensation.

Don’t miss our tips on freezing cottage cheese and turning it into smooth ice cream—a technique also gaining popularity on these same platforms.

Ingredients Needed for the Perfect Zucchini Breadwich

zucchini breadwich ingredients prep

Best zucchini bread base recipes (savory vs. sweet)

When crafting a Zucchini Breadwich, the foundation makes all the difference. Your bread needs to be firm enough to hold fillings without crumbling, yet moist enough to bring that signature zucchini richness. While traditional zucchini bread leans sweet—with sugar, cinnamon, and sometimes even chocolate chips—for a true breadwich experience, go savory.

Here’s a comparison of the two most common base approaches:

TypeIngredientsBest Used With
Sweet Zucchini BreadGrated zucchini, brown sugar, cinnamon, nutmegLight cream cheese, nut butters, honey-glazed turkey
Savory Zucchini BreadGrated zucchini, olive oil, garlic, herbs, ParmesanGrilled veggies, deli meats, hummus, spicy mayo

For breadwiches, savory zucchini bread wins out. The herbed flavor enhances sandwich fillings and gives a more balanced, meal-ready result.

Suggested fillings and spreads (cheese, meats, plant-based, etc.)

Now, let’s talk stuffing. The beauty of a Zucchini Breadwich is its versatility—you can go full comfort food or keep it fresh and light. Here are some of the best combinations to elevate your breadwich game:

Classic Fillings:

  • Smoked turkey, Swiss cheese, arugula, and honey mustard
  • Grilled chicken, pesto, mozzarella, and sun-dried tomato

Plant-Based Options:

  • Roasted red peppers, hummus, avocado, and spinach
  • Vegan cream cheese, shredded carrots, and cucumber slices

Gourmet Picks:

  • Prosciutto, goat cheese, fig jam
  • Brie, caramelized onions, and pear slices

Spread Ideas:

  • Garlic aioli
  • Spicy mayo
  • Herbed cream cheese
  • Avocado mash with lemon zest

If you’re making a sweeter version of the breadwich, think about adding a whipped cottage cheese spread and a drizzle of raw honey—perfect for brunch or a light snack.

The layering is key: stack strategically to keep moisture in without making the bread soggy. Use cheese or greens as a barrier between the bread and wet ingredients like tomatoes or pickles.

How to Make a Zucchini Breadwich at Home

Step-by-step guide to making zucchini bread from scratch

Making a Zucchini Breadwich at home starts with a solid loaf of homemade zucchini bread. This version is savory—balanced with herbs and just enough moisture to hold up to your favorite fillings.

Ingredients for the Bread:

  • 2 cups grated zucchini (drained of excess water)
  • 1 ½ cups all-purpose flour (or almond flour for gluten-free)
  • ½ cup grated Parmesan
  • 2 eggs
  • ¼ cup olive oil
  • 1 tsp baking powder
  • ½ tsp baking soda
  • ½ tsp garlic powder
  • ½ tsp salt
  • 1 tbsp chopped fresh basil or parsley

Instructions:

  1. Preheat your oven to 350°F (175°C) and grease a standard loaf pan.
  2. Drain the zucchini: After grating, squeeze out the excess moisture using a clean towel or cheesecloth.
  3. Mix the wet ingredients: In a large bowl, beat the eggs, then add oil and zucchini.
  4. Combine dry ingredients in another bowl: flour, baking powder, baking soda, garlic powder, and salt.
  5. Mix wet and dry until just combined. Stir in Parmesan and herbs.
  6. Pour into the loaf pan and bake for 40–45 minutes, or until a toothpick comes out clean.
  7. Let the bread cool fully before slicing. For best results, refrigerate for 1–2 hours for firmer slices.

This loaf slices cleanly and holds up like a champ—even when toasted or grilled.

Assembling and toasting the breadwich for optimal flavor

Here’s where the fun begins: turning that beautiful loaf into a drool-worthy Zucchini Breadwich.

Assembly Tips:

  • Slice the zucchini bread into ½-inch thick slices.
  • Lightly toast each slice in a dry skillet or toaster oven for a firmer bite.
  • Add a cheese layer first to act as a moisture barrier.
  • Stack your protein or veggies next.
  • Finish with leafy greens or microgreens to add texture.

Optional Toasting:

Want a melty sandwich? Assemble the breadwich, then grill it on a panini press or in a skillet with a bit of olive oil. Press down with a spatula for an extra crispy crust.

This quick toast transforms your sandwich into something warm, crispy, and fully craveable.

Health Benefits of Zucchini Breadwich

Nutritional breakdown of key ingredients

One of the biggest reasons why the Zucchini Breadwich is gaining popularity is that it’s not just tasty—it’s surprisingly nutritious. Zucchini, the star ingredient, brings a load of health benefits to the table without adding heavy calories or carbs.

Let’s take a look at what’s inside one serving of homemade savory zucchini bread (based on a medium slice):

NutrientAmount (approx.)
Calories120
Carbs9g
Protein5g
Fiber2g
Fat7g
Vitamin C22% DV
Potassium10% DV

Zucchini is rich in antioxidants like lutein and zeaxanthin, which support eye health. It’s also loaded with water—over 90%—making it naturally hydrating and perfect for light, summer-style meals.

Including proteins like grilled chicken or plant-based spreads in your breadwich boosts the nutrient profile even more. Combine that with healthy fats (think avocado or olive oil), and you’ve got a balanced meal packed into every bite.

Zucchini’s fiber, vitamins, and low-carb appeal

Zucchini is a low-carb champion. It contains fewer carbs than traditional sandwich breads, which often pack 15–20g per slice. Using zucchini bread as your base reduces your overall carb intake while increasing dietary fiber.

Why does that matter? Fiber supports digestion, stabilizes blood sugar, and keeps you feeling full longer. That’s a big win for anyone watching their weight, managing diabetes, or trying to eat more mindfully.

The vegetable is also a good source of:

  • Vitamin A – Supports skin and immune health
  • Vitamin C – Helps fight inflammation and boost collagen production
  • Magnesium & Potassium – Important for muscle and nerve function

So yes—your Zucchini Breadwich isn’t just a fun twist on sandwiches. It’s a smart, nutrient-dense choice that fuels your day without the midday crash.

how to assemble zucchini breadwich

Variations of the Zucchini Breadwich

Keto-friendly, gluten-free, and vegan zucchini breadwich ideas

One of the best parts about the Zucchini Breadwich is how easily it adapts to different dietary lifestyles. Whether you’re keto, gluten-sensitive, or vegan, this recipe welcomes all.

Keto Zucchini Breadwich

To make it keto, swap out traditional flour for almond flour or coconut flour, and keep your filling high in protein and healthy fats.

Bread Base Modifications:

  • Use 1 ½ cups almond flour instead of regular flour
  • Add extra eggs for structure
  • Include shredded cheese like cheddar or mozzarella for binding

Keto-Friendly Fillings:

  • Bacon, avocado, and egg
  • Grilled chicken with garlic aioli and spinach
  • Tuna salad with celery and olives

Gluten-Free Zucchini Breadwich

Going gluten-free? It’s simple. Use gluten-free all-purpose flour or oat flour. Just be sure to squeeze all the liquid from the zucchini to keep the texture firm.

Bread Tip: Add ½ tsp xanthan gum to improve texture if your flour blend doesn’t include it.

Tasty Fillings:

  • Roast beef and horseradish cream
  • Grilled tofu and veggie slaw
  • Turkey and cranberry mustard

Vegan Zucchini Breadwich

For a plant-based version, use flax eggs (1 tbsp flaxseed meal + 2.5 tbsp water) and dairy-free cheese or nutritional yeast.

Vegan Breadwich Fillings:

  • Hummus, cucumber, and red onion
  • Vegan pesto, tomato, and sprouts
  • Curried chickpea mash with shredded carrots

This flexibility makes the Zucchini Breadwich a perfect addition to your regular meal rotation, especially for families with different dietary needs.

International flavors and fusion-style fillings

If you’re craving bold tastes, it’s time to go global. The Zucchini Breadwich serves as a neutral base, ready to absorb bold spices, tangy sauces, and rich flavors from around the world.

Here are a few globally-inspired ideas:

RegionBreadwich Combo
MediterraneanGrilled eggplant, tzatziki, feta, and mint
MexicanBlack beans, avocado, pickled onions, chipotle mayo
Asian FusionMiso-glazed tofu, scallions, sesame slaw
Middle EasternFalafel, hummus, tabbouleh
ItalianPesto, tomato, arugula, vegan mozzarella

These creative twists are not only delicious but also an exciting way to introduce new tastes to your everyday lunch or brunch menu.

Tips for the Best Texture and Taste

How to keep the bread moist and firm for sandwiches

The key to a successful Zucchini Breadwich isn’t just in the filling—it’s in the texture of the bread. You need slices that are moist but sturdy, soft but not soggy. Striking this balance ensures your sandwich holds together when stacked and sliced.

Here are proven tricks to get that perfect bread consistency:

  1. Drain the zucchini thoroughly
    • Grate, then press it in a clean towel or cheesecloth to remove excess water. Moisture left in the zucchini will cause the bread to crumble or sink.
  2. Use the right flour blend
    • Stick with all-purpose, almond, or oat flour for structure. Coconut flour alone can be too crumbly, so combine it with binding agents like eggs or flax eggs.
  3. Don’t overmix
    • Stir ingredients until just combined. Overmixing can make the bread gummy or too dense.
  4. Cool completely before slicing
    • Warm zucchini bread falls apart easily. Chill it in the fridge for an hour before slicing for clean, sandwich-ready cuts.
  5. Toast lightly before assembly
    • A quick toast in a skillet firms up the surface and adds a crisp outer layer that resists sogginess from wet fillings.

Balancing sweetness with savory fillings

If you’re working with a slightly sweet zucchini bread base—say, one with just a touch of honey or cinnamon—pair it with ingredients that contrast and complement.

Here’s how to match flavors:

Bread Flavor BaseBest Pairings
Lightly sweetCream cheese, turkey, cranberry jam
Herby & savoryGarlic aioli, grilled chicken, spinach
Nutty (with almond flour)Tofu, sprouts, spicy mayo

A sprinkle of salt or a swipe of tangy spread like mustard or pickled onion relish can help neutralize excess sweetness and balance out the taste.

And don’t forget to season your fillings! Even the best bread can’t carry a sandwich on its own—your fillings need to shine, too.

Zucchini Breadwich for Meal Prep and Storage

How to prep and store zucchini breadwiches

Whether you’re packing lunches for the week or planning a weekend picnic, Zucchini Breadwiches make excellent make-ahead meals—when stored right.

Here’s how to prep them efficiently:

  1. Bake the bread ahead
    • Make a full loaf, cool completely, and slice. Store slices between parchment in an airtight container in the fridge for up to 5 days.
  2. Pre-assemble dry components
    • Add lettuce, cheese, turkey, or tofu—leave out tomatoes or wet spreads until the day of serving.
  3. Wrap smart
    • Use wax paper or foil instead of plastic wrap to reduce sweating. Keep stacked breadwich halves slightly separated to preserve texture.
  4. Store fillings separately when possible
    • Place moist ingredients like cucumber slices or sauces in mini containers and assemble right before eating.

Can you freeze a zucchini breadwich? Tips for reheating

Yes! Zucchini Breadwiches (and the bread itself) freeze well with the right technique. You just need to pay attention to moisture content and how it’s wrapped.

Freezing tips:

  • Freeze individual slices of zucchini bread between parchment sheets.
  • Place in a freezer-safe zip bag and store up to 3 months.
  • If freezing assembled sandwiches, avoid wet ingredients like tomatoes or mayo. Stick to dry meats, cheeses, and spreads.

Reheating tips:

  • For bread only: Thaw overnight in the fridge. Toast in a skillet for 2–3 minutes on each side to revive texture.
  • For full breadwiches: Wrap in foil and reheat in a toaster oven at 325°F for 10–12 minutes, or until warmed through.

Breadwiches are ideal for batch cooking. Prepare a loaf on Sunday, slice and refrigerate, then mix-and-match fillings throughout the week for variety and ease.

Creative Serving Ideas and Pairings

Fun presentation ideas for kids, brunches, and parties

Zucchini Breadwiches aren’t just flavorful—they’re fun. With the right presentation, they can steal the spotlight at brunch, charm picky eaters, or add a rustic touch to your next gathering.

For Kids:

  • Mini Breadwich Sliders: Slice the zucchini bread into small rounds using a biscuit cutter, then stack with turkey and cheddar.
  • DIY Breadwich Station: Let kids assemble their own mini sandwiches with options like hummus, cucumber slices, and mild cheese.
  • Shapes and Skewers: Cut breadwiches into stars or hearts and place on skewers with cherry tomatoes and grapes.

For Brunch:

  • Serve warm halves stacked with goat cheese, arugula, and sun-dried tomatoes.
  • Plate with a side of balsamic-drizzled greens and a soft-boiled egg.
  • Offer a mix of sweet and savory: some filled with almond butter and banana, others with smoked salmon and dill spread.

For Parties:

  • Make-ahead platter: Slice into quarters and secure with toothpicks for easy grab-and-go bites.
  • Breadwich Charcuterie Board: Add olives, pickles, cheeses, and dips alongside stacked sandwich triangles.

Zucchini Breadwiches are as visually appealing as they are delicious. Dress them up or down—they shine in any setting.

What sides and drinks pair well with zucchini breadwich

Pairing your Zucchini Breadwich with the right accompaniments enhances the meal experience, whether you’re serving it for lunch, brunch, or a light dinner.

Best Sides:

  • Simple side salad with vinaigrette
  • Roasted sweet potato wedges
  • Pickled veggies for tang and crunch
  • Fresh fruit (like sliced apples or berries for sweeter versions)

Drink Pairings:

  • Iced green tea or cucumber mint water for a refreshing, light touch
  • Sparkling lemonade to cut through richer fillings
  • Cold brew coffee with almond milk for breakfast pairings
  • Light white wine (Sauvignon Blanc or Pinot Grigio) for adults at brunch

Balance is key. Pair rich or cheesy breadwiches with acidic or crunchy sides, and lighter ones with heartier accompaniments.

serving zucchini breadwich at brunch

Frequently Asked Questions About Zucchini Breadwich & Cottage Cheese Ice Cream

Can you use cottage cheese in ice cream?

Yes, you absolutely can! Cottage cheese has recently become a trendy base for high-protein, creamy desserts. It blends smoothly when whipped or processed, and its mild flavor works well with both fruits and chocolate. While it may sound unconventional, it’s a genius way to make low-fat, low-sugar ice cream with a rich, satisfying texture—perfect for health-focused dessert lovers.
Don’t miss our detailed guide on making cottage cheese ice cream with just a few clean ingredients.

Why is my cottage cheese ice cream icy?

The iciness often comes from water content in the cottage cheese or added ingredients like fruit that weren’t fully pureed. To fix this, blend your base thoroughly until it’s ultra-smooth and add a little fat—like nut butter or full-fat yogurt—to prevent crystallization. Also, freeze the mixture in shallow containers and stir once or twice during freezing for a creamier result.

What is the healthiest ice cream you can eat?

The healthiest ice creams typically have minimal added sugar, use clean ingredients, and offer a boost of protein or healthy fats. Options made from cottage cheese, Greek yogurt, banana bases, or even avocado are topping the charts. Bonus points if it’s homemade—because you control every ingredient.

Does cottage cheese freeze?

Yes, but it depends on how you plan to use it. Plain cottage cheese can be frozen, but its texture may become grainy upon thawing. That’s why blending it first (for things like ice cream or sauces) is ideal before freezing. For best results, portion it and store in airtight containers for up to 2 months.

Table of Contents

Table of Contents

If you enjoyed this recipe, I’d love to share more with you—feel free to visit me over on Facebook or Pinterest, where I post stories, seasonal ideas, and my favorite family recipes straight from my kitchen to yours.

Cottage Cheese Ice Cream Recipe (High-Protein 4-Ingredient Dessert)

Cottage cheese ice cream mixture in a loaf pan with chocolate chips stirred in, ready for freezing

Introduction

Cottage Cheese Ice Cream is a viral high-protein dessert that’s taking the internet by storm – and for good reason. Made with just four simple ingredients, this creamy treat offers all the indulgence of traditional ice cream with a nutritious twist. Blending cottage cheese into ice cream might sound unusual, but it creates a thick, creamy texture and adds a hefty dose of protein (over 20 grams per serving!). Whether you’re looking for a healthier alternative to satisfy your sweet tooth or a fun new recipe to add to your list of healthy desserts and low-carb snacks, this cottage cheese ice cream has you covered.

Why You’ll Love This Cottage Cheese Ice Cream

https://www.eatingbirdfood.com/cottage-cheese-ice-cream/ A bowl of creamy homemade cottage cheese ice cream studded with chocolate chips. This recipe has become wildly popular because it hits the sweet spot between healthy and delicious. Here are a few reasons you’ll love it:

Print
clock clock iconcutlery cutlery iconflag flag iconfolder folder iconinstagram instagram iconpinterest pinterest iconfacebook facebook iconprint print iconsquares squares iconheart heart iconheart solid heart solid icon
Bowl of cottage cheese ice cream garnished with chocolate chips and honey drizzle

Cottage Cheese Ice Cream Recipe


  • Author: Chef Emily
  • Total Time: 10 minutes
  • Yield: 4 servings
  • Diet: Low Calorie

Description

You only need 4 simple ingredients to make this viral cottage cheese ice cream! It’s super creamy, thick and packed with over 20 grams of protein!


Ingredients

  • 2 cups (16 oz) full fat cottage cheeseI used Good Culture
  • ¼ cup honey
  • 2 Tablespoons peanut butter
  • 2 Tablespoons chocolate chips

Instructions

  1. Add cottage cheese, honey and peanut butter to a food processor or high powered blender and pulse/process until smooth and creamy.
  2. Stir in chocolate chips.
  3. Add mixture back into the cottage cheese container or a loaf pan and place in the freezer for about 4 hours, or until hard.
  4. Remove from the freezer, let thaw for 5-10 minutes, just until you can easily scoop it. Use an ice cream scoop to scoop into bowls and enjoy.
  • Prep Time: 10 minutes
  • Cuisine: American

Nutrition

  • Serving Size: 3
  • Calories: 284kcal
  • Sugar: 27g
  • Sodium: 483mg
  • Fat: 12g
  • Saturated Fat: 4g
  • Protein: 22g
  • Cholesterol: 20mg

Keywords: cottage cheese ice cream

  • High-Protein & Healthy: Each serving is packed with protein thanks to cottage cheese, making it a more filling option than regular ice cream. It’s also lower in refined sugar, using natural honey as a sweetener and even offering some fiber and healthy fats from peanut butter and chocolate chips.
  • Easy 4-Ingredient Recipe: You only need four simple ingredients to whip up this recipe, and no ice cream maker is required. It’s a quick blend-and-freeze process that anyone can do in minutes.
  • Creamy & Delicious: Despite being made from cottage cheese, the texture is surprisingly smooth and creamy (no noticeable curds!). The flavor is like a rich cheesecake-meets-ice-cream, and you can customize it with your favorite mix-ins to suit your cravings.
  • Versatile & Customizable: This base recipe is endlessly adaptable – you can create different flavor variations (think chocolate, fruit swirls, or coffee) to make your perfect ice cream. It’s a guilt-free frozen treat you’ll love as a dessert or even a post-workout snack.

Nutritional Benefits of Cottage Cheese Ice Cream

Using cottage cheese as the star ingredient means this ice cream isn’t just a dessert – it’s also nutritionally beneficial. Cottage cheese is loaded with protein (a one-cup serving contains around 20–25 grams of protein) and is a good source of calcium, B vitamins, and phosphorus. By turning it into ice cream, you’re getting a treat that can help keep you satisfied longer and support muscle maintenance and blood sugar balance. Unlike traditional ice creams that are high in sugar and low in protein, this recipe provides a better macronutrient balance. Each serving of this cottage cheese ice cream has roughly 20+ grams of protein, moderate carbs from the honey and any add-ins, and healthy fats from peanut butter. Plus, if you include mix-ins like dark chocolate or fruit, you get extra antioxidants and fiber. In short, you can indulge your cravings with a dessert that also nourishes your body – truly the best of both worlds!

Ingredients for Cottage Cheese Ice Cream

Blender filled with cottage cheese, honey, and peanut butter being blended into a smooth base

To make this cottage cheese ice cream, you’ll need just four main ingredients:

  • Cottage Cheese: This is the creamy base of the ice cream. Full-fat cottage cheese will yield the creamiest result (thanks to the higher fat content), but low-fat cottage cheese can also work if you prefer. The cottage cheese provides the rich texture and high protein content. (Tip: Choose a brand of cottage cheese with a smooth consistency and no added flavors. If possible, opt for an organic brand without excessive salt.)
  • Honey: A natural sweetener that blends perfectly with cottage cheese. Honey adds just the right amount of sweetness and keeps this recipe free of refined sugar. You can substitute with pure maple syrup or agave nectar if you like. For a lower-sugar option, a liquid stevia or monk fruit sweetener could work as well.
  • Peanut Butter: This brings a nutty flavor and contributes extra creaminess (along with a boost of protein and healthy fats). Peanut butter makes the ice cream taste almost like a peanut butter cheesecake. If you have an allergy or don’t enjoy peanut butter, feel free to swap it with almond butter, cashew butter, or even sunflower seed butter. The nut/seed butter not only adds flavor but also helps improve the texture of the ice cream.
  • Chocolate Chips: A handful of chocolate chips add delicious chocolatey bites throughout the ice cream. You can use dark chocolate chips, semi-sweet, or even sugar-free chocolate chips. For a lower sugar content, choose a brand sweetened with stevia or erythritol. If you prefer, you can replace the chocolate chips with cacao nibs or leave them out entirely – it’s up to you.

Optional Add-Ins: A pinch of salt can enhance the flavors, and a splash of pure vanilla extract can give an extra depth of classic ice cream flavor. These aren’t required, but a dash of vanilla or a sprinkle of cinnamon can be great if you want to experiment with the taste.

How to Make Cottage Cheese Ice Cream

Making this cottage cheese ice cream is as easy as blend and freeze. No fancy equipment or churning needed!

  1. Blend the Base: In a high-speed blender or food processor, combine the cottage cheese, honey, and peanut butter. Blend on high until the mixture is completely smooth and creamy. Make sure no lumps remain – you want the cottage cheese fully pureed so the “ice cream” will have a velvety texture. (Tip: Stop and scrape down the sides of the blender as needed to ensure everything is incorporated.) Once smooth, add the chocolate chips and either pulse a couple of times or simply stir them in. You don’t want to blend the chips (they’ll break up too much); just mix them so they’re evenly distributed throughout the mixture.
  2. Freeze: Transfer the blended cottage cheese mixture into a freezer-safe container. You can use the original cottage cheese tub (how convenient!), a loaf pan, or any airtight container. Smooth out the top of the mixture. For best results and to prevent iciness, press a piece of plastic wrap or parchment paper directly on the surface of the ice cream before sealing the container – this helps prevent ice crystals from forming on top. Place the container in the freezer and let it freeze for about 4 hours, or until the ice cream is firm.
  3. Serve: When you’re ready to enjoy your cottage cheese ice cream, take the container out of the freezer and let it sit at room temperature for 5–10 minutes. This slight thaw makes it much easier to scoop (since homemade protein ice creams can freeze quite hard). Use an ice cream scoop to serve into bowls or cones. Add your favorite toppings and dig in! You’ll be amazed at how creamy and scoopable it is, considering it’s made from cottage cheese.

Tips for the Best Results: For an even creamier texture, you can occasionally stir the ice cream as it freezes (for example, give it a good mix every 30 minutes for the first 2 hours) to break up ice crystals – this mimics the effect of churning and can help reduce iciness. Using full-fat cottage cheese and including the peanut butter (as this recipe does) also improves the creamy consistency. If you want to take it up a notch, you could even fold in a few tablespoons of whipped heavy cream into the blended mixture before freezing to add extra richness and volume (totally optional, but it can make the texture even closer to traditional ice cream). The base recipe itself should turn out thick and creamy if blended well and allowed to soften slightly before serving.

Flavor Variations and Mix-In Ideas

One of the best things about this cottage cheese ice cream recipe is how easy it is to customize. Once you have the basic base (cottage cheese + sweetener), you can get creative and make all sorts of flavors. Here are some delicious variation ideas to try:

  • Chocolate Lovers: Blend 1–2 tablespoons of unsweetened cocoa powder into the base mixture to create a chocolate-flavored cottage cheese ice cream. You can also boost the chocolate factor by adding extra chocolate chips or swirling in a bit of melted dark chocolate before freezing.
  • Strawberry Swirl (or Other Fruits): Blend a handful of fresh or frozen strawberries with the cottage cheese base for a fruity twist. After blending, fold in some chopped strawberries or swirl in a couple of tablespoons of strawberry jam before freezing. (Strawberry cottage cheese ice cream ends up tasting like strawberry cheesecake – yum!) This method works with other fruits too: blueberries, mango, peaches, or cherries.
  • Peanut Butter & Banana: For an Elvis-inspired treat, blend in half of a ripe banana with the cottage cheese, honey, and peanut butter. The banana adds natural sweetness and extra creaminess. You can stir in a few crushed walnuts or pecans for texture. The result is like a frozen peanut butter banana pie.
  • Mocha Espresso: Dissolve 1 teaspoon of instant espresso powder in a tablespoon of hot water and blend it into the cottage cheese mixture to infuse a coffee flavor. Combine this with the cocoa powder from the chocolate variation to make it a mocha-flavored ice cream. A pinch of cinnamon can be added to complement the coffee notes.
  • Vanilla Bean: Keep it simple by adding 1–2 teaspoons of pure vanilla extract (or the seeds from a vanilla bean) to the base. This enhances the sweetness and gives a classic vanilla ice cream vibe – perfect for topping with anything from fresh fruit to a drizzle of chocolate sauce.
  • Cinnamon Spice: Mix in 1/2 teaspoon of ground cinnamon (or pumpkin pie spice) into the blended base. This gives the ice cream a warm, spiced flavor – think along the lines of a snickerdoodle or chai-spiced ice cream. It pairs wonderfully with a honey drizzle on top.
  • Cookies & Cream: After blending the base until smooth, fold in a few crushed chocolate sandwich cookies (or a healthier cookie alternative) before freezing. You’ll get a high-protein take on cookies & cream ice cream.

Feel free to get creative with mix-ins, but try not to add too much extra liquid (like thin syrups) as that could alter the freezing process and texture. Solid add-ins or thick swirls (nut butters, jams) tend to work best. The possibilities are endless, so have fun inventing your own cottage cheese ice cream flavors!

Cottage cheese ice cream mixture in a loaf pan with chocolate chips stirred in, ready for freezing

Storage Tips

Homemade cottage cheese ice cream is best enjoyed within a couple of weeks for optimal taste and texture. Here are some tips for storing it and maintaining that creamy consistency:

  • Freeze in an Airtight Container: Keep the ice cream in a freezer-safe, airtight container when storing it. As mentioned above, pressing a piece of plastic wrap or wax paper directly on the surface of the ice cream before sealing the container will help prevent ice crystals and freezer burn. This extra step keeps your ice cream as creamy as possible.
  • Use Within 1–2 Weeks: For the best flavor and texture, try to enjoy your cottage cheese ice cream within about two weeks of making it. It can technically be stored longer (it won’t spoil in the freezer), but after a couple of weeks you might notice more ice crystals or a slight change in taste/texture. Luckily, with how tasty this is, it rarely lasts that long!
  • Thaw Briefly Before Serving: When you’re ready to eat, let the container sit out at room temperature for about 5–10 minutes. Because this ice cream doesn’t have the softening additives of commercial ice cream, it can freeze very solid. A short thaw makes it easier to scoop and gives you a smoother, creamier bite. Avoid leaving it out too long, though – you don’t want it fully melted.
  • No Refreezing Melted Ice Cream: Try to only scoop out what you plan to eat in one sitting. If the ice cream melts significantly, refreezing it can cause a loss of the creamy texture and create larger ice crystals. If you do accidentally let it melt, you can still refreeze it safely, but the texture will not be as smooth. It’s best to enjoy it while it’s at the perfect semi-frozen consistency.

By following these storage tips, you’ll ensure each scoop of your cottage cheese ice cream is as delicious and creamy as the first!

Conclusion & Call to Action

Creamy, nourishing, and unbelievably simple, this Cottage Cheese Ice Cream recipe is a game-changer for healthy homemade desserts. It allows you to indulge in a frozen treat while sticking to your wellness goals – a total win-win! The next time you’re craving ice cream, skip the store-bought pint and try this high-protein, low-sugar alternative instead. You’ll love the satisfaction of knowing it’s made with wholesome ingredients and none of the guilt.

Ready to give it a whirl? Go grab that blender and a tub of cottage cheese, and start creating your own cottage cheese ice cream! If you try this recipe, let us know how you liked it – leave a comment and a star rating ⭐ to share your feedback. We’d love to hear about your favorite flavor variations or any creative twists you add. And if you’re looking for more guilt-free sweet treats, be sure to check out our other healthy desserts and low-carb snacks for inspiration. Enjoy your homemade ice cream!

Bowl of cottage cheese ice cream garnished with chocolate chips and honey drizzle

Cottage Cheese Ice Cream FAQs

To cover all your curiosities, here are answers to some common questions about cottage cheese ice cream:

Q: Can you use cottage cheese in ice cream?

A: Yes, absolutely! Using cottage cheese in ice cream is the key to this recipe’s high-protein, creamy result. When blended, cottage cheese becomes smooth and thick, creating a rich base that mimics the texture of traditional ice cream (almost like a blended cheesecake). It’s a clever hack to make a frozen treat without needing heavy cream or eggs. Cottage cheese has a mild flavor that easily takes on the taste of whatever sweeteners or mix-ins you add (like honey, peanut butter, or fruit), so the end result doesn’t actually taste like tangy cottage cheese – it just tastes like delicious ice cream. In short, you can definitely use cottage cheese to make ice cream, and it’s a wonderful way to boost the protein and nutrition in your dessert.

Q: Why is my cottage cheese ice cream icy?

A: If your cottage cheese ice cream turned out icy or hard, a few factors could be at play. Cottage cheese has a high water content, and when you freeze it without churning, larger ice crystals can form (leading to an icy texture). To minimize iciness, make sure you used full-fat cottage cheese – the extra fat helps keep the mixture creamy. Adding ingredients like peanut butter (or a splash of cream) also increases the fat content and improves texture. Another important step is blending the mixture until completely smooth; any remaining curd bits or liquid pockets might freeze into ice bits. Also, remember to cover the ice cream’s surface with plastic wrap in the freezer and, if possible, stir the mixture once or twice during the initial freeze period to break up ice formation. Lastly, be sure to let the ice cream soften for a few minutes at room temp before scooping – if you try to scoop it rock-solid, it can feel icier. With these tips, your cottage cheese ice cream should come out creamy, not icy. (If all else fails and it’s still a bit icy, you can let it soften a tad more or even re-blend it before eating.)

Q: What is the healthiest ice cream you can eat?

A: The “healthiest” ice cream is one that satisfies your sweet tooth while aligning with your nutritional goals. In general, a healthier ice cream will be lower in added sugar and higher in beneficial nutrients (like protein or fiber) compared to regular ice cream. Some of the top choices include homemade frozen desserts like banana nice cream (made from blended frozen bananas) or Greek yogurt-based ice creams and popsicles. This cottage cheese ice cream is also one of the healthiest ice cream alternatives you can enjoy – it’s high in protein, contains natural sweetener instead of refined sugar, and is made from whole foods. There are also store-bought light ice creams and protein ice creams (for example, brands that are lower in calories and sugar, or dairy-free options made from almond or coconut milk), but be sure to read the labels, as some replace sugar with artificial sweeteners or have long ingredient lists. Ultimately, the healthiest ice cream is one with simple ingredients, moderate sugar, and some nutritional value. Cottage cheese ice cream checks those boxes, making it a smart choice for a healthy indulgence.

Q: Does cottage cheese freeze well?

A: Cottage cheese can be frozen, but its texture will change in the process. If you freeze plain cottage cheese in its container and then thaw it, you’ll likely notice it becomes watery or a bit grainy as the curds separate from the liquid. This texture isn’t very appetizing for eating plain, which is why people don’t usually snack on thawed cottage cheese by itself. However, cottage cheese freezes very well when it’s used in recipes where it’s blended or cooked. For example, in this cottage cheese ice cream recipe, we blend the cottage cheese until smooth before freezing, which results in a creamy, uniform texture in the finished ice cream. Similarly, you can freeze cottage cheese for later use in smoothies or baked goods – just be aware that you’ll want to blend it or mix it into something after thawing to get the best texture. In summary, yes, you can freeze cottage cheese, but it’s best used in applications like this ice cream (or other dishes) rather than eating it straight after thawing

Happy blending and happy scooping! 🍨

Table of Contents

If you enjoyed this recipe, I’d love to share more with you—feel free to visit me over on Facebook or Pinterest, where I post stories, seasonal ideas, and my favorite family recipes straight from my kitchen to yours.